There’s a specific kind of chaos that happens when you’re shooting on location and a client texts asking for a watermarked preview image before you’ve even packed up your gear. I used to handle that by saying “I’ll send it when I’m back at my desk,” which is a perfectly reasonable answer that also makes you look slightly less impressive than the photographer who sends a branded image before they leave the parking lot. That second photographer is who I wanted to be.
Watch the full tutorial on YouTube
In this KelbyOne tutorial, retouching educator Lisa Carney walks through something that sounds almost too simple once you see it: adding logos and textures to photos entirely inside Lightroom Mobile, while you’re still on location. No desktop. No Photoshop. No “I’ll fix it later.” The workflow she demonstrates is fast enough that you could realistically send a client a branded image during the gear-breakdown phase of a shoot. Here’s exactly how she does it.
Step 1: Start with Your Image Open in Lightroom Mobile
 Lightroom Mobile interface shown on a mobile device
Lightroom Mobile syncs across your phone, tablet, and desktop, which means any image you shoot, import, or sync from your desktop catalog is available on your phone the moment you need it. Open the image you want to brand inside the app. From here, everything happens through the sharing and export workflow, not the editing tools. You don’t need to touch the tone curves or the HSL panel for this one.
Lightroom Mobile interface shown on a mobile device
Lightroom Mobile syncs across your phone, tablet, and desktop, which means any image you shoot, import, or sync from your desktop catalog is available on your phone the moment you need it. Open the image you want to brand inside the app. From here, everything happens through the sharing and export workflow, not the editing tools. You don’t need to touch the tone curves or the HSL panel for this one.
Step 2: Use “Export As” Instead of “Share” or “Save a Copy”
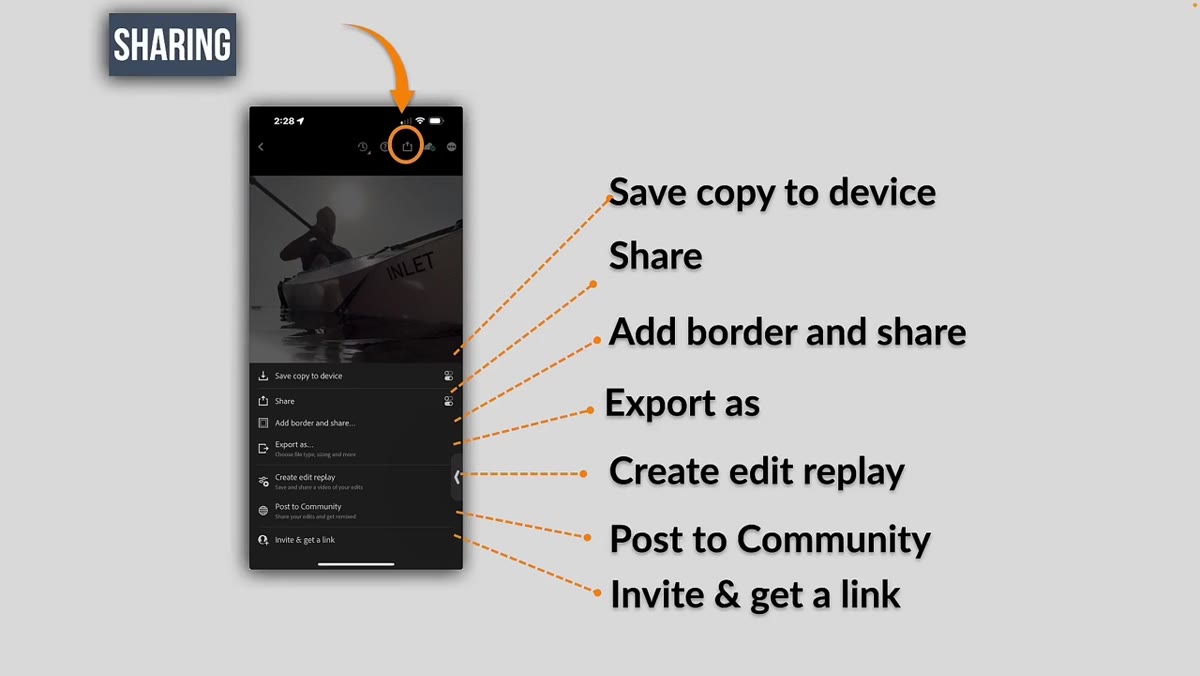 Export options dialog box displayed on screen
Tap the share icon and a dialog appears with several options. Most people instinctively tap “Save a Copy” or “Share” and call it done, but both of those output a JPEG with no additional control. The option you want is “Export As.” This is where the file type, size, and watermark settings live. It takes one extra tap and gives you a completely different set of tools. Lisa is clear on this point, and so am I: if you’re doing anything beyond a straight export, “Export As” is your starting point, full stop.
Export options dialog box displayed on screen
Tap the share icon and a dialog appears with several options. Most people instinctively tap “Save a Copy” or “Share” and call it done, but both of those output a JPEG with no additional control. The option you want is “Export As.” This is where the file type, size, and watermark settings live. It takes one extra tap and gives you a completely different set of tools. Lisa is clear on this point, and so am I: if you’re doing anything beyond a straight export, “Export As” is your starting point, full stop.
Step 3: Choose the Right File Format Before You Do Anything Else
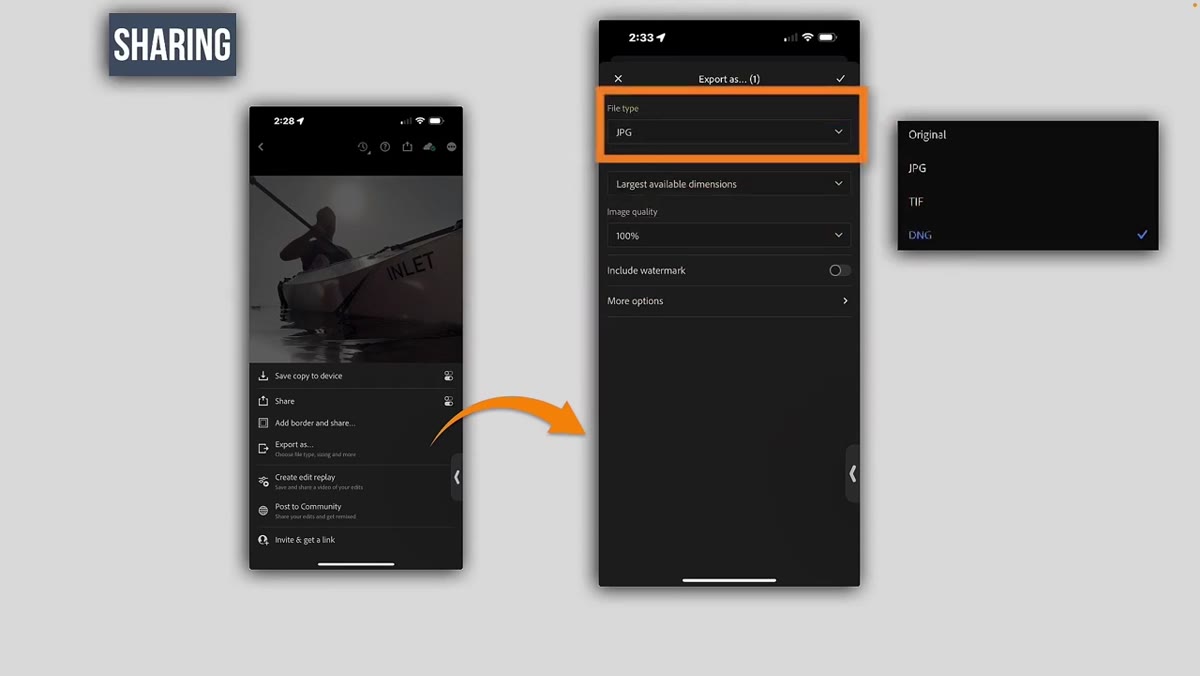 File type selection showing JPEG, TIFF, DNG options
Inside the Export As menu, the first thing you need to set is the file type. Your options are Original, JPEG, TIFF, and DNG. This matters more than it might seem: the watermark and logo functionality only works with JPEG or TIFF exports. If you export as DNG, the watermark option is essentially locked out. JPEG is the practical choice for social posts and client previews. TIFF is there if you need maximum quality for a print-ready file. Pick one of those two and move on.
File type selection showing JPEG, TIFF, DNG options
Inside the Export As menu, the first thing you need to set is the file type. Your options are Original, JPEG, TIFF, and DNG. This matters more than it might seem: the watermark and logo functionality only works with JPEG or TIFF exports. If you export as DNG, the watermark option is essentially locked out. JPEG is the practical choice for social posts and client previews. TIFF is there if you need maximum quality for a print-ready file. Pick one of those two and move on.
Step 4: Find the Watermark Toggle and Open Customize
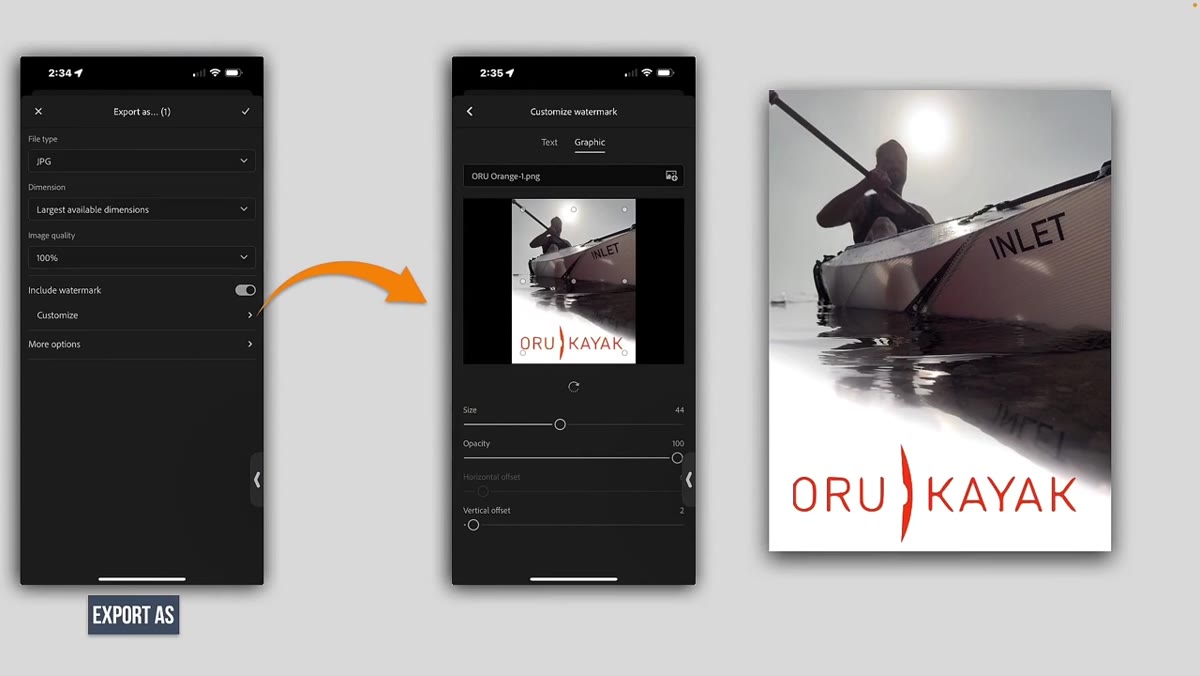 Watermark toggle and Customize button in Export As menu
Still inside the Export As panel, scroll until you find the Watermark option. Toggle it on, then tap “Customize.” This is the part of Lightroom Mobile that most people don’t know exists, because you’d only find it if you went looking. The Customize screen lets you choose between text-based watermarks and graphic watermarks. Text is fine for quick and simple, but the real capability here is the graphic option, which is what lets you drop in a logo or a transparency-layer texture file.
Watermark toggle and Customize button in Export As menu
Still inside the Export As panel, scroll until you find the Watermark option. Toggle it on, then tap “Customize.” This is the part of Lightroom Mobile that most people don’t know exists, because you’d only find it if you went looking. The Customize screen lets you choose between text-based watermarks and graphic watermarks. Text is fine for quick and simple, but the real capability here is the graphic option, which is what lets you drop in a logo or a transparency-layer texture file.
Step 5: Pre-Load Your Logo or Texture File to Your Device Before You Shoot
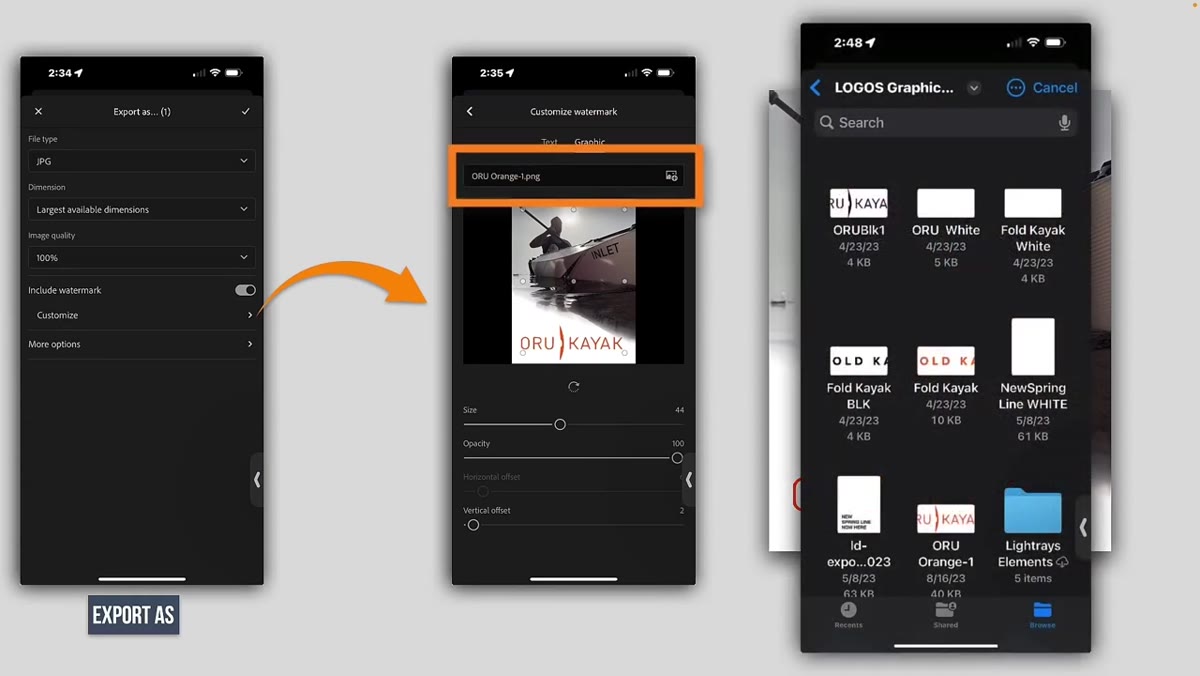 Logo file being accessed from a folder on the device
Here’s the step that makes or breaks this whole workflow: your logo or texture file has to already be on your device before you need it. Lisa saves her files to iCloud Drive before a shoot so they’re accessible from her phone when she’s in the field. I do something similar, keeping a folder of logo variations and PNG textures in my Files app. The graphic file needs to be a PNG with a transparent background. That transparency is what allows it to layer over your photo without a big white or black box around it. If you hand a client a photo with a blocky white rectangle where your logo should be, that is a bad afternoon for everyone involved.
Logo file being accessed from a folder on the device
Here’s the step that makes or breaks this whole workflow: your logo or texture file has to already be on your device before you need it. Lisa saves her files to iCloud Drive before a shoot so they’re accessible from her phone when she’s in the field. I do something similar, keeping a folder of logo variations and PNG textures in my Files app. The graphic file needs to be a PNG with a transparent background. That transparency is what allows it to layer over your photo without a big white or black box around it. If you hand a client a photo with a blocky white rectangle where your logo should be, that is a bad afternoon for everyone involved.
Step 6: Upload the Graphic and Adjust Scale and Position
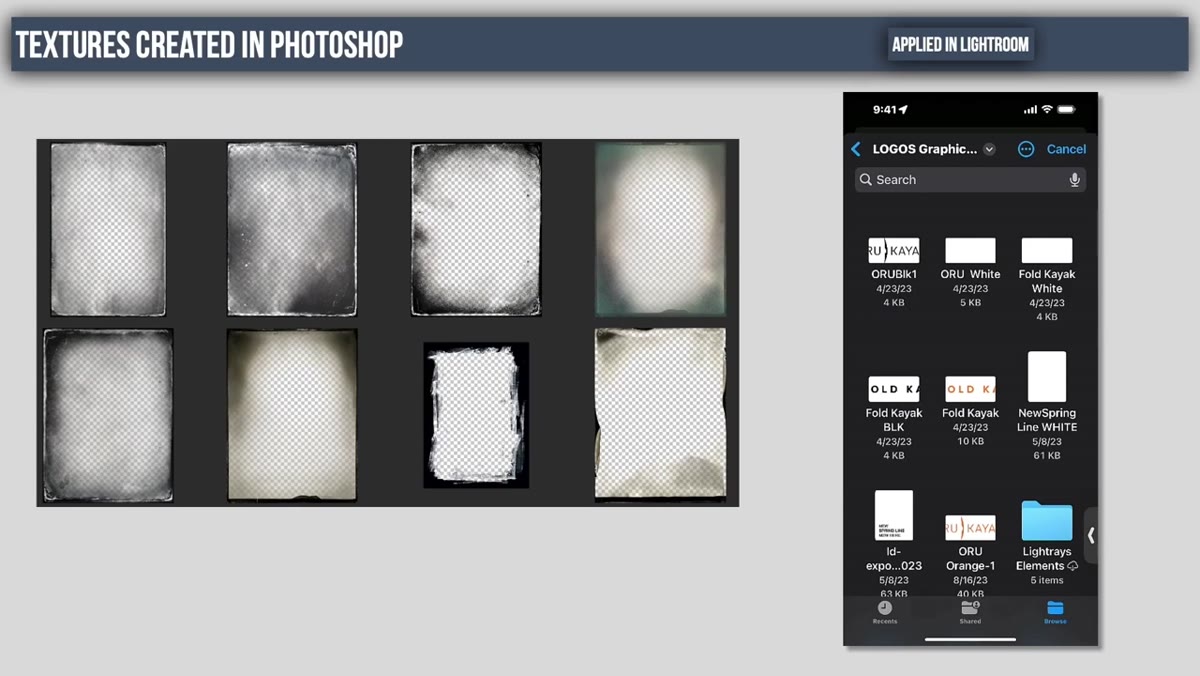 Graphic watermark file selected and positioned on the photo
Back in the Customize screen, select the graphic option and tap the plus icon to browse for your file. Navigate to wherever you saved your logo or texture PNG and select it. Lightroom will drop it onto a preview of your image. From there, you can adjust the scale slider to resize it and use the vertical offset to reposition it on the frame. The controls are limited compared to what you’d have in Photoshop, and Lisa acknowledges that directly in the tutorial. But limited doesn’t mean useless. You have enough control to place a logo cleanly in a corner or to scale a texture so it covers the full image.
Graphic watermark file selected and positioned on the photo
Back in the Customize screen, select the graphic option and tap the plus icon to browse for your file. Navigate to wherever you saved your logo or texture PNG and select it. Lightroom will drop it onto a preview of your image. From there, you can adjust the scale slider to resize it and use the vertical offset to reposition it on the frame. The controls are limited compared to what you’d have in Photoshop, and Lisa acknowledges that directly in the tutorial. But limited doesn’t mean useless. You have enough control to place a logo cleanly in a corner or to scale a texture so it covers the full image.
Step 7: Apply the Same Logic to Textures
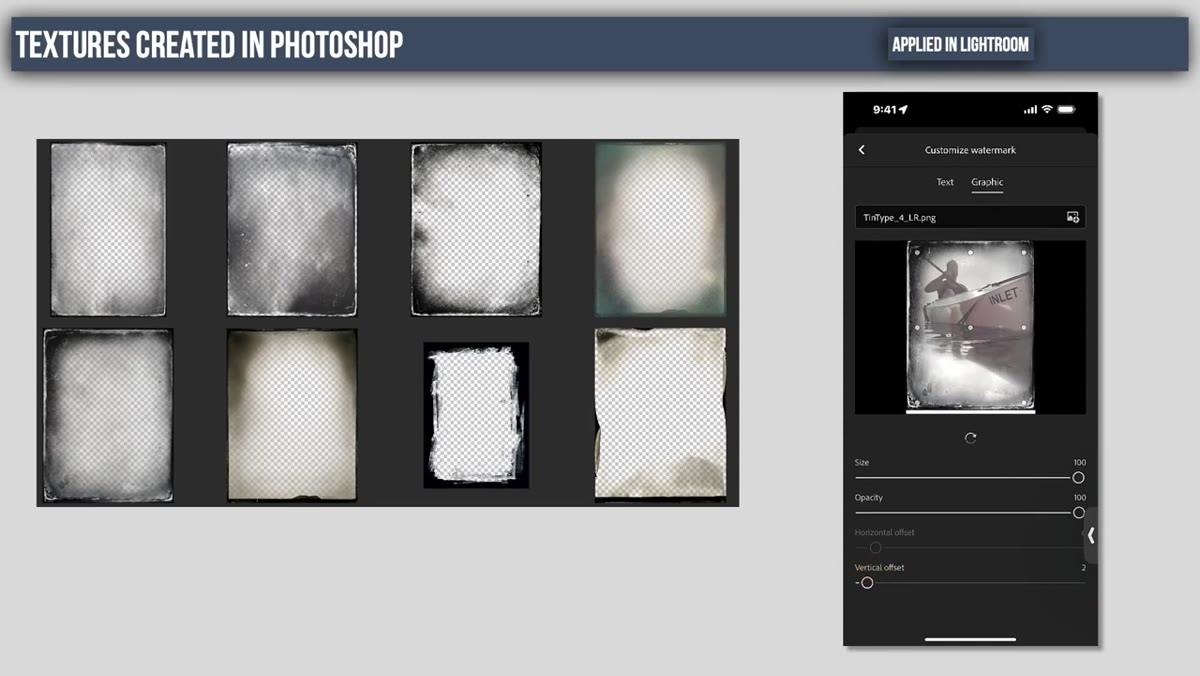 Texture PNG overlaid on a photo during export
The texture application is the same process as the logo, just with a different intent. Instead of a brand mark, you’re using a PNG file that has a visual texture baked into it, something like a film grain overlay, a light leak, or a tintype-style effect. Because the file has transparency, Lightroom composites it over your photo during the export step. The result can be subtle or pronounced depending on the texture file. Lisa shows a tintype-style overlay in the tutorial that adds a real darkroom-era feel to the image. It’s not a perfect replacement for doing this in Photoshop with blend modes, but for a fast on-location export, it gets you surprisingly far.
Texture PNG overlaid on a photo during export
The texture application is the same process as the logo, just with a different intent. Instead of a brand mark, you’re using a PNG file that has a visual texture baked into it, something like a film grain overlay, a light leak, or a tintype-style effect. Because the file has transparency, Lightroom composites it over your photo during the export step. The result can be subtle or pronounced depending on the texture file. Lisa shows a tintype-style overlay in the tutorial that adds a real darkroom-era feel to the image. It’s not a perfect replacement for doing this in Photoshop with blend modes, but for a fast on-location export, it gets you surprisingly far.
A Note on Organizing Your Asset Library Before You Leave the House
The part of this workflow that took me the longest to get right wasn’t the Lightroom settings. It was the prep. I now keep a dedicated folder in iCloud Drive called “Export Assets” with subfolders for logo variations, white version logos, black version logos, and textures. Before any shoot, I make sure that folder has synced to my phone. It takes about thirty seconds to check. Missing that step and then needing a logo file while standing in a field with a client waiting is the kind of thing that only happens to you once before you build the habit.
I’d also recommend preparing at least a light and dark version of your logo in PNG format. Depending on the image, a white logo disappears on a bright background or a black logo gets lost in shadows. Having both ready means you’re never stuck.
The single most useful thing Lisa Carney demonstrates in this tutorial is that branded, polished deliverables don’t have to wait for a desktop. The entire pipeline from shot to watermarked export can happen on your phone, while you’re still on location, using tools that are already inside an app most photographers carry everywhere. That’s a real shift in what’s possible for anyone doing client work on tight timelines.
Watch the full tutorial on YouTube and pay close attention to the file format section. It’s easy to skim past, and it’s the thing most likely to trip you up on the first attempt.
Comments
Leave a Comment