Landscape photographers talk about golden hour like it’s a guaranteed ticket to a great shot. It isn’t. The real problem with dramatic outdoor scenes isn’t the light itself, it’s the dynamic range. Bright skies, dark shadows, and everything in between crammed into a single frame that your sensor simply cannot capture in one exposure. HDR helps. Panoramas help. Combining them into a single HDR panorama? That’s where things get genuinely powerful.
I came across this workflow while working through a KelbyOne tutorial by Scott Kelby, and I’ll be honest, I already knew the individual pieces. I knew how to shoot brackets. I knew how to stitch a pano. What I didn’t have was a clean, repeatable process for doing both together inside Lightroom without it turning into a mess of files and confusion about what merged into what. This tutorial clicked it into place. Watch the full tutorial on YouTube if you want to follow along with the original before or after reading through this breakdown.
Step 1: Set Up Your Camera for Bracketed Shooting
 Camera bracketing mode explanation with three-shot sequence
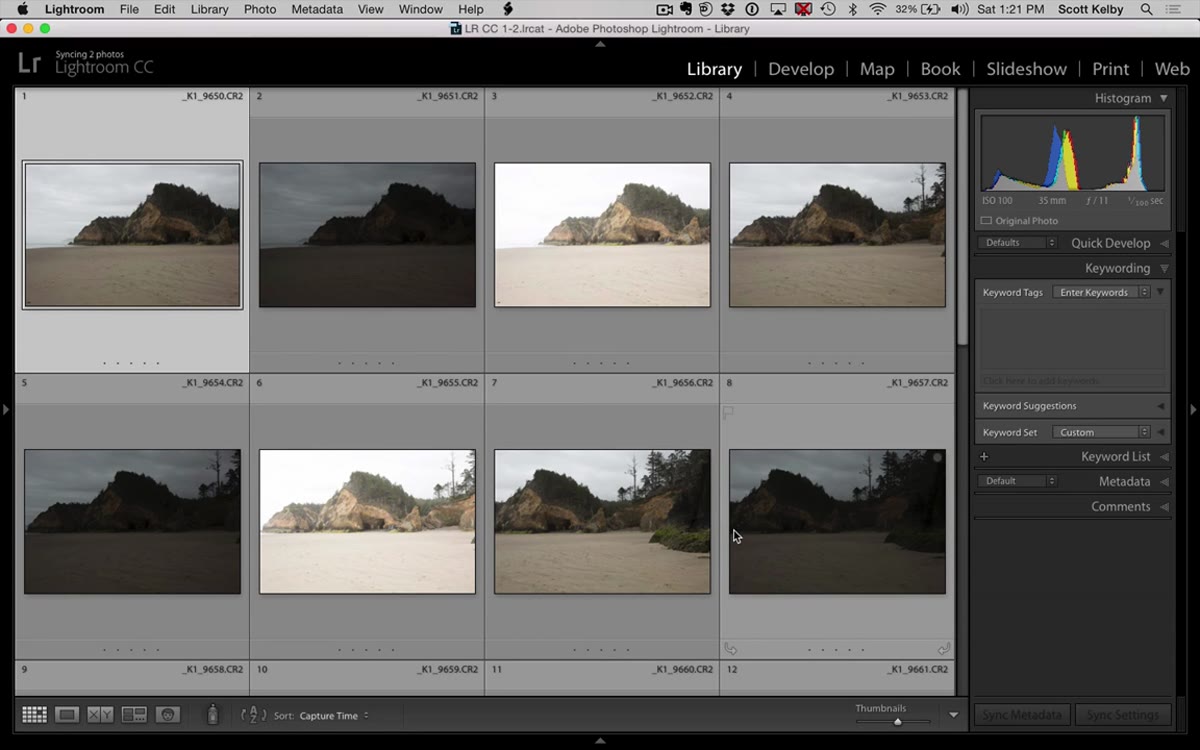
Before you touch Lightroom, you need to shoot this correctly at the camera level. Set your camera to bracketed shooting mode. The standard setup Kelby recommends is three shots per bracket: one at normal exposure, one two stops underexposed, and one two stops overexposed. Those three images combine into a single HDR frame. If you’re shooting a six-panel panorama, that means you’re walking away from the scene with 18 raw files total. Count them when you get back. Missing one bracket throws off the whole merge.
Camera bracketing mode explanation with three-shot sequence
Before you touch Lightroom, you need to shoot this correctly at the camera level. Set your camera to bracketed shooting mode. The standard setup Kelby recommends is three shots per bracket: one at normal exposure, one two stops underexposed, and one two stops overexposed. Those three images combine into a single HDR frame. If you’re shooting a six-panel panorama, that means you’re walking away from the scene with 18 raw files total. Count them when you get back. Missing one bracket throws off the whole merge.
Overlap your frames by at least 20% as you rotate the camera between positions. Shoot on a tripod if you can. The overlap gives Lightroom enough shared pixels to stitch the panels cleanly, and a tripod eliminates the biggest source of alignment headaches. Move right, shoot three, move right, shoot three, all the way across your scene.
Step 2: Select Your First Bracket Set and Run the HDR Merge
 Selecting three bracketed images in Lightroom grid view
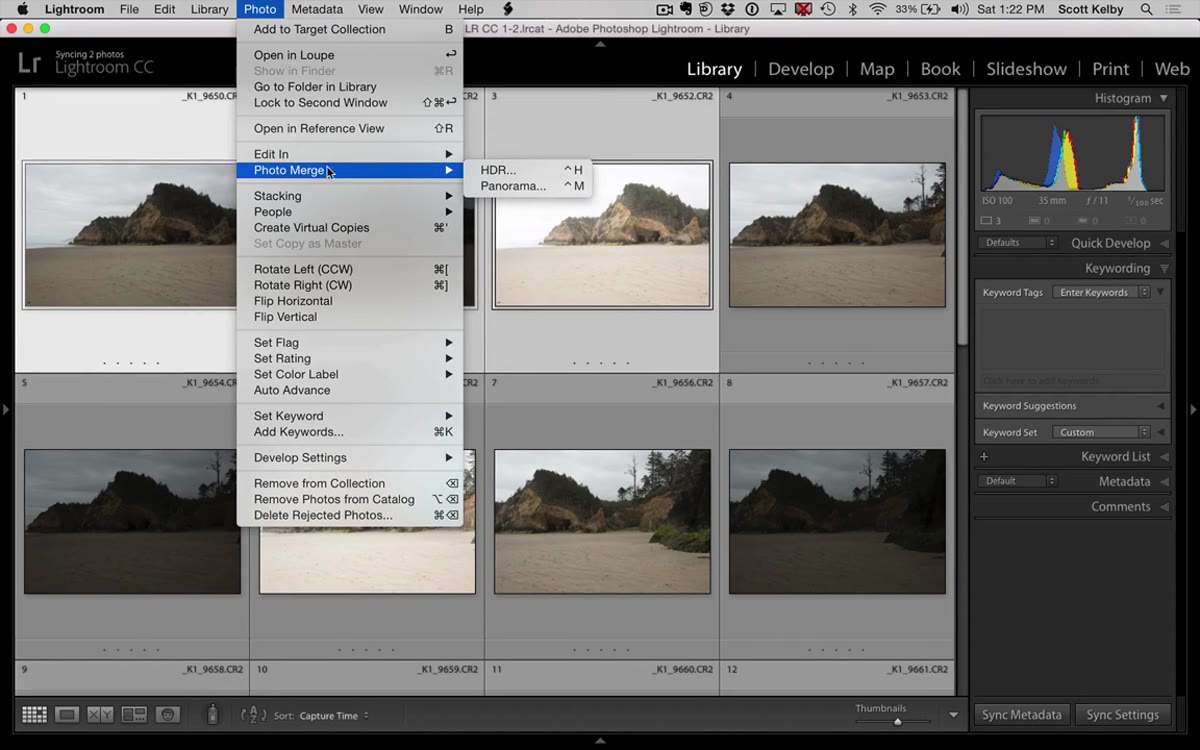
Back in Lightroom, organize your images so the bracket sets are clearly visible. Select the first three images, which is your normal exposure, your underexposed shot, and your overexposed shot. Go to Photo, then Photo Merge, then choose HDR. This opens the HDR Merge Preview dialog, which lets you check your settings before committing.
Selecting three bracketed images in Lightroom grid view
Back in Lightroom, organize your images so the bracket sets are clearly visible. Select the first three images, which is your normal exposure, your underexposed shot, and your overexposed shot. Go to Photo, then Photo Merge, then choose HDR. This opens the HDR Merge Preview dialog, which lets you check your settings before committing.
For the first bracket set, it’s worth taking a moment in this dialog. If you shot on a tripod, you can leave Auto Align on without it causing problems, and you likely won’t need any ghosting reduction unless there was wind or movement during the shot. Check the preview, confirm you like what you see, then hit Merge. Lightroom processes this one in the background so you can keep moving.
Step 3: Use the Keyboard Shortcut to Merge the Remaining Brackets
 Keyboard shortcut creating HDR in background with status indicator
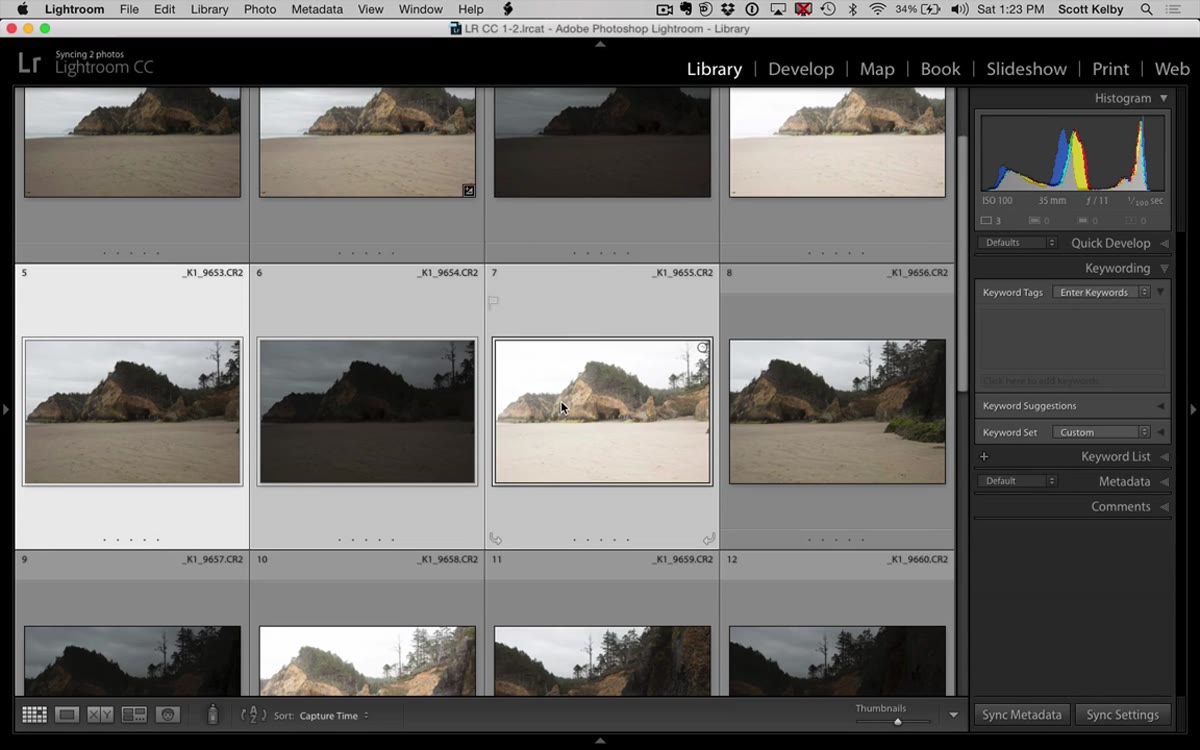
Here’s where the workflow gets fast. Once you’ve confirmed your settings in that first HDR dialog, you don’t need to open it again for the remaining bracket sets. Select the next three images and use the shortcut Shift + Control + H on Mac or Shift + Option + H on Windows. This tells Lightroom to create the HDR merge using your last-used settings, skipping the dialog entirely and running the process in the background.
Keyboard shortcut creating HDR in background with status indicator
Here’s where the workflow gets fast. Once you’ve confirmed your settings in that first HDR dialog, you don’t need to open it again for the remaining bracket sets. Select the next three images and use the shortcut Shift + Control + H on Mac or Shift + Option + H on Windows. This tells Lightroom to create the HDR merge using your last-used settings, skipping the dialog entirely and running the process in the background.
You can chain these back to back. Select your next bracket set, hit the shortcut, select the next, hit the shortcut again. Lightroom queues them up. You’ll see a “Creating HDR” indicator at the top of the interface as it works. Repeat this for all remaining bracket sets. For a six-panel panorama, you’ll do this five more times after the first manual merge.
Step 4: Confirm You Have All Six HDR DNG Files
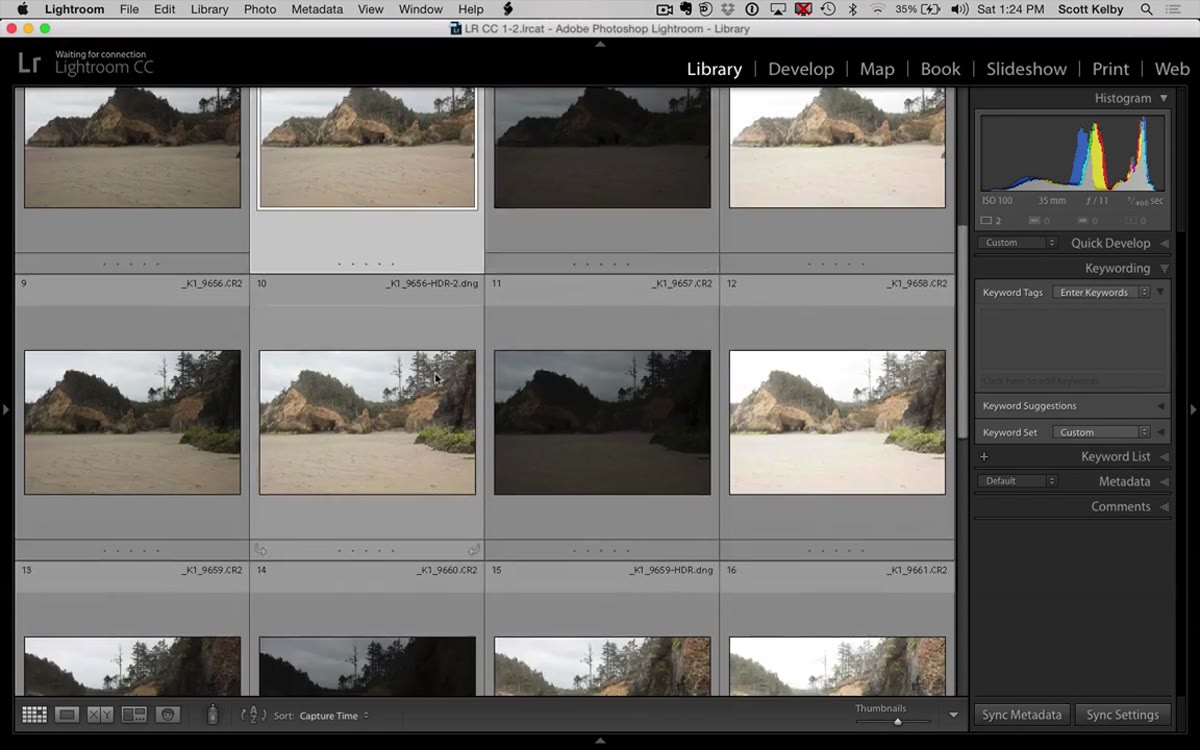 Six completed HDR DNG files visible in Lightroom filmstrip
Once the background processing finishes, check your grid. You should see exactly one HDR DNG file for every bracket set you shot. Kelby is specific about this: if you’re building a six-panel pano, you need six HDR DNGs before you do anything else. Count them. These files carry the “.dng” extension and behave like raw files, so you still have full editing latitude before the final panorama merge.
Six completed HDR DNG files visible in Lightroom filmstrip
Once the background processing finishes, check your grid. You should see exactly one HDR DNG file for every bracket set you shot. Kelby is specific about this: if you’re building a six-panel pano, you need six HDR DNGs before you do anything else. Count them. These files carry the “.dng” extension and behave like raw files, so you still have full editing latitude before the final panorama merge.
If you’re short a file, something went wrong during the shortcut step. It’s usually a timing issue where you selected the wrong images or hit the shortcut before the previous merge had started. Worth double-checking the bracket sets to find the gap.
Step 5: Select All Six HDR DNGs and Merge to Panorama
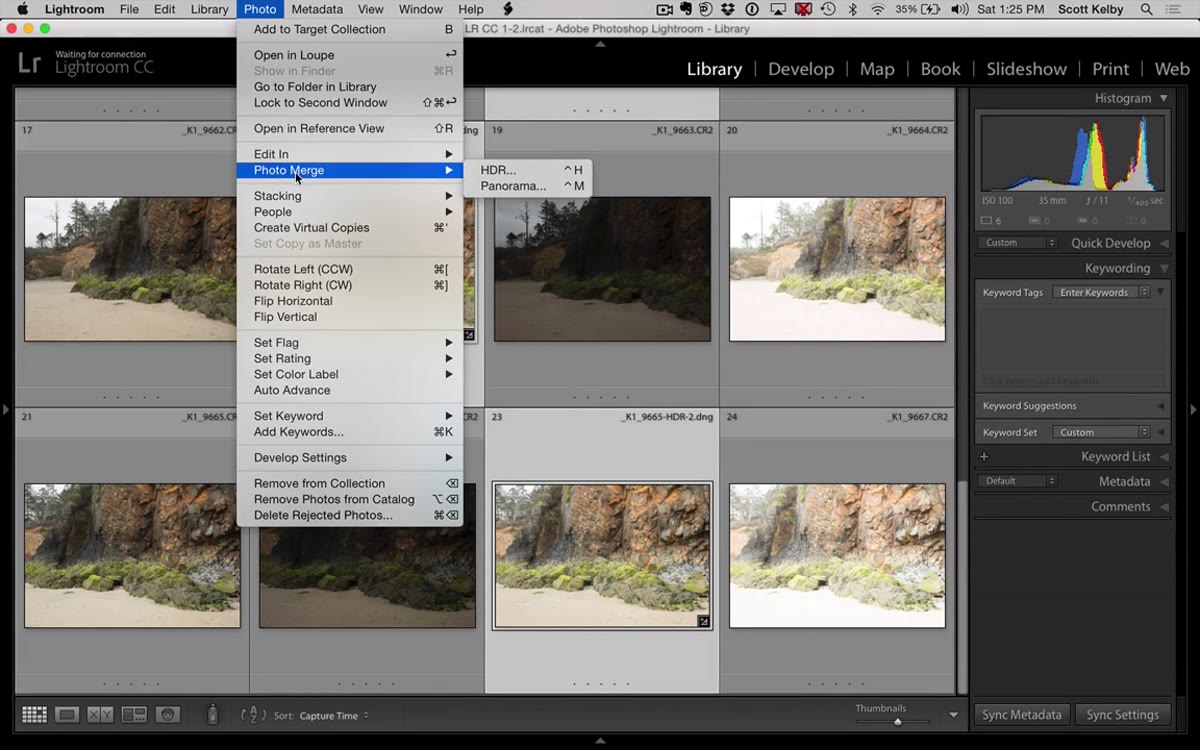 All six HDR DNGs selected before Panorama merge
Select all six HDR DNG files. Go to Photo, then Photo Merge, then Panorama. If you were doing multiple panoramas in a batch, Kelby notes you can also use the shift-modified version of the shortcut here, same logic as before. For a single pano, just go through the menu.
All six HDR DNGs selected before Panorama merge
Select all six HDR DNG files. Go to Photo, then Photo Merge, then Panorama. If you were doing multiple panoramas in a batch, Kelby notes you can also use the shift-modified version of the shortcut here, same logic as before. For a single pano, just go through the menu.
The Panorama Merge Preview dialog opens and generates a preview of the final stitched image. Lightroom does the heavy lifting of aligning the panels. You can choose your projection type here. Spherical works well for most landscape panoramas. Let the preview render fully before deciding, because the thumbnail updates as it processes and can look misleading mid-way through.
Step 6: Review the Panorama Preview and Complete the Merge
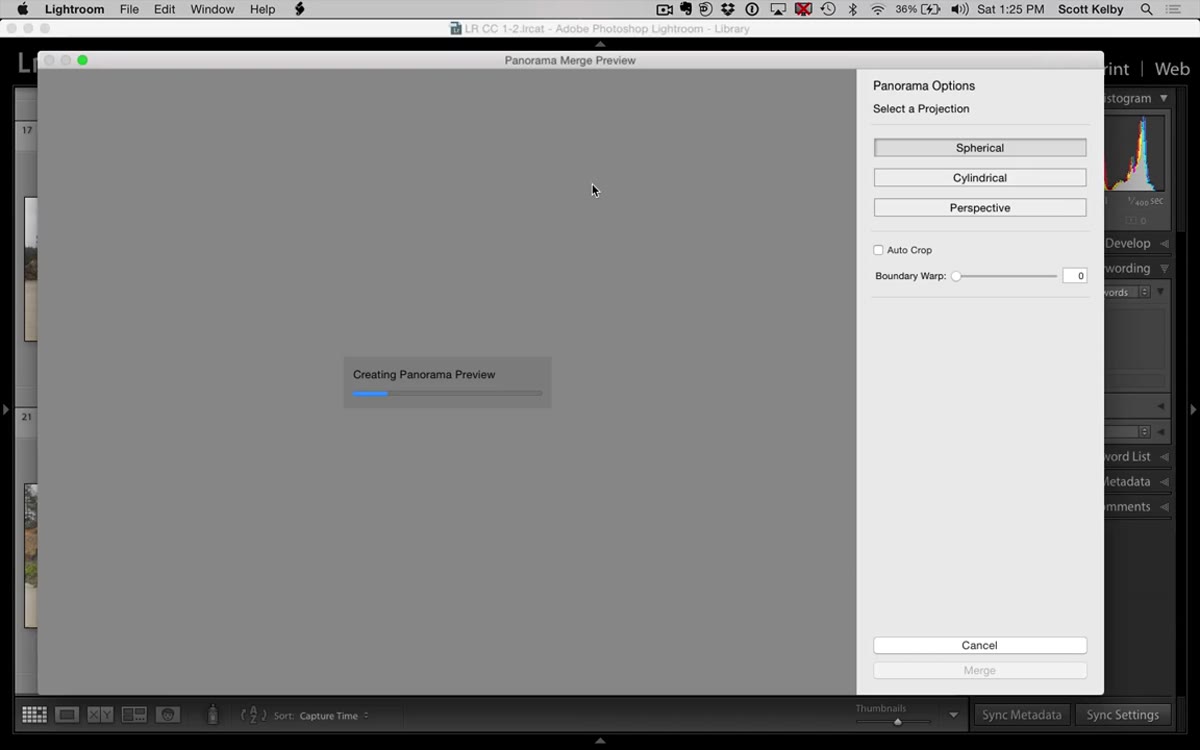 Panorama merge preview dialog showing final stitched result
Once the preview renders, check the edges of your frame. Lightroom often crops slightly to clean up the uneven borders that come from stitching. You can enable the Fill Edges option if you want to preserve more of the frame area, though results vary depending on how dramatic the edge irregularities are. For clean tripod shots with good overlap, the standard crop is usually tight and usable.
Panorama merge preview dialog showing final stitched result
Once the preview renders, check the edges of your frame. Lightroom often crops slightly to clean up the uneven borders that come from stitching. You can enable the Fill Edges option if you want to preserve more of the frame area, though results vary depending on how dramatic the edge irregularities are. For clean tripod shots with good overlap, the standard crop is usually tight and usable.
Hit Merge. Lightroom produces a final panoramic DNG that, again, behaves like a raw file. You can go into the Develop module and push the sliders hard. The HDR capture gives you headroom in the highlights and shadows that a single-exposure panorama simply cannot match.
One Thing I’d Add From My Own Experience
The step that trips people up most often isn’t in the merge dialogs. It’s the file organization before you start. If your 18 source files are scattered or out of order in your grid, selecting the right three images for each bracket set becomes genuinely error-prone. Before you merge anything, I sort by capture time and do a quick visual pass to confirm the groupings look right. Three-shot brackets shot in rapid succession should cluster cleanly. Any gap in time usually signals a new bracket group.
I also keep the source brackets and the HDR DNGs in the same folder until the final panorama is confirmed. Deleting the source files before you’ve verified the merged output is the kind of move you only make once.
The single most important thing this tutorial reinforced for me: do the HDR merges first, then do the panorama merge second. It sounds obvious written out, but the temptation to throw all 18 files at the panorama tool in one shot is real, and Lightroom cannot produce an HDR panorama that way. The order is non-negotiable. Brackets to HDR, then HDR panels to panorama.
Watch the full tutorial on YouTube to see Scott Kelby walk through every step in real time, including the exact dialogs and file states at each stage.
Comments (3)
This should be required reading for anyone starting out.
Really solid breakdown. This pairs perfectly with the photoshop work I've been writing about.
Simple but effective. Sometimes that's all you need.
Leave a Comment