
There’s a story I’ve heard from too many photographers to count. Shoot a wedding or a portrait session, send over proofs so the client can pick their favorites, and then… silence. No final payment, no response, just your unwatermarked images sitting on someone’s Facebook page while you eat the loss. It’s the kind of thing that sounds like it happens to other people until it happens to you. I’ve been lucky, but I’ve also been careful, and a big part of that comes down to something as simple as slapping a watermark on anything that leaves my hard drive before a job is fully paid.
In this Aaron Nace (PHLEARN) tutorial from his 30 Days of Lightroom series, he walks through exactly how to set up and apply watermarks at the point of export. Watch the full tutorial on YouTube if you want to follow along with the original footage. What I’m laying out below is the full walkthrough with the context I think makes it actually stick.
Watermarks live inside Lightroom’s Export dialog, which means you can bake them into any export preset you already use. You don’t need a separate app, you don’t need Photoshop. Once it’s configured, protecting your work costs you about three extra seconds per export.
Step 1: Open the Export Dialog
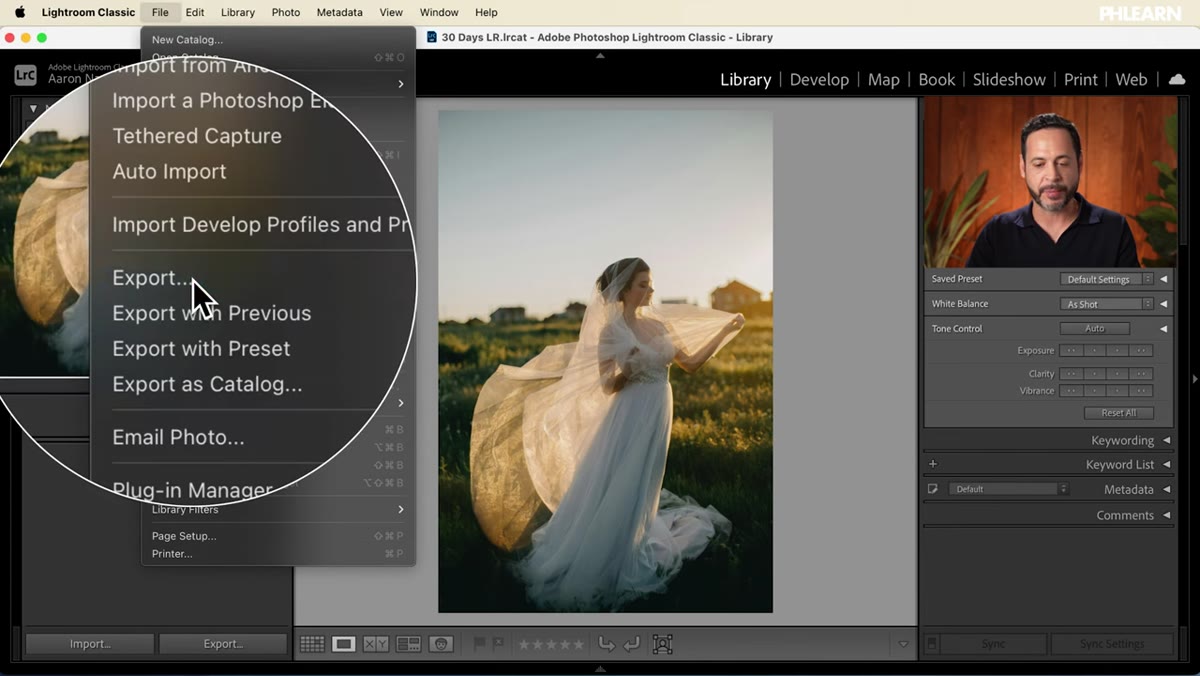 File menu open, cursor hovering over Export option
Go to File > Export in Lightroom Classic. This opens the full export panel where you control file format, size, output sharpening, and, crucially, watermarking. If you’ve already built export presets for client delivery or web uploads, you can modify those directly instead of starting from scratch. Nace resets his settings here so the walkthrough is clean, which is a good habit when you’re learning a panel for the first time.
File menu open, cursor hovering over Export option
Go to File > Export in Lightroom Classic. This opens the full export panel where you control file format, size, output sharpening, and, crucially, watermarking. If you’ve already built export presets for client delivery or web uploads, you can modify those directly instead of starting from scratch. Nace resets his settings here so the walkthrough is clean, which is a good habit when you’re learning a panel for the first time.
Step 2: Find the Watermarking Section and Enable It
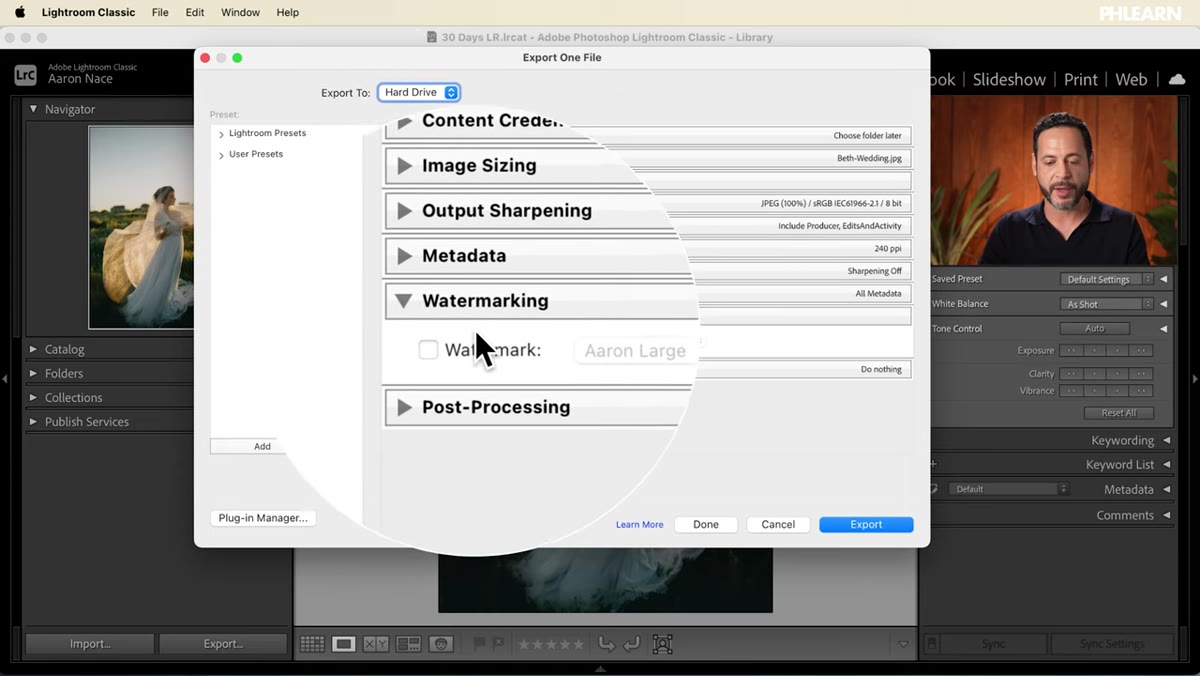 Export panel scrolled to Watermarking section, checkbox being clicked
Scroll down in the Export dialog until you see the Watermarking section. Check the box to enable it, then open the dropdown next to it. By default it might say “Simple Copyright Watermark,” which just pulls from your metadata. That’s not what you want here. Click the dropdown and select Edit Watermarks to open the full watermark editor where you actually have control.
Export panel scrolled to Watermarking section, checkbox being clicked
Scroll down in the Export dialog until you see the Watermarking section. Check the box to enable it, then open the dropdown next to it. By default it might say “Simple Copyright Watermark,” which just pulls from your metadata. That’s not what you want here. Click the dropdown and select Edit Watermarks to open the full watermark editor where you actually have control.
Step 3: Set Up a Text Watermark
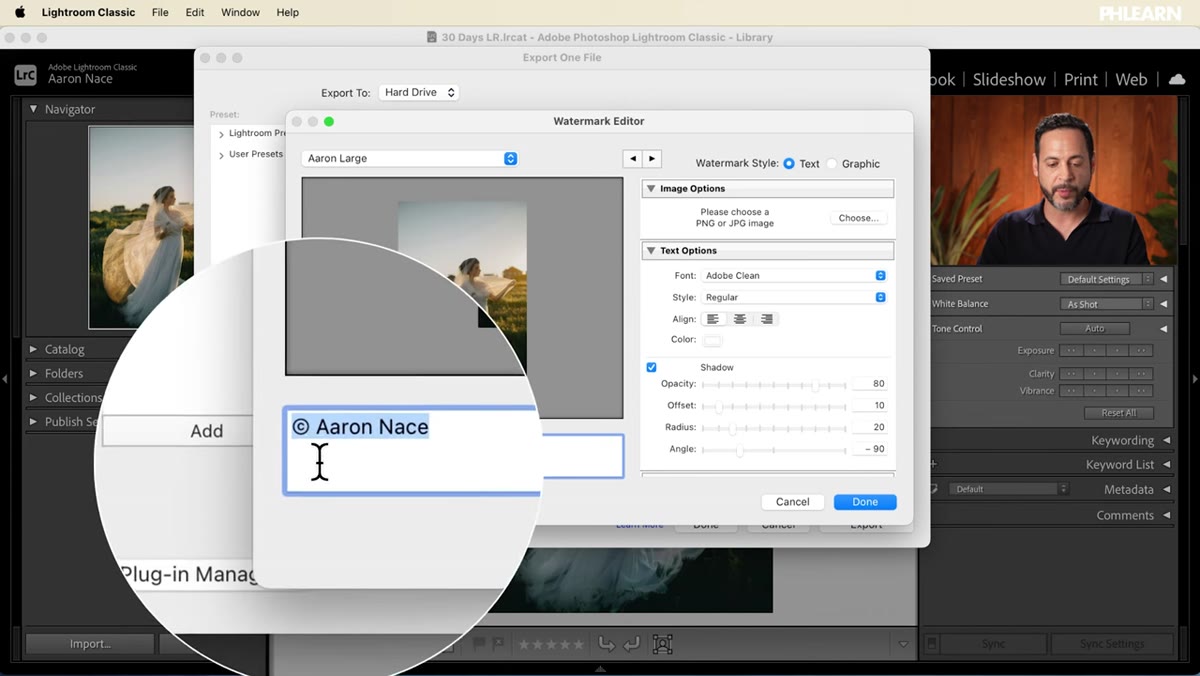 Watermark editor open, name typed into text field, visible on preview photo
The watermark editor opens with a text option selected by default. Type your name, your studio name, or whatever you want displayed on the image. You’ll see it appear live on the preview photograph below, which makes it easy to judge how it reads against different parts of the image.
Watermark editor open, name typed into text field, visible on preview photo
The watermark editor opens with a text option selected by default. Type your name, your studio name, or whatever you want displayed on the image. You’ll see it appear live on the preview photograph below, which makes it easy to judge how it reads against different parts of the image.
On the right side of the editor you have real options: font selection, alignment (left, center, right), drop shadow toggle, opacity slider, and size control. Opacity is worth paying attention to. A watermark at 100% opacity screams “proof shot.” Something in the 30-50% range reads as professional and intentional rather than defensive. You also control the horizontal and vertical position, so you can anchor your text to any corner or center it across the frame.
Step 4: Switch to a Graphic Watermark
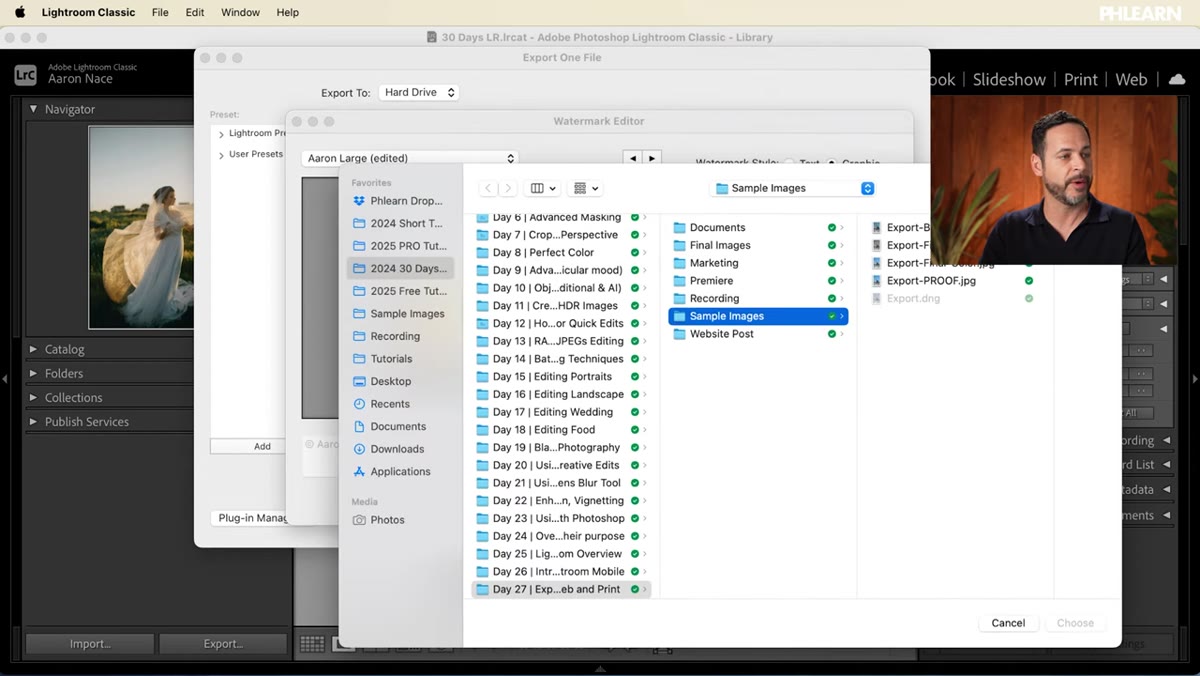 Graphic radio button selected, file browser open to choose logo file
If you have a logo, a signature file, or any PNG with a transparent background, you can use that instead of text. In the watermark editor, switch the style from Text to Graphic using the radio buttons at the top. Lightroom will prompt you to choose a file. Select your PNG and it loads directly into the preview.
Graphic radio button selected, file browser open to choose logo file
If you have a logo, a signature file, or any PNG with a transparent background, you can use that instead of text. In the watermark editor, switch the style from Text to Graphic using the radio buttons at the top. Lightroom will prompt you to choose a file. Select your PNG and it loads directly into the preview.
This is the move if your brand already has a visual identity. A logo watermark tends to look cleaner than text, especially at small sizes, and it’s immediately recognizable if someone screenshots your image and shares it without credit. Make sure your file has a transparent background before you bring it in, otherwise you’ll get a white or black box around your mark instead of a clean overlay.
Step 5: Size and Position for Your Use Case
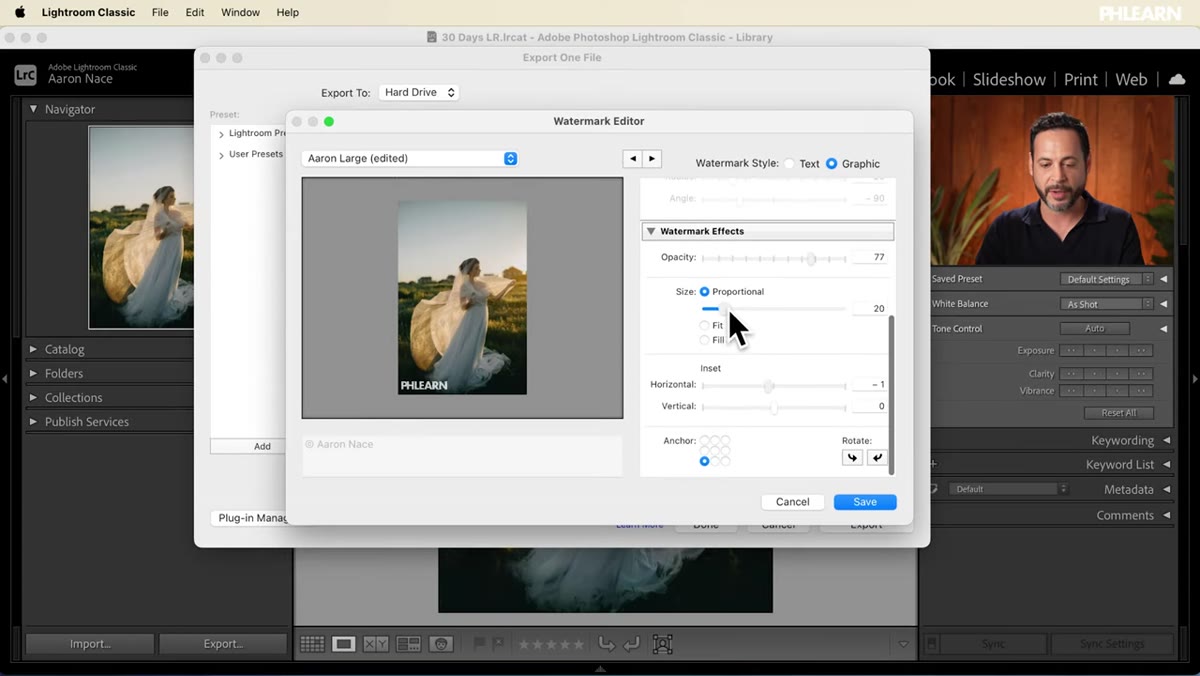 Size slider being dragged, large centered logo visible across the wedding photo
Here’s where you make a decision about what this watermark is actually for. Nace breaks it down into two distinct scenarios, and I think this is the most useful part of the whole tutorial.
Size slider being dragged, large centered logo visible across the wedding photo
Here’s where you make a decision about what this watermark is actually for. Nace breaks it down into two distinct scenarios, and I think this is the most useful part of the whole tutorial.
For general web use, where you just want your name on images so people can find you, keep the watermark small. Corner placement, maybe 15-20% of the frame width, low opacity. It identifies the work without distracting from it. For proof delivery, where you’re sending images mid-project before final payment, go big. Center the watermark, push the size up, drop the opacity just enough that the image is still readable but the watermark is impossible to ignore. No one posts a proof shot to Facebook if your logo is sitting right across the couple’s faces.
Step 6: Save as a Preset and Export
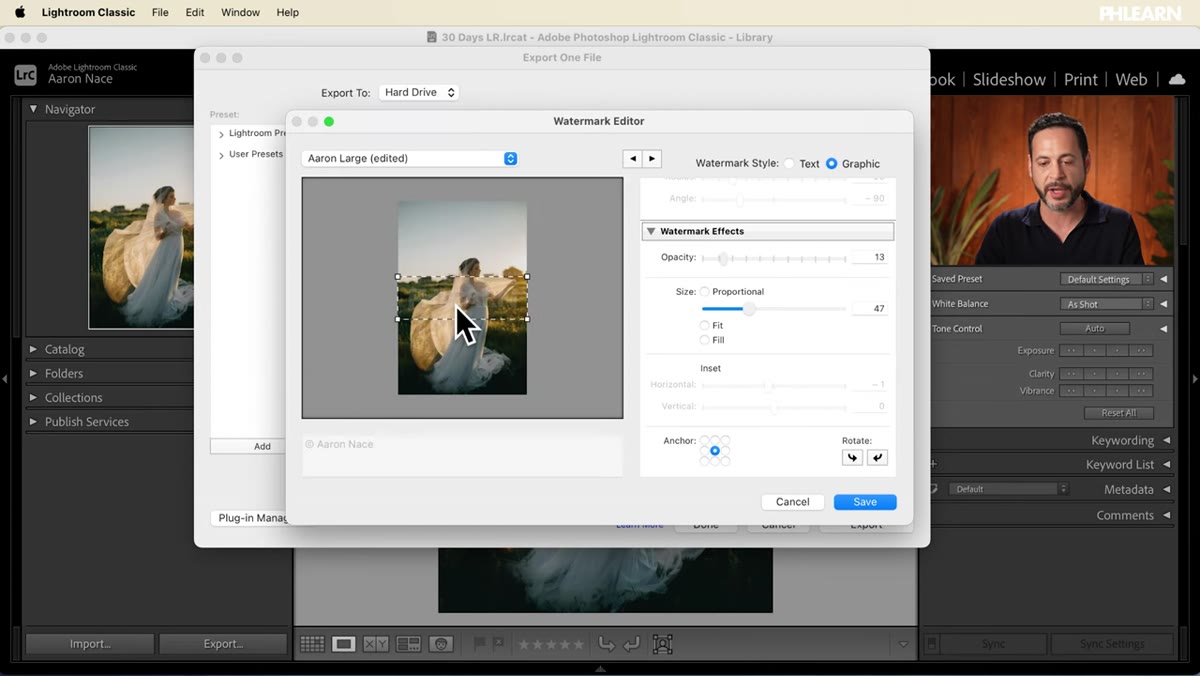 Save button in watermark editor, preset name field visible
Once your watermark is configured the way you want it, save it as a named preset using the dropdown at the top left of the watermark editor. Name it something that tells you exactly what it’s for, “Client Proof Large” or “Web Portfolio Small.” Then click Done and it’ll be available in the watermarking dropdown inside every future export session.
Save button in watermark editor, preset name field visible
Once your watermark is configured the way you want it, save it as a named preset using the dropdown at the top left of the watermark editor. Name it something that tells you exactly what it’s for, “Client Proof Large” or “Web Portfolio Small.” Then click Done and it’ll be available in the watermarking dropdown inside every future export session.
Back in the main Export dialog, confirm your watermark preset is selected in the dropdown, set the rest of your export options, and hit Export. Every image in your selection comes out with the watermark already baked in.
What I’d Add From My Own Workflow
I run two watermark presets for almost every job. The first is a small, low-opacity text mark I use on anything going to a client portal or shared folder before final payment is received. The second is nothing at all, because once a job is closed and paid, clean files go out. The temptation is to always watermark everything everywhere, but over-watermarking your portfolio work can make it feel like you don’t trust the people looking at it. On your own website, on curated portfolio pieces, let the work breathe. Save the heavy watermarking for the business situations where you genuinely need protection.
One thing the video doesn’t cover but is worth knowing: your watermark preset saves to Lightroom itself, not to your catalog. If you move to a new machine, you’ll need to recreate it. Keep a screenshot or notes on your settings so you’re not rebuilding from memory six months later when you’re in a hurry before a delivery deadline.
Watermarks won’t solve every client problem you’ll ever have, but they’re a free, low-effort safeguard that lives inside a workflow you’re already using. If you’re sending proofs to clients without them right now, the five minutes it takes to set this up is genuinely worth it.
Watch the full tutorial on YouTube to see Nace walk through the watermark editor live, including the graphic watermark import, which is easier to follow visually than to describe in text.
Comments
Leave a Comment