
Every fall I do the same thing. Adobe drops its annual updates, I spend a Saturday going through the changelogs, and I try to figure out which features will actually change how I work versus which ones will quietly collect dust in a menu I never open. This year’s releases, Lightroom Classic version 14 and Lightroom Desktop version 8, landed with a few genuinely useful upgrades. The one I want to walk through here is the one I’ve already used more in two weeks than I used the old version in two years: the overhauled Generative Remove tool.
In this Matt Kloskowski tutorial (Watch the full tutorial on YouTube), Matt breaks down every notable change across both versions of Lightroom. I’m zeroing in on the Generative Remove workflow because it’s the update that solves a real problem I kept running into: removing mid-frame distractions from wildlife and outdoor shots without bouncing over to Photoshop. The old content-aware erase tool was, to put it gently, optimistic. The generative version that launched in Early Access last spring was better. What’s in Classic 14 is better still, and it’s no longer in Early Access, which means Adobe is actually standing behind it.
Here’s how the whole workflow goes, step by step.
Step 1: Open the Remove Tool in the Develop Module
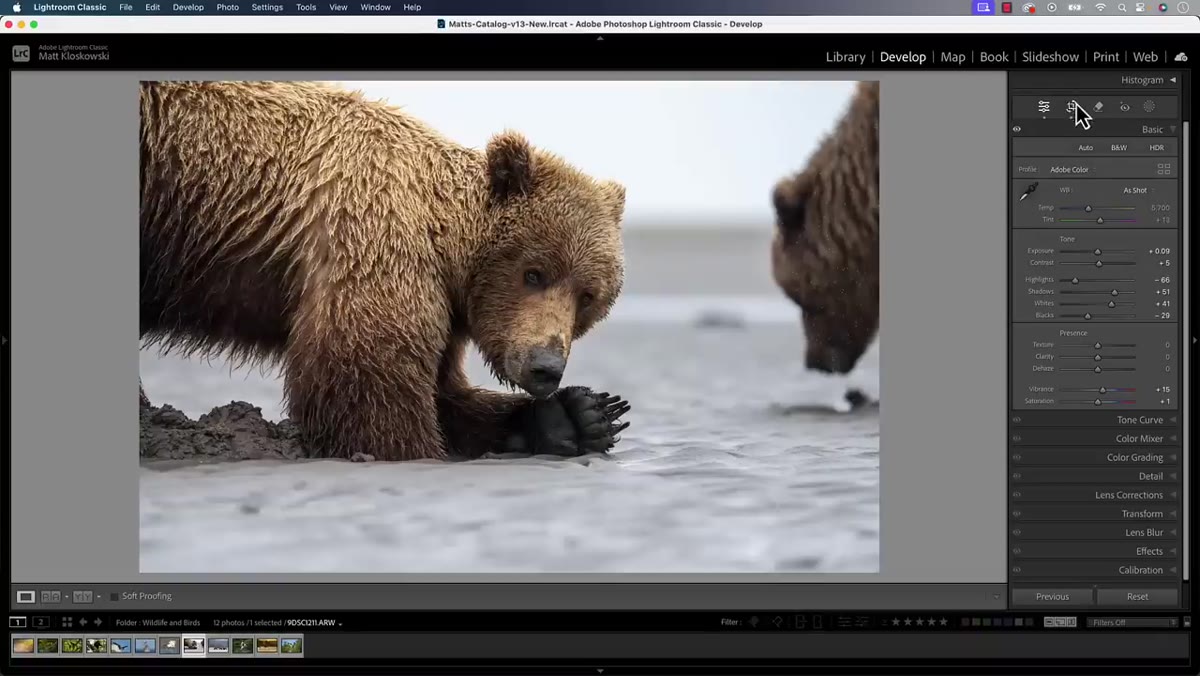 The Develop module with the eraser icon highlighted in toolbar
Head into the Develop module and look for the eraser icon in the toolbar just below the histogram. This isn’t new real estate, the icon has lived there for a while. What’s changed is what’s underneath it. When you click into the tool you’ll notice the interface has been reorganized slightly compared to earlier versions. The big headline is that the Generative Remove option is now fully out of Early Access and sitting front and center, not tucked away like a feature Adobe wasn’t sure about yet.
The Develop module with the eraser icon highlighted in toolbar
Head into the Develop module and look for the eraser icon in the toolbar just below the histogram. This isn’t new real estate, the icon has lived there for a while. What’s changed is what’s underneath it. When you click into the tool you’ll notice the interface has been reorganized slightly compared to earlier versions. The big headline is that the Generative Remove option is now fully out of Early Access and sitting front and center, not tucked away like a feature Adobe wasn’t sure about yet.
Step 2: Decide Whether to Paint Freely or Use Detect Objects
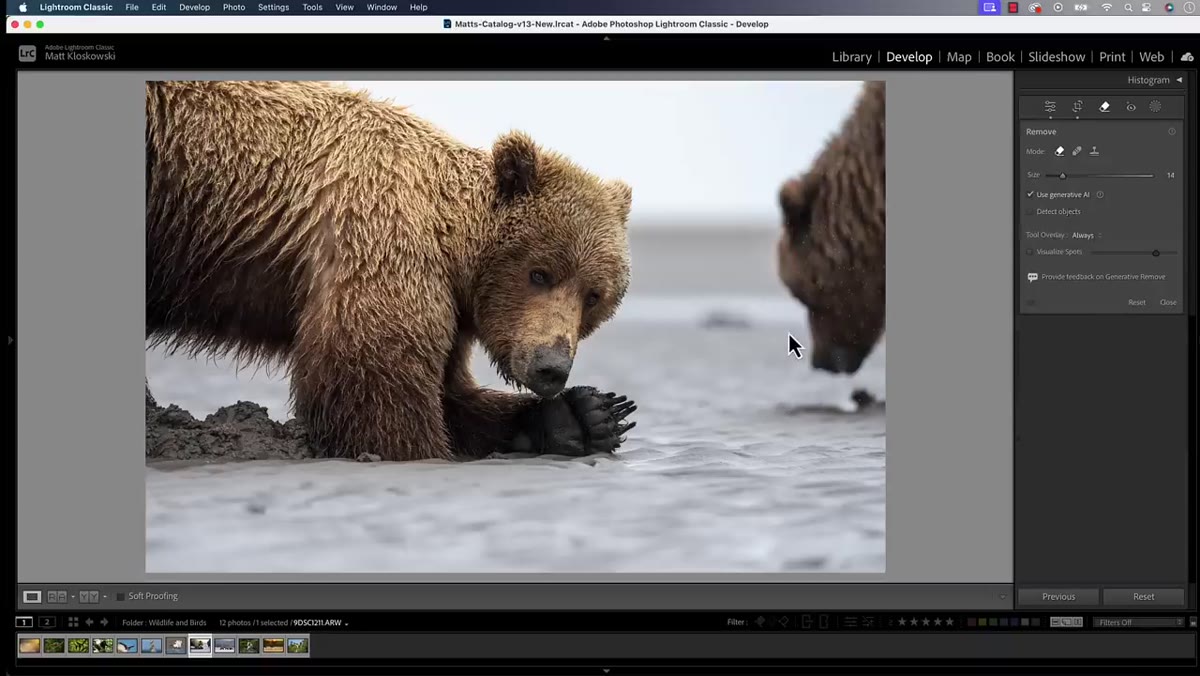 Detect Objects toggle visible in the Remove tool panel
Before you start brushing, make a quick decision: is the thing you’re removing a small, simple distraction, or is it a complex object with irregular edges? For a stray piece of trash in a landscape corner, you can skip straight to painting over it. For something larger, like an animal, a person, or a vehicle, turn on the Detect Objects toggle. This tells Lightroom to analyze your rough selection and find the actual edges of the subject rather than relying entirely on the precision of your brushstroke. It saves you from the tedious work of careful edge-tracing.
Detect Objects toggle visible in the Remove tool panel
Before you start brushing, make a quick decision: is the thing you’re removing a small, simple distraction, or is it a complex object with irregular edges? For a stray piece of trash in a landscape corner, you can skip straight to painting over it. For something larger, like an animal, a person, or a vehicle, turn on the Detect Objects toggle. This tells Lightroom to analyze your rough selection and find the actual edges of the subject rather than relying entirely on the precision of your brushstroke. It saves you from the tedious work of careful edge-tracing.
Step 3: Paint a Rough Selection Around the Object
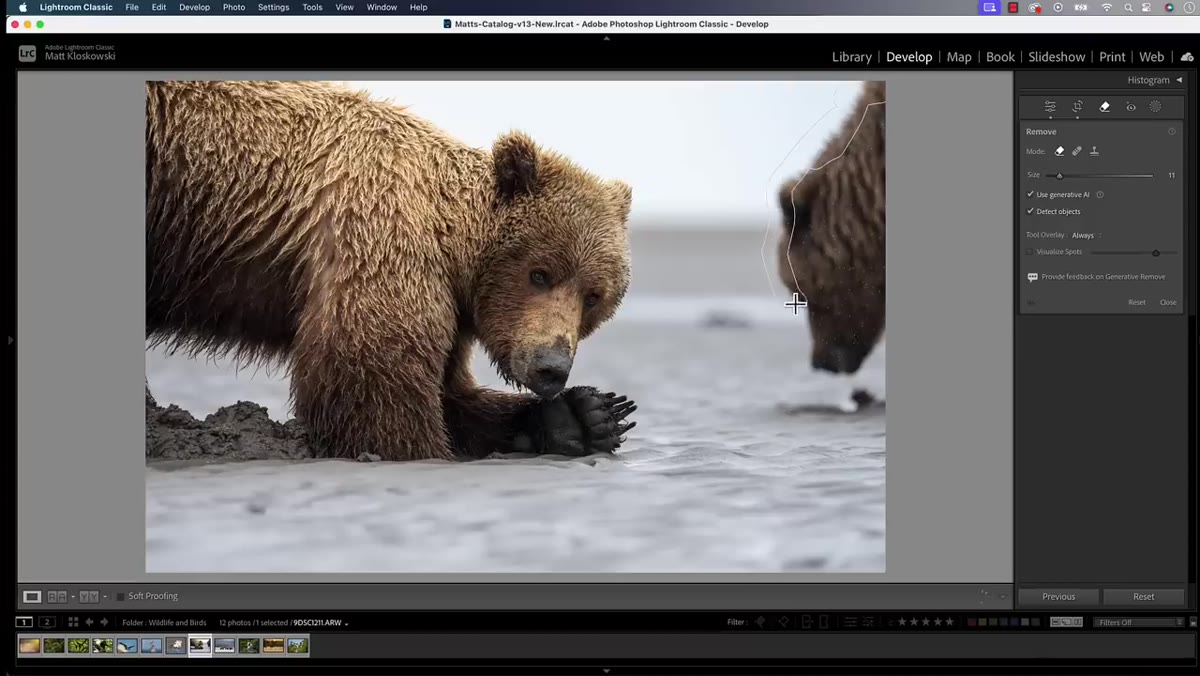 User brushing a loose outline around the subject on screen
With Detect Objects enabled, you don’t need to be precise. Draw a loose border around whatever you want gone. You can use the left and right bracket keys to resize your brush on the fly, which is worth memorizing if you haven’t already. The key thing Matt points out here is that you don’t need to close a perfect loop or fill in the entire object. A rough outline is enough for the detection to do its job. I’d compare it to the first pass of a lasso selection in Photoshop where you’re just giving the AI a general idea of where to look, not drawing a pixel-perfect mask.
User brushing a loose outline around the subject on screen
With Detect Objects enabled, you don’t need to be precise. Draw a loose border around whatever you want gone. You can use the left and right bracket keys to resize your brush on the fly, which is worth memorizing if you haven’t already. The key thing Matt points out here is that you don’t need to close a perfect loop or fill in the entire object. A rough outline is enough for the detection to do its job. I’d compare it to the first pass of a lasso selection in Photoshop where you’re just giving the AI a general idea of where to look, not drawing a pixel-perfect mask.
Step 4: Refine with Add and Subtract
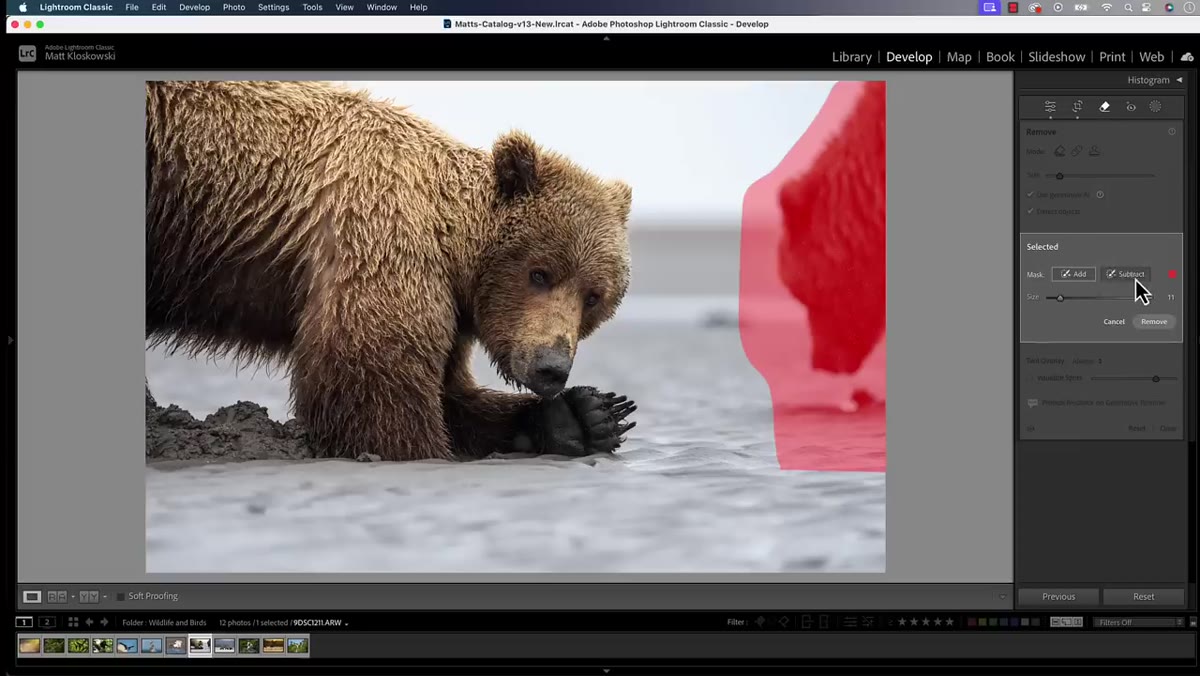 Add and subtract selection controls shown in Remove tool panel
Once you’ve made your initial selection, Lightroom leaves you in a refinement mode where you can see Add and Subtract options. This is where you clean up the selection before the actual removal happens. To subtract from the selection without clicking the button, hold Option on Mac or Alt on PC. That keyboard shortcut makes the back-and-forth much faster than mousing up to toggle between modes. Matt’s advice here is worth repeating: don’t hug the edge of the object too tightly, but don’t leave a huge buffer of background included either. Give the AI a clean, snug selection and it has a better chance of generating a convincing fill.
Add and subtract selection controls shown in Remove tool panel
Once you’ve made your initial selection, Lightroom leaves you in a refinement mode where you can see Add and Subtract options. This is where you clean up the selection before the actual removal happens. To subtract from the selection without clicking the button, hold Option on Mac or Alt on PC. That keyboard shortcut makes the back-and-forth much faster than mousing up to toggle between modes. Matt’s advice here is worth repeating: don’t hug the edge of the object too tightly, but don’t leave a huge buffer of background included either. Give the AI a clean, snug selection and it has a better chance of generating a convincing fill.
Step 5: Hit Remove and Let Generative AI Fill the Gap
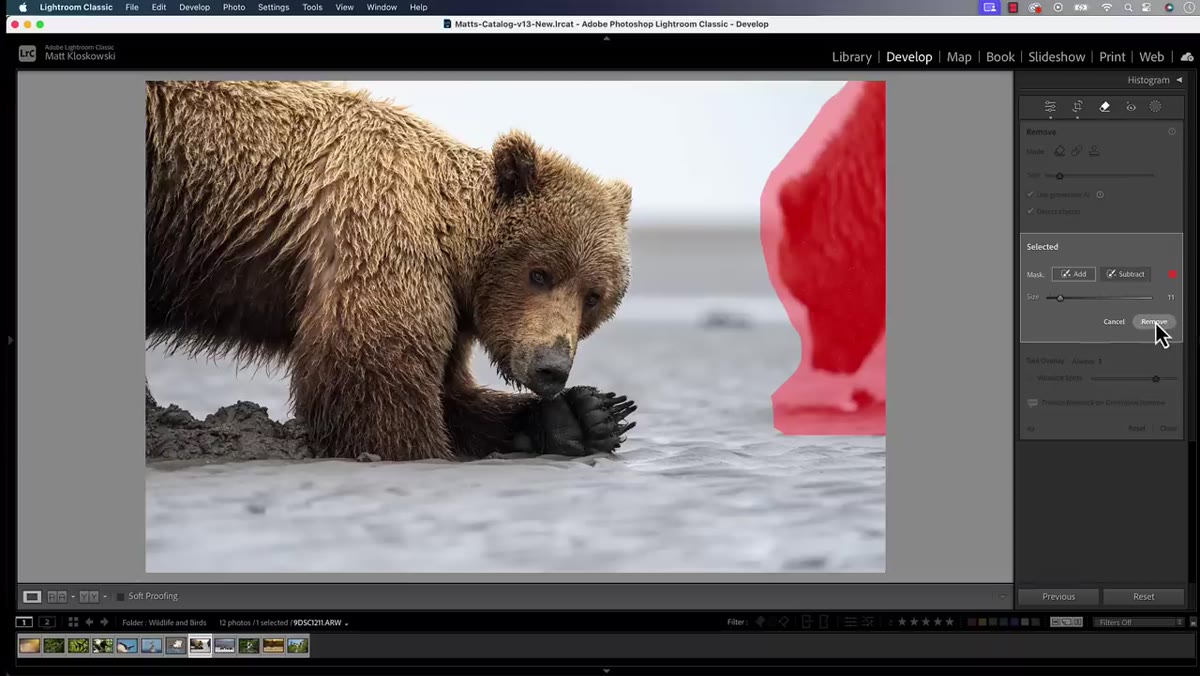 The Remove button being clicked and Lightroom processing the selection
When the selection looks right, click Remove. Previously this button said “Apply,” which Matt notes didn’t really communicate what was happening. The rename to “Remove” is a small change but it makes the workflow more intuitive, especially for anyone newer to the tool. The generation takes a few seconds. What comes back is a fill based on the surrounding context of the image, not a rubber-stamp clone of nearby pixels. On the example Matt demonstrates in the video, with a bear mid-frame against a natural background, the results are clean enough that I would not reach for Photoshop as a follow-up step. That’s a bar the old erase tool never cleared for me.
The Remove button being clicked and Lightroom processing the selection
When the selection looks right, click Remove. Previously this button said “Apply,” which Matt notes didn’t really communicate what was happening. The rename to “Remove” is a small change but it makes the workflow more intuitive, especially for anyone newer to the tool. The generation takes a few seconds. What comes back is a fill based on the surrounding context of the image, not a rubber-stamp clone of nearby pixels. On the example Matt demonstrates in the video, with a bear mid-frame against a natural background, the results are clean enough that I would not reach for Photoshop as a follow-up step. That’s a bar the old erase tool never cleared for me.
Step 6: Check the Full Coverage of Your Painted Area
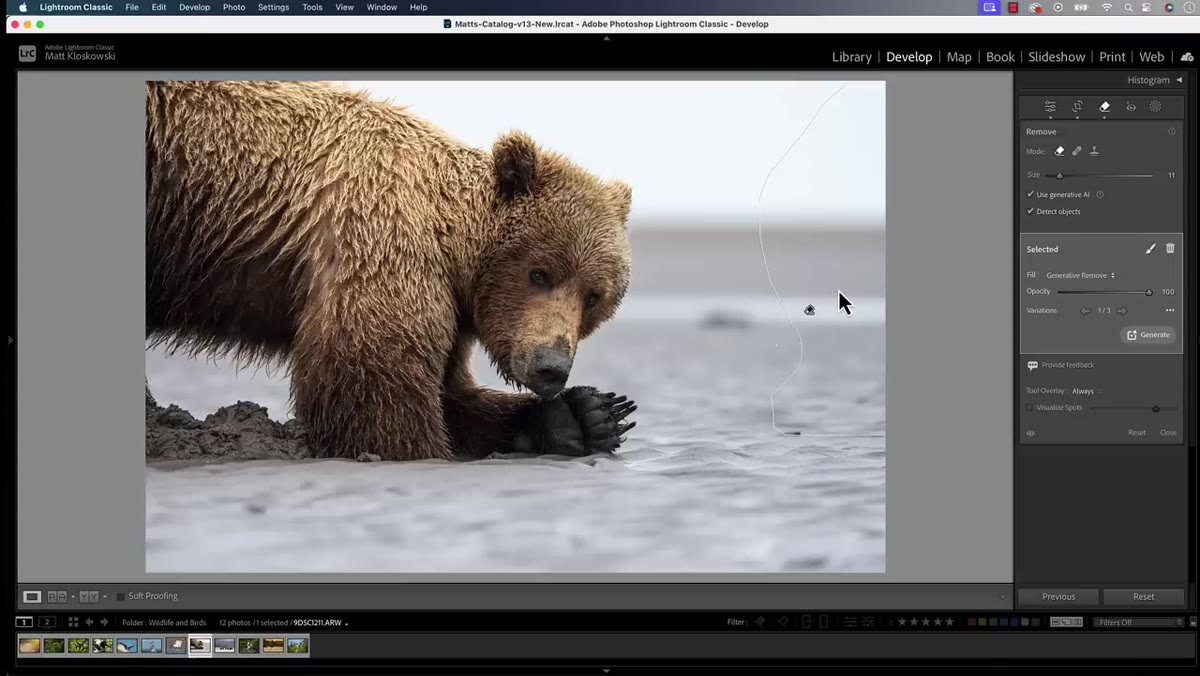 Completed removal shown with surrounding area intact
One thing Matt flags at the end of his walkthrough is worth paying extra attention to: make sure your brush actually covered the full area of the object before you commit to the removal. If you outline something but leave gaps in your painted selection, the generation can come back incomplete, with the edges of the original object still partially visible. It’s a quick fix, you just redo the selection, but it’s easier to double-check coverage before you click Remove than to troubleshoot a patchy result afterward.
Completed removal shown with surrounding area intact
One thing Matt flags at the end of his walkthrough is worth paying extra attention to: make sure your brush actually covered the full area of the object before you commit to the removal. If you outline something but leave gaps in your painted selection, the generation can come back incomplete, with the edges of the original object still partially visible. It’s a quick fix, you just redo the selection, but it’s easier to double-check coverage before you click Remove than to troubleshoot a patchy result afterward.
My Add-On: Combine This With Masking for Cleaner Results on Busy Backgrounds
I’ve been running the Generative Remove tool on photos with fairly complex backgrounds, forest scenes, textured walls, crowded markets, and the results get noticeably better when I spend thirty extra seconds loosening my selection rather than tightening it. My instinct used to be to make the selection as precise as possible. Turns out the generative model seems to benefit from seeing a bit more of the surrounding context. Give it room to read the texture and light of the area around the object, and the fill blends more naturally. If the generated result still has a visible seam, a quick pass with the Healing brush set to a low feather can knock it back without leaving the Develop module at all.
The single most important thing I took from this tutorial is that Generative Remove has quietly crossed the threshold from “interesting experiment” to “actual production tool.” It’s worth revisiting even if you tried it during Early Access and walked away unimpressed. The 2025 version in Lightroom Classic 14 is a different experience.
Watch the full tutorial on YouTube to see Matt cover every other update in Classic 14 and Desktop 8, including the changes you might be sleeping on.
Comments (1)
My workflow just got 10x faster. Not even kidding.
Leave a Comment