Night photography editing has a way of humbling you fast. You nail the exposure, you get home, you open Lightroom, and suddenly that brilliant Milky Way you saw with your own eyes looks like a faint smudge above some rocks. I’ve been there more times than I want to admit. The gap between what the camera captures and what the eye actually sees is widest at night, which means your editing has to work harder to close it.
That’s exactly why I kept coming back to this CreativeLive session with Tim Cooper. Watch the full tutorial on YouTube before or after reading this breakdown. Cooper covers three techniques that, taken together, give you a real workflow for night images rather than a collection of random slider moves. Two of them live in Lightroom, one in Photoshop, and all three are faster than whatever you’re currently doing.
What I appreciate most is that these aren’t tricks for beginners. They’re the kind of moves working photographers use on actual client work, explained clearly enough that you can apply them the same afternoon.
Step 1: Use the Dehaze Slider to Pull the Milky Way Forward
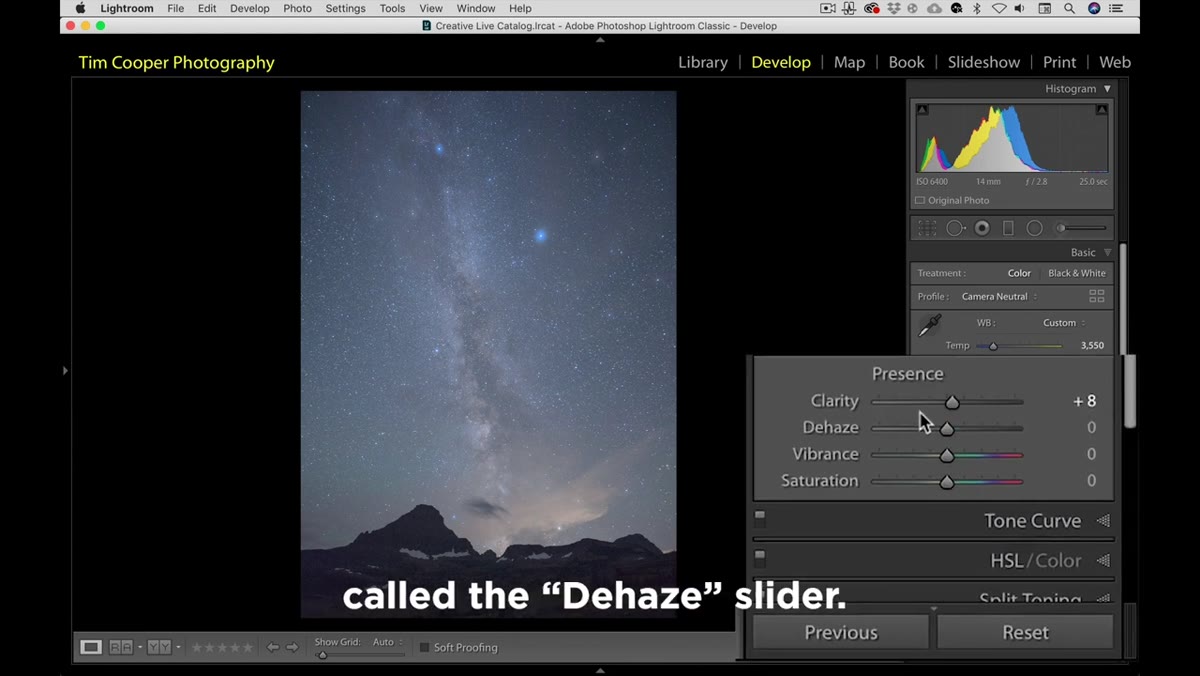 Dehaze slider being moved up in Lightroom’s Presence panel
The Dehaze slider has been sitting in Lightroom for a few versions now, and in the most recent update Adobe moved it up into the Presence panel where it genuinely belongs. If you’ve been ignoring it, stop. For Milky Way shots, it’s the single most impactful move you can make in global editing.
Dehaze slider being moved up in Lightroom’s Presence panel
The Dehaze slider has been sitting in Lightroom for a few versions now, and in the most recent update Adobe moved it up into the Presence panel where it genuinely belongs. If you’ve been ignoring it, stop. For Milky Way shots, it’s the single most impactful move you can make in global editing.
Pull the Dehaze slider to the right and watch what happens to your sky. The galactic core gets denser, stars pop against the background, and the whole scene gets the kind of contrast that usually takes three separate adjustments to achieve. The catch is that Dehaze also cranks up saturation aggressively, so right after you move it up, pull your global Saturation slider back by somewhere between 10 and 20 points. You’re keeping the structural contrast while taming the neon-purple sky that Dehaze tends to produce if left alone.
Step 2: Replicate the Dehaze Effect in Photoshop with Overlay Blending
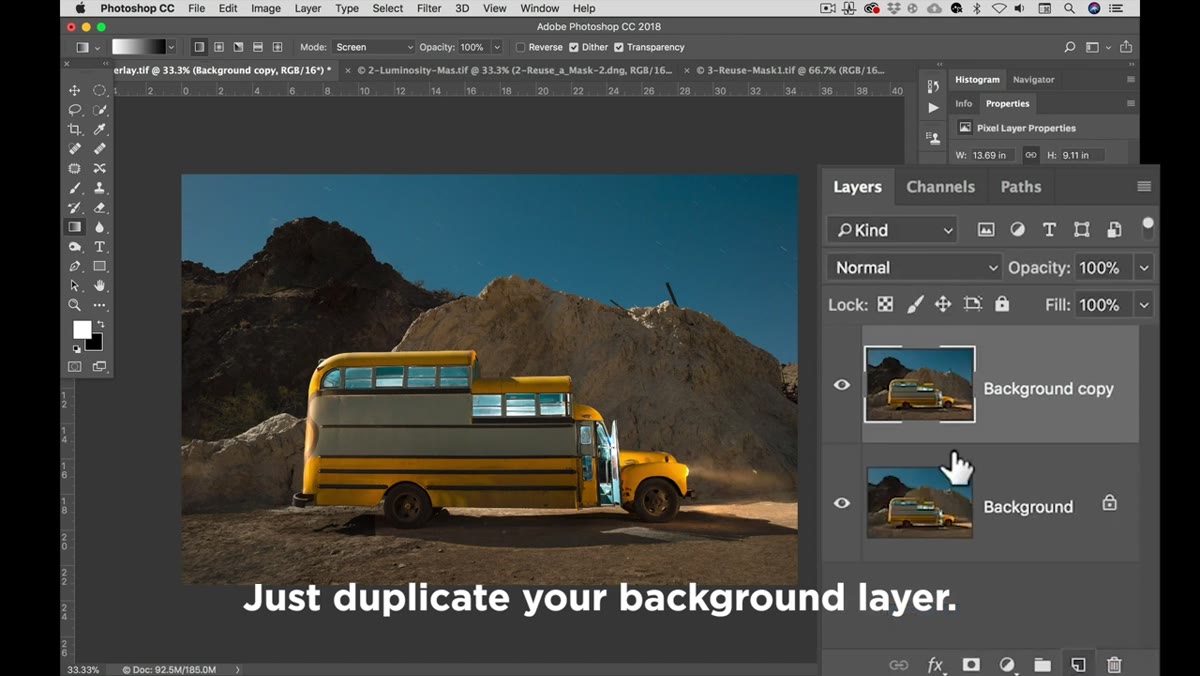 Duplicate background layer with Overlay blend mode applied to sky selection
Photoshop doesn’t have a native Dehaze filter the way Lightroom does, but Cooper shows a clean workaround that produces a similar result. Start by duplicating your background layer. Then use the Quick Selection tool to select just the sky area. Once you have the selection, add a mask to that duplicate layer so only the sky is affected.
Duplicate background layer with Overlay blend mode applied to sky selection
Photoshop doesn’t have a native Dehaze filter the way Lightroom does, but Cooper shows a clean workaround that produces a similar result. Start by duplicating your background layer. Then use the Quick Selection tool to select just the sky area. Once you have the selection, add a mask to that duplicate layer so only the sky is affected.
With the sky layer still selected, change the blending mode from Normal to Overlay. Overlay mode darkens the darks and brightens the brights relative to the layer below, which effectively deepens the sky and makes stars read more clearly against it. If the effect is too intense (and it often is), bring the layer’s Opacity down to somewhere between 50 and 70 percent. That range tends to feel natural without looking processed.
Step 3: Create a Luminosity Mask to Blend Two Exposures
 Channels palette open with RGB composite layer being clicked to create luminosity mask
This is the technique I wish someone had shown me years ago. Luminosity masks were a standard tool before HDR software made blending exposures feel automatic, and they’re still more precise than any tone-mapping algorithm I’ve used. The idea is simple: use the brightness information in the image itself as the basis for a mask.
Channels palette open with RGB composite layer being clicked to create luminosity mask
This is the technique I wish someone had shown me years ago. Luminosity masks were a standard tool before HDR software made blending exposures feel automatic, and they’re still more precise than any tone-mapping algorithm I’ve used. The idea is simple: use the brightness information in the image itself as the basis for a mask.
In Photoshop, with two exposures stacked as layers (one exposed for highlights, one for shadows), click your upper layer, then open the Channels palette. Hold Command on Mac or Control on PC and click the RGB composite channel. That action loads a selection based on the luminosity values in the image. Bright areas are fully selected, dark areas are not. Return to the Layers panel, click the Add Mask button, and you now have a mask that naturally transitions between your two exposures. One more step: hit Command-I (Control-I on PC) to invert the mask. Without that inversion, you’d be masking the wrong way, hiding your highlights instead of your shadows. After the invert, bright areas in the top layer show through where you need detail in the lights, and the layer below fills in the shadow information.
Step 4: Save Your Selections as Reusable Masks
 Quick Selection tool used on sky, then photo filter adjustment layer added
Making a good selection takes time. There’s no reason to redo it from scratch every time you need to apply a different adjustment to the same area. Cooper’s approach here is genuinely practical. Once you’ve used the Quick Selection tool to isolate your sky, use that selection to create a Photo Filter adjustment layer. In his example, he drops in a Cooling Filter and dials it up slightly to push the sky toward a deeper blue, which creates better visual separation from the warmer foreground.
Quick Selection tool used on sky, then photo filter adjustment layer added
Making a good selection takes time. There’s no reason to redo it from scratch every time you need to apply a different adjustment to the same area. Cooper’s approach here is genuinely practical. Once you’ve used the Quick Selection tool to isolate your sky, use that selection to create a Photo Filter adjustment layer. In his example, he drops in a Cooling Filter and dials it up slightly to push the sky toward a deeper blue, which creates better visual separation from the warmer foreground.
That mask you just created on the Photo Filter layer doesn’t disappear once you move on. To reload it, hold Command (or Control) and click directly on the mask thumbnail in the Layers panel. The selection snaps back exactly as it was.
Step 5: Invert the Selection to Work the Foreground
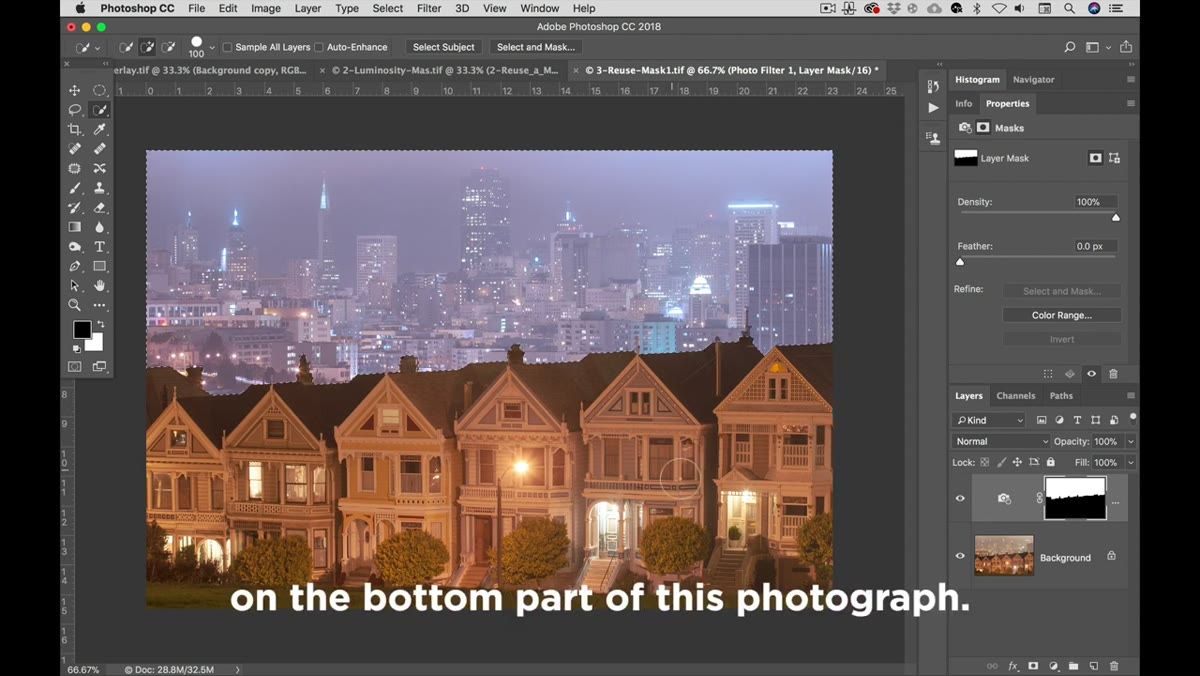 Select Inverse applied, then Curves adjustment targeting foreground houses
With your sky selection reloaded, go to Select, then Inverse. Now everything except the sky is selected. This is where you can work the foreground independently without touching the sky at all. Cooper brings in a Curves adjustment layer and adds contrast to the foreground houses by pulling the shadows slightly darker and lifting the midtones just a touch. The mask is automatically applied through the inverse selection, so the adjustment only affects the ground.
Select Inverse applied, then Curves adjustment targeting foreground houses
With your sky selection reloaded, go to Select, then Inverse. Now everything except the sky is selected. This is where you can work the foreground independently without touching the sky at all. Cooper brings in a Curves adjustment layer and adds contrast to the foreground houses by pulling the shadows slightly darker and lifting the midtones just a touch. The mask is automatically applied through the inverse selection, so the adjustment only affects the ground.
The result is two adjustment layers with masks that are mirror images of each other. You can toggle back to either mask at any time by Command-clicking the thumbnail. One click gives you the sky selection, the other gives you everything below it.
How I Actually Use These in My Own Edits
The luminosity mask step is the one I’ve built into my regular workflow, especially for cityscapes at blue hour where the sky and artificial lights are pulling the exposure in opposite directions. What I’d add to Cooper’s method is this: before you invert the mask, take a look at it in the Channels palette by Option-clicking the mask thumbnail. You’ll see exactly where the mask is soft and where it’s hard. Sometimes I’ll run a slight Gaussian blur on the mask (1 to 2 pixels) before applying it so the blend between layers reads more natural, particularly around skylines with irregular edges like rooftops and tree lines.
For the Overlay blending trick in Photoshop, I’ll sometimes run it twice at lower opacity rather than once at a higher setting. Two layers at 40 percent opacity each tends to give smoother results than one layer at 80 percent, especially if your sky has a strong gradient from the horizon upward.
These three techniques, taken together, solve the biggest problem in night photography editing: the image looks flat, the sky looks weak, and you can’t adjust one without wrecking the other. Dehaze fixes the sky in Lightroom quickly. The Overlay blend does the same in Photoshop. The luminosity mask lets you blend two exposures without visible seams. And the reusable selection system means you do the hard work once and apply it as many times as you need.
Watch the full tutorial on YouTube to see Cooper demonstrate each step in real time. The visual context of watching the masks build and the blending modes shift makes the logic click in a way that reading alone can’t fully replicate.
Comments (3)
Just subscribed. If the rest of your content is this good, I'm in.
Been doing this wrong for years apparently. Thanks for the wake-up call.
Great article! I actually covered something related on my site — the landscape angle is really complementary to this.
Leave a Comment