
There’s a specific kind of frustration that comes from knowing a tool can do something, but making it do that thing requires jumping through hoops that feel completely backwards. For a while, batch AI noise reduction in Lightroom Classic was exactly that. You’d select your photos, run Denoise, and Lightroom would churn out a pile of duplicate DNG files alongside your originals. Your folder looked like a parking lot after a fender bender. Manageable, but messy, and mentally exhausting when you’re already deep in a session with a hundred wildlife shots from a weekend hunt.
Adobe has changed how this works, and in this Matt Kloskowski tutorial, he walks through exactly what changed and how to take advantage of it. The short version: AI Denoise now runs non-destructively on your original raw file, no duplicate DNG required. But the bigger practical win is that syncing Denoise to a batch of photos now follows the same logic as every other sync operation in Lightroom Classic. If you’ve been using this software for more than a week, you already know how to do it.
I’ve been recommending Kloskowski’s tutorials to people in my workshops for years because he teaches the way I try to teach: he shows you what broke, explains why the fix matters, and gets out of your way. This one is worth your time even if you think you’ve already figured out a workaround.
Step 1: Understand What Actually Changed
 Side-by-side comparison showing old DNG duplicate workflow versus new
The old workflow required Lightroom to create a brand new DNG file every time you applied AI Denoise. This was a hard technical limitation, not a design choice Adobe loved. The new update moves Denoise into the Detail panel as a non-destructive edit, meaning it lives on your raw file the same way an exposure or HSL adjustment does. No duplicate. No extra file cluttering your hard drive. And critically, because it’s now a standard Develop setting, it can be synced to other photos using the exact same Sync button you’ve been clicking since Lightroom 1.
Side-by-side comparison showing old DNG duplicate workflow versus new
The old workflow required Lightroom to create a brand new DNG file every time you applied AI Denoise. This was a hard technical limitation, not a design choice Adobe loved. The new update moves Denoise into the Detail panel as a non-destructive edit, meaning it lives on your raw file the same way an exposure or HSL adjustment does. No duplicate. No extra file cluttering your hard drive. And critically, because it’s now a standard Develop setting, it can be synced to other photos using the exact same Sync button you’ve been clicking since Lightroom 1.
Step 2: Make Your Core Edits on the Hero Image First
 Develop module open with profile, exposure, and shadow adjustments applied
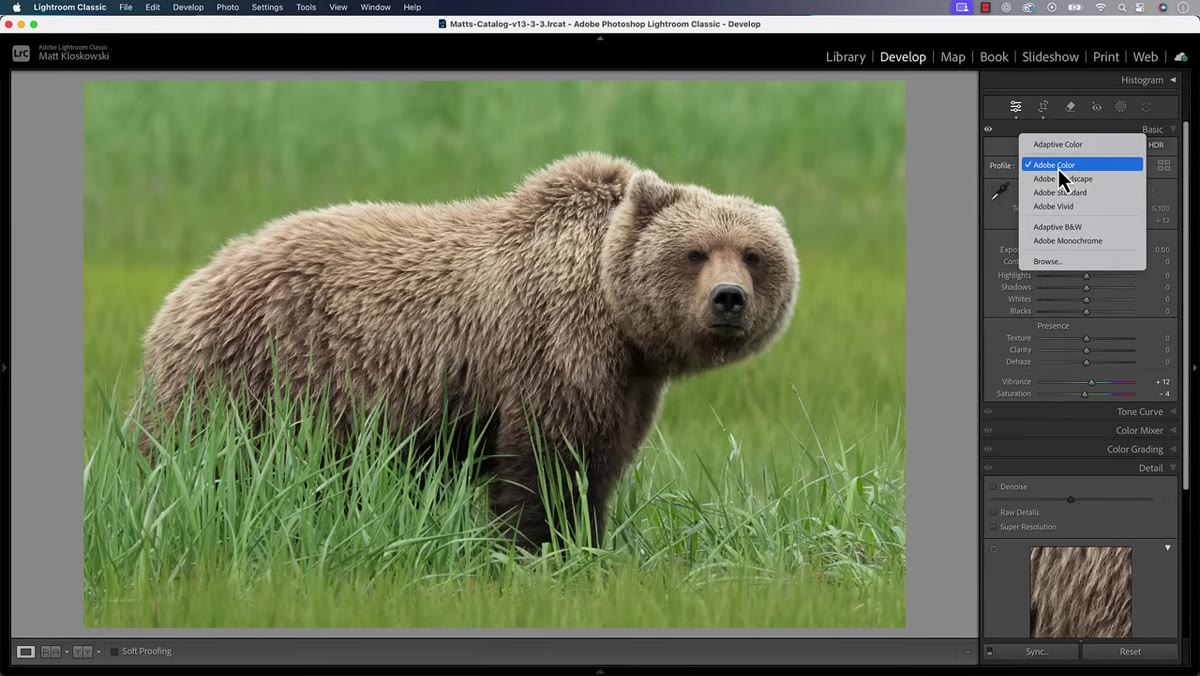
Before you think about Denoise or syncing, get your primary image looking the way you want it. In the tutorial, Kloskowski selects an adaptive color profile, nudges exposure up, opens shadows, and pulls the highlights back a touch. Nothing exotic. The point here is that Denoise is going to be one ingredient in a full edit, not the only thing on the plate. Apply your profile in the top of the Develop panel, dial in your basic exposure settings, and handle any cropping you’ve already planned for this set of images. You want your hero image to be as close to finished as possible before you sync anything.
Develop module open with profile, exposure, and shadow adjustments applied
Before you think about Denoise or syncing, get your primary image looking the way you want it. In the tutorial, Kloskowski selects an adaptive color profile, nudges exposure up, opens shadows, and pulls the highlights back a touch. Nothing exotic. The point here is that Denoise is going to be one ingredient in a full edit, not the only thing on the plate. Apply your profile in the top of the Develop panel, dial in your basic exposure settings, and handle any cropping you’ve already planned for this set of images. You want your hero image to be as close to finished as possible before you sync anything.
Step 3: Apply AI Denoise from the Detail Panel
 Detail panel open with Denoise toggle being activated on raw file
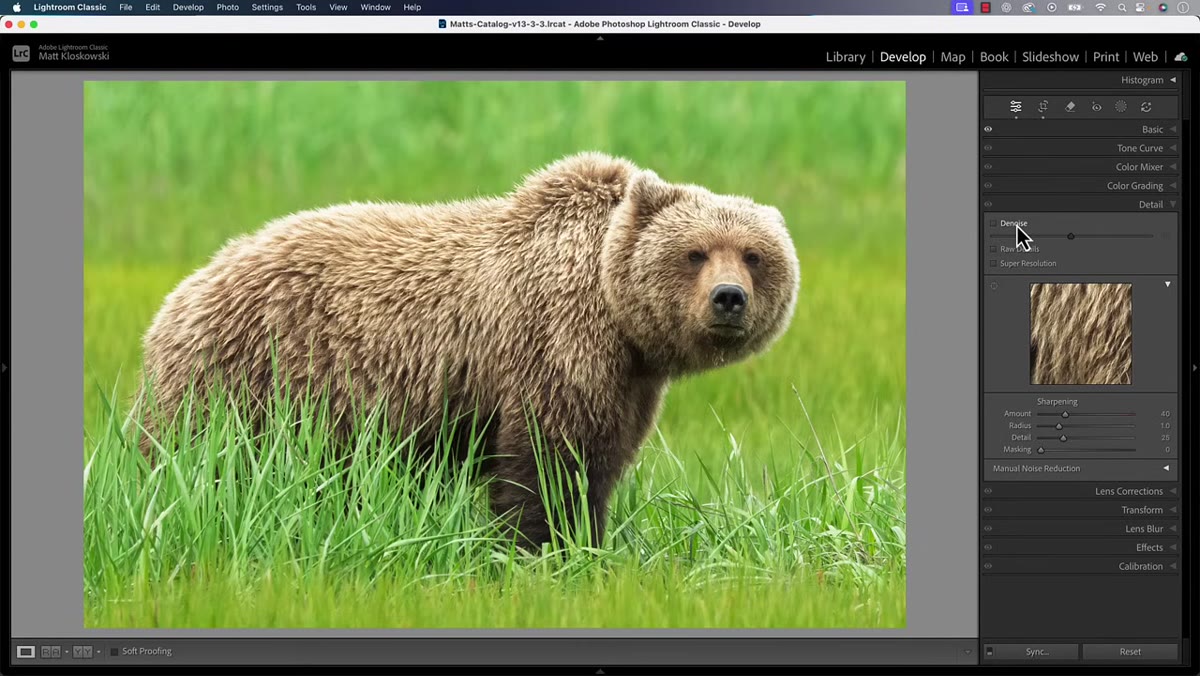
Scroll down to the Detail panel in the Develop module. You’ll see the Denoise option sitting there now, folded into the same neighborhood as your Sharpening and Luminance Noise Reduction sliders. Click the checkbox to enable it and let Lightroom run the process on your image. Depending on your machine this might take a few seconds or longer for a high-resolution file. Once it finishes, you’ll get a strength slider you can adjust to taste. Kloskowski leaves this open for interpretation based on your image, but the default is a reasonable starting point for most high-ISO shots.
Detail panel open with Denoise toggle being activated on raw file
Scroll down to the Detail panel in the Develop module. You’ll see the Denoise option sitting there now, folded into the same neighborhood as your Sharpening and Luminance Noise Reduction sliders. Click the checkbox to enable it and let Lightroom run the process on your image. Depending on your machine this might take a few seconds or longer for a high-resolution file. Once it finishes, you’ll get a strength slider you can adjust to taste. Kloskowski leaves this open for interpretation based on your image, but the default is a reasonable starting point for most high-ISO shots.
While you’re in that panel, dial in your sharpening amount too. Since sharpening and noise reduction interact with each other visually, it makes sense to finalize both before you lock in your settings for the batch sync.
Step 4: Select Your Target Photos in the Filmstrip
 Filmstrip at bottom showing hero image highlighted brighter than selected group
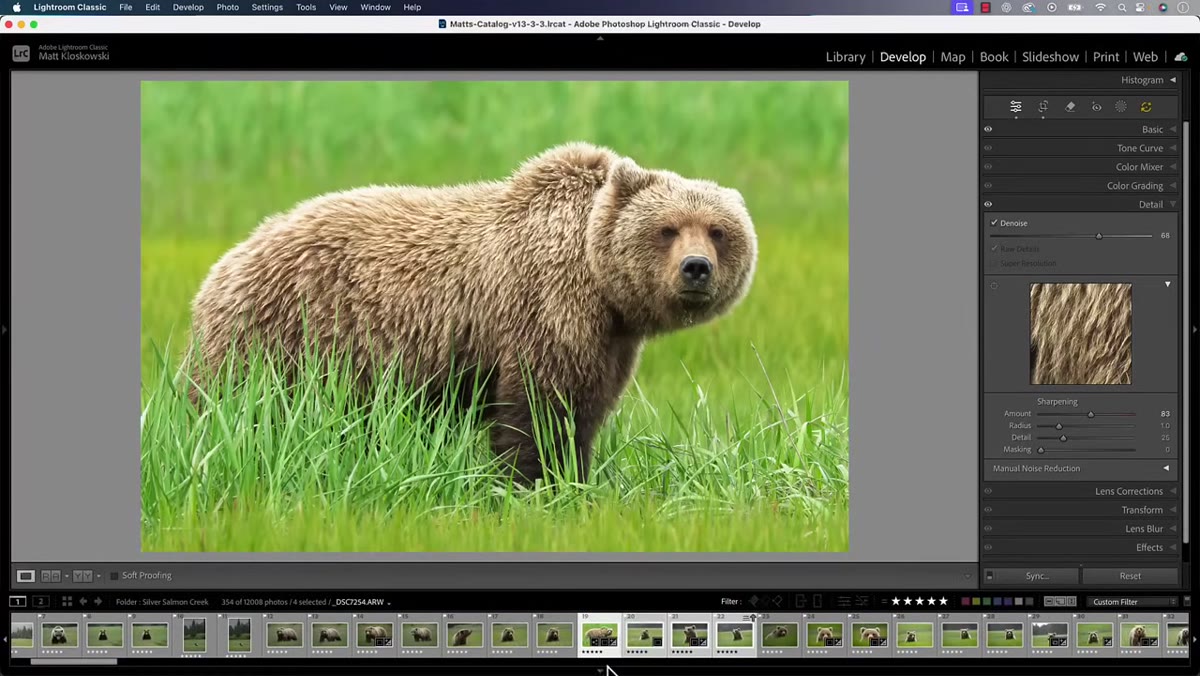
With your edits finished on the hero image, reveal the filmstrip at the bottom of the Develop module. Click your hero image first to make sure it’s the active photo, then shift-click the last photo in the group you want to apply these settings to. Lightroom will highlight all the images in between. Here’s a detail worth paying attention to: the hero image will appear slightly brighter in the filmstrip than the others. That brightness difference is Lightroom’s way of telling you this is the “most selected” photo, meaning it’s the source from which all settings will sync. The others are selected, but they’re the recipients.
Filmstrip at bottom showing hero image highlighted brighter than selected group
With your edits finished on the hero image, reveal the filmstrip at the bottom of the Develop module. Click your hero image first to make sure it’s the active photo, then shift-click the last photo in the group you want to apply these settings to. Lightroom will highlight all the images in between. Here’s a detail worth paying attention to: the hero image will appear slightly brighter in the filmstrip than the others. That brightness difference is Lightroom’s way of telling you this is the “most selected” photo, meaning it’s the source from which all settings will sync. The others are selected, but they’re the recipients.
Step 5: Sync Settings to the Batch
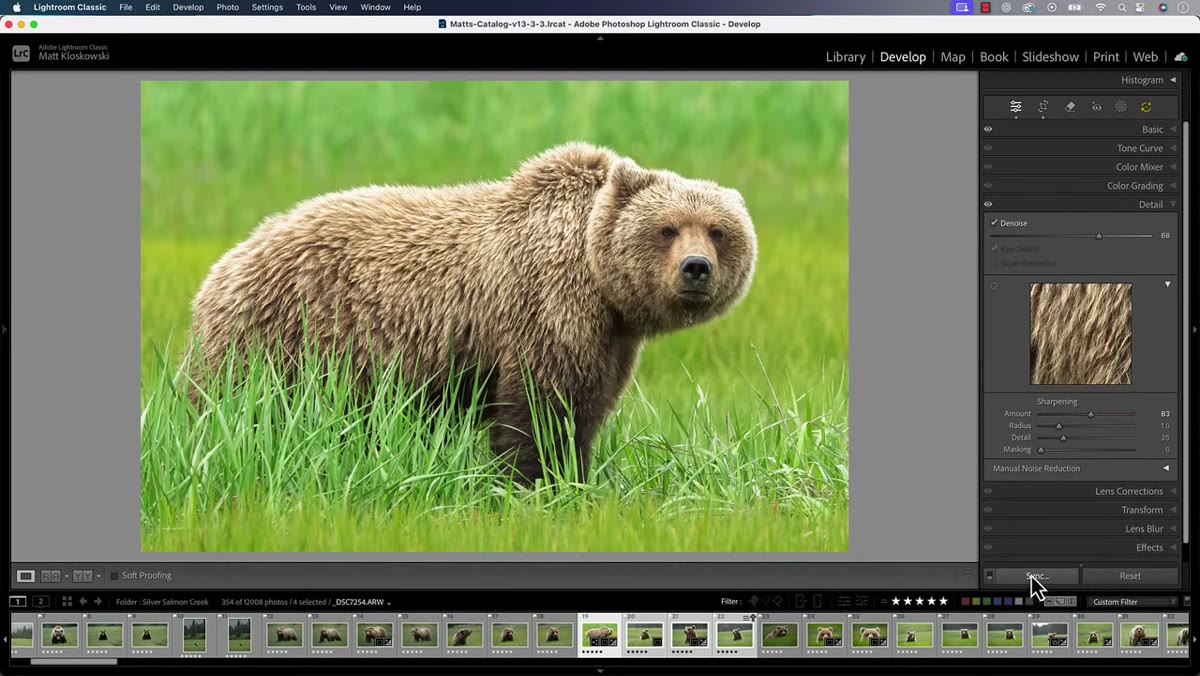 Sync button visible in Develop module with multiple photos selected in filmstrip
Now hit the Sync button at the bottom right of the Develop panels. Lightroom will open the Sync Settings dialog, which lets you choose exactly which adjustments get copied to the rest of the selected photos. Make sure Denoise is checked along with whatever other settings you want to push across, then click Synchronize. Lightroom will process Denoise on each photo in the group. This is the part that used to require that awkward right-click Enhance workaround from Library mode, with the duplicate DNGs and the silent prayer that your file names stayed organized. Now it’s just the Sync button, same as always.
Sync button visible in Develop module with multiple photos selected in filmstrip
Now hit the Sync button at the bottom right of the Develop panels. Lightroom will open the Sync Settings dialog, which lets you choose exactly which adjustments get copied to the rest of the selected photos. Make sure Denoise is checked along with whatever other settings you want to push across, then click Synchronize. Lightroom will process Denoise on each photo in the group. This is the part that used to require that awkward right-click Enhance workaround from Library mode, with the duplicate DNGs and the silent prayer that your file names stayed organized. Now it’s just the Sync button, same as always.
One Thing I’d Add: Pre-Sort by ISO Before You Batch
The workflow Kloskowski demonstrates assumes you’re syncing Denoise with a uniform strength setting across a group of similar shots, which makes total sense for a set from the same session and lighting conditions. Where I’ve found this gets complicated is when you’re batching across shots that span a wide ISO range inside a single import.
If you dropped from ISO 800 to ISO 3200 mid-shoot because the light changed, applying the same Denoise strength to every frame will either over-process the cleaner shots or under-process the noisier ones. My habit now is to sort by ISO in the Library module before I start, split the images into ISO-range groups, and run the sync operation separately for each group with a strength value matched to that range. It adds maybe two minutes to the workflow and saves you from having to go back and correct Denoise on a photo-by-photo basis later.
The bottom line here is simple: Adobe removed a real pain point, and the new workflow is genuinely better. If you’ve been avoiding AI Denoise on batches because the old process felt like doing expense reports, this update is worth revisiting. Watch Matt walk through the whole thing himself, because his pacing makes it easy to follow along with your own images open at the same time.
Watch the full tutorial on YouTube
Comments
Leave a Comment