Sky editing is one of those things that sounds simple until you’re staring at a photo where the clouds are blown out and the foreground looks like it was shot at midnight. I’ve been in that exact situation more times than I want to count, and for a long time my fix was clunky at best. I’d pull down the overall exposure, hate what it did to the shadows, undo it, and then just… accept a mediocre sky. Not a great workflow.
That changed when I watched Matt Kloskowski’s tutorial over at KelbyOne, which walks through a genuinely clever two-step approach to the Graduated Filter that I wish someone had shown me years ago. Watch the full tutorial on YouTube - it’s short, it’s focused, and it has one of those moments where you’ll actually say “oh, obviously” out loud. The technique is built around understanding what the Shadow slider does and doesn’t affect, and once that clicks, you’ll use it constantly.
The core problem Kloskowski is solving is this: the Graduated Filter is a fantastic tool for bringing down an overexposed sky, but it doesn’t know where the sky ends. It darkens everything in its path, including trees, mountains, buildings - anything that rises above your horizon line. His fix is elegant and already built into Lightroom. You just have to know which slider to reach for.
Step 1: Start With a Global Edit First
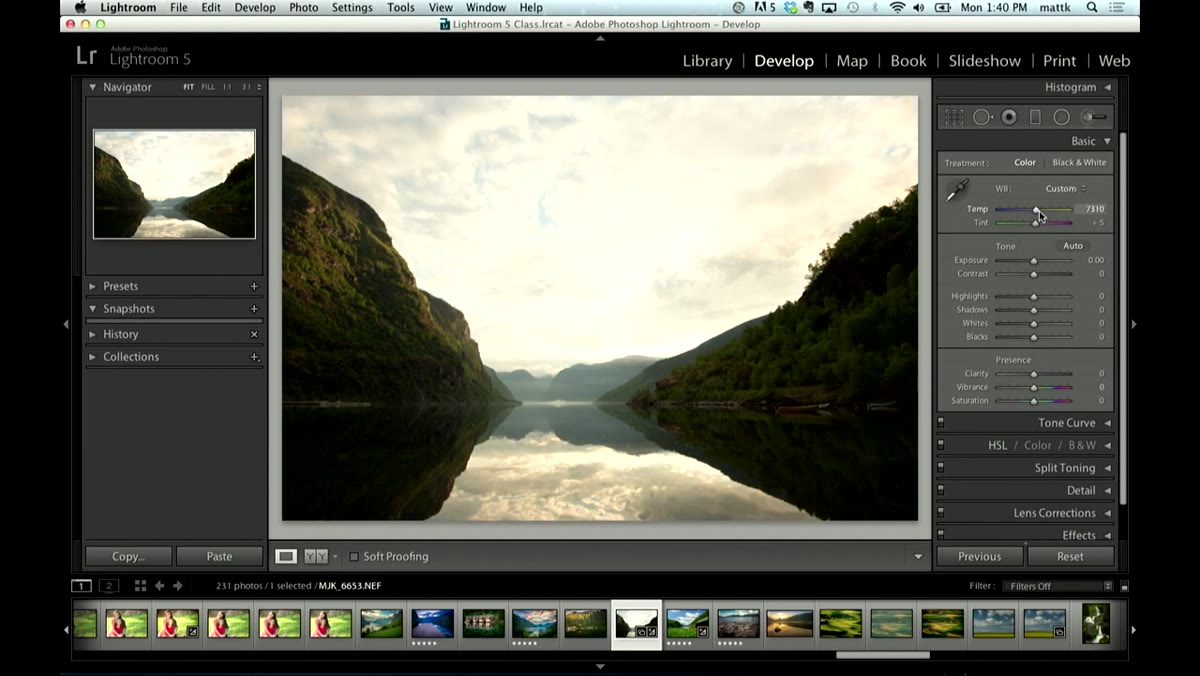 Global develop sliders adjusted before any local edits applied
Before you touch any local adjustment tools, get your overall image into reasonable shape. Kloskowski pulls the white balance slightly warmer to set a natural tone, then leaves the Exposure slider alone because this particular image has a classic split problem - the sky is too bright and the foreground is too dark. Pulling exposure down hurts the foreground. Pushing it up blows out the sky further.
Global develop sliders adjusted before any local edits applied
Before you touch any local adjustment tools, get your overall image into reasonable shape. Kloskowski pulls the white balance slightly warmer to set a natural tone, then leaves the Exposure slider alone because this particular image has a classic split problem - the sky is too bright and the foreground is too dark. Pulling exposure down hurts the foreground. Pushing it up blows out the sky further.
The solution for that conflict is to leave Exposure neutral and instead work Highlights and Shadows in opposite directions. Drag Highlights down to recover sky detail, and bring Shadows up to open the foreground. Think of it as a manual HDR with actual taste.
Step 2: Set Your White and Black Points
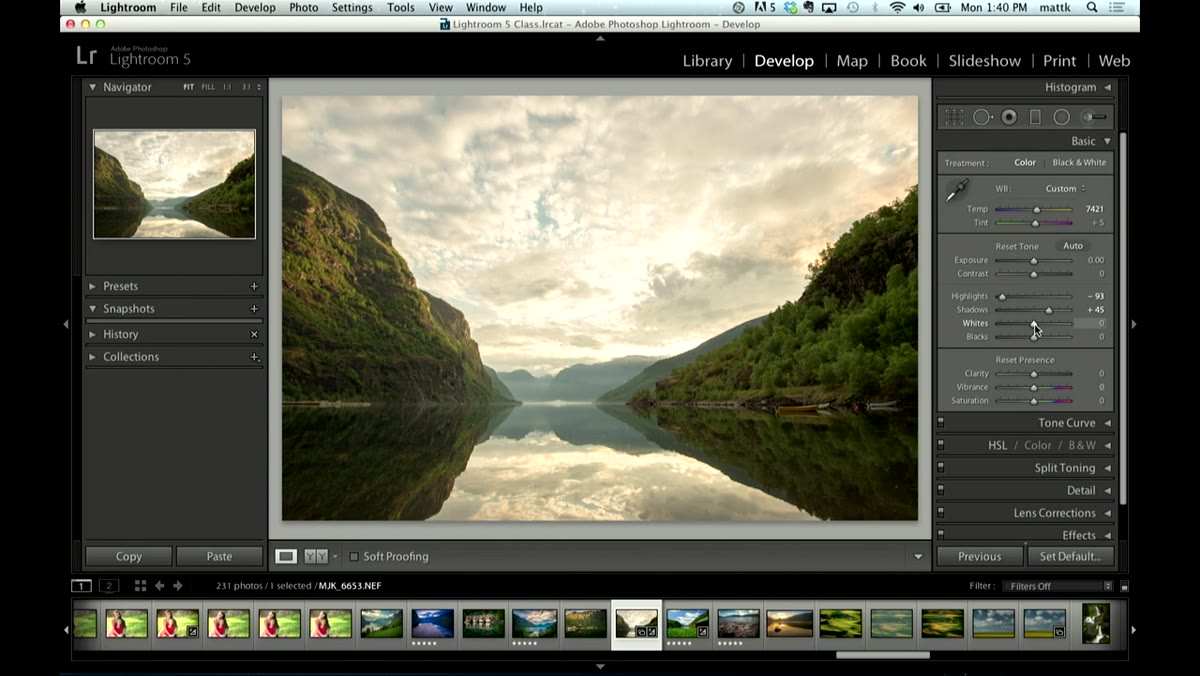 Whites slider clipping warning visible with option key held
This step is easy to skip and you shouldn’t. Hold Option on Mac (Alt on PC) and click the Whites slider. Your screen goes black. Drag the slider right until you see just a few small bright specks appear - those represent your true white point, the edge of clipping. Stop there.
Whites slider clipping warning visible with option key held
This step is easy to skip and you shouldn’t. Hold Option on Mac (Alt on PC) and click the Whites slider. Your screen goes black. Drag the slider right until you see just a few small bright specks appear - those represent your true white point, the edge of clipping. Stop there.
Do the same with Blacks, but drag left. A few dark specks appear against a white field, and that’s your black point set. These two moves lock in a full tonal range and give your image contrast without applying any artificial-looking curve. It takes about ten seconds and makes a real difference.
Step 3: Add Clarity and Saturation
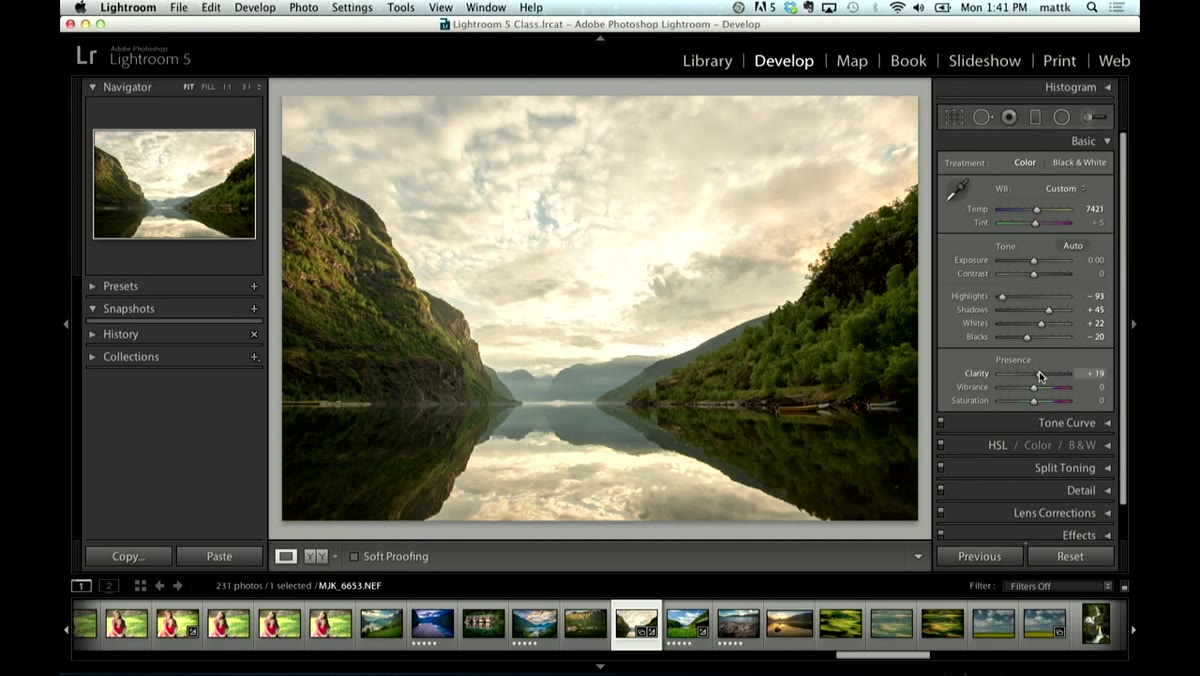 Clarity and Saturation sliders being adjusted in Basic panel
A modest Clarity boost - somewhere in the low-to-mid range, not cranked - adds edge contrast that brings out texture in clouds and foliage without making skin look like a topographic map. If your image doesn’t have people in it, you can push a little harder.
Clarity and Saturation sliders being adjusted in Basic panel
A modest Clarity boost - somewhere in the low-to-mid range, not cranked - adds edge contrast that brings out texture in clouds and foliage without making skin look like a topographic map. If your image doesn’t have people in it, you can push a little harder.
Saturation is the final global move here. The goal is not to make the colors shout, just to bring them back to what your eyes saw at the scene. A small push of 10 to 20 is usually enough. After these four global adjustments, you’ll have a solid base image, and you’ll also see clearly why the sky still needs more work.
Step 4: Apply the Graduated Filter to the Sky
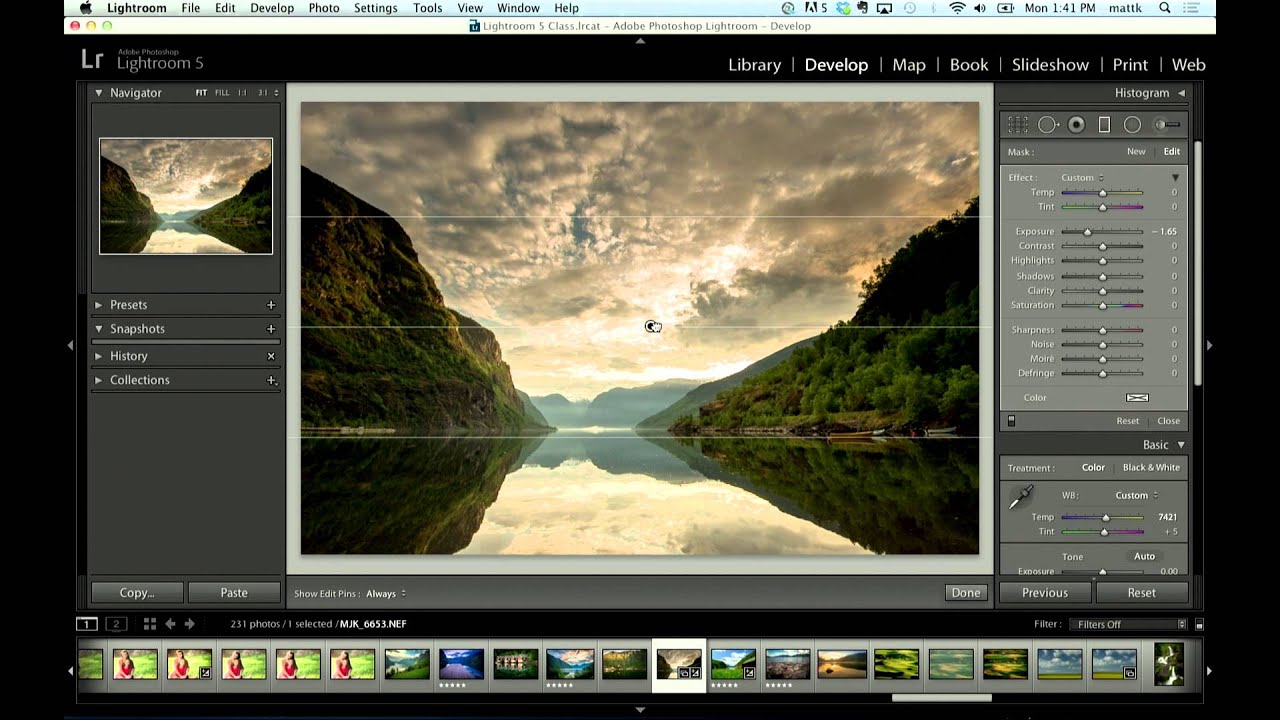
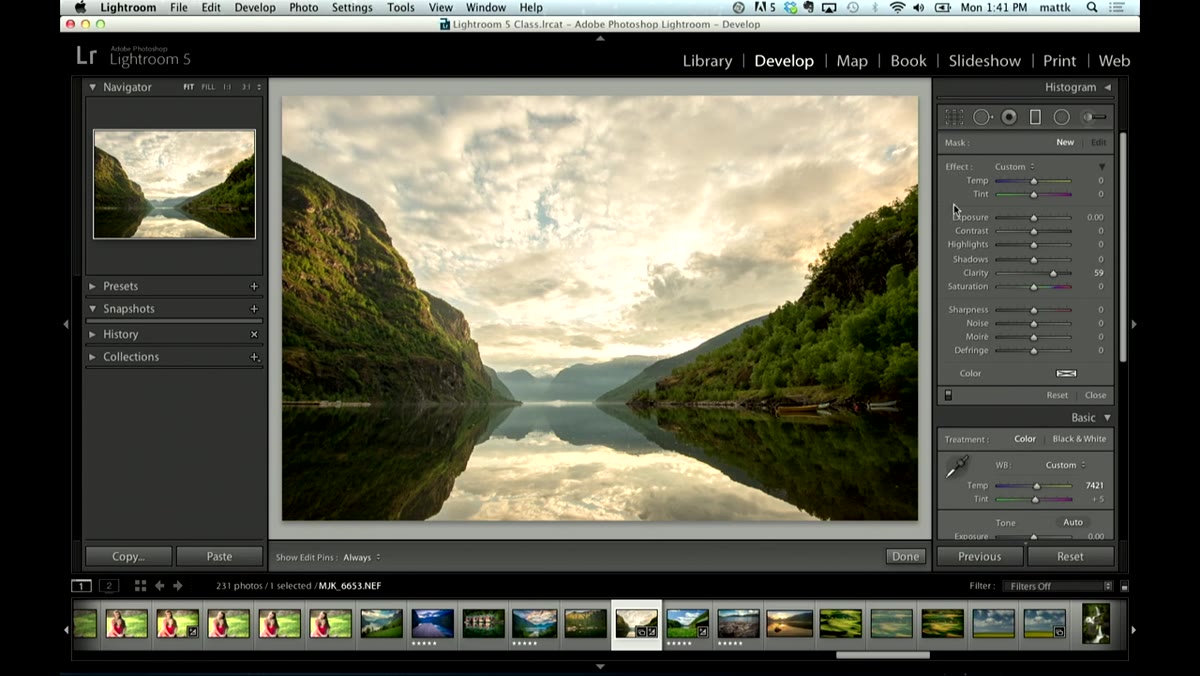 Graduated Filter being dragged downward from top of image
Select the Graduated Filter from the toolbar (it looks like a rectangle fading to nothing). Before you draw it, double-click the word “Effect” in the panel - this zeroes out all the sliders so you’re starting clean with no accidental leftover settings from a previous edit.
Graduated Filter being dragged downward from top of image
Select the Graduated Filter from the toolbar (it looks like a rectangle fading to nothing). Before you draw it, double-click the word “Effect” in the panel - this zeroes out all the sliders so you’re starting clean with no accidental leftover settings from a previous edit.
Pull the Exposure slider to the left. A value around -0.75 to -1.5 is a reasonable starting point depending on how blown out your sky is. Now click at the top of your image and drag downward across the sky. Lightroom will darken everything in that gradient area. The result is immediate and often impressive - but look at your treeline or any elements that cross into the gradient zone. They’ve gone dark too, and that’s the problem this whole technique exists to fix.
Step 5: Use the Shadow Slider to Recover the Foreground
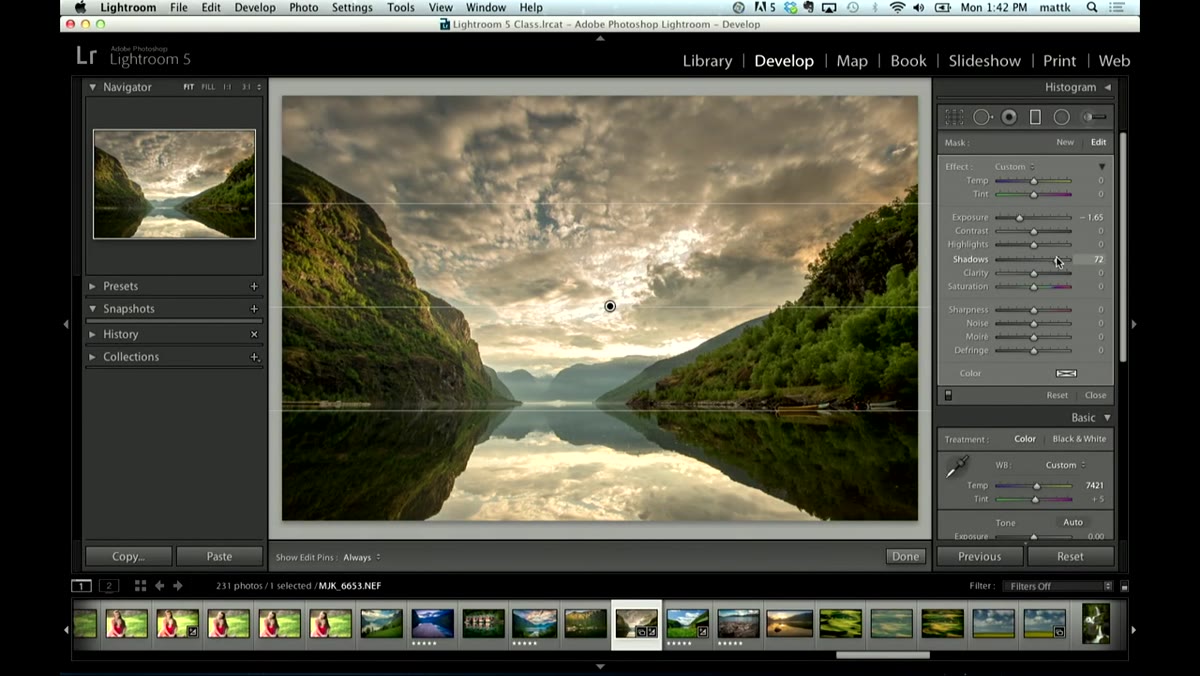 Shadow slider moved right while sky remains unaffected
Still inside the Graduated Filter’s settings, locate the Shadows slider and bring it up. Watch carefully what happens: the trees and foreground elements brighten back up, but the sky doesn’t move at all. This is the key insight Kloskowski is sharing. The Shadows slider specifically targets deep shadow tones, and a properly exposed sky doesn’t have any of those. So the slider rescues the areas that were unfairly darkened by the gradient while leaving your sky correction completely intact.
Shadow slider moved right while sky remains unaffected
Still inside the Graduated Filter’s settings, locate the Shadows slider and bring it up. Watch carefully what happens: the trees and foreground elements brighten back up, but the sky doesn’t move at all. This is the key insight Kloskowski is sharing. The Shadows slider specifically targets deep shadow tones, and a properly exposed sky doesn’t have any of those. So the slider rescues the areas that were unfairly darkened by the gradient while leaving your sky correction completely intact.
Don’t push Shadows so high that the foreground becomes brighter than it looks in the rest of the image. The goal is recovery, not overexposure. Bring it up until the treeline or dark edges look natural, then stop. What you’re left with is a darkened sky and a foreground that looks exactly the way it did before you touched the Graduated Filter.
One More Thing: This Works in Both Directions
The logic Kloskowski demonstrates here is actually a broader principle worth internalizing. Any time a local adjustment tool creates a side effect you don’t want, you don’t have to accept it or undo the whole edit. You can counteract it with a second slider inside that same adjustment layer.
I’ve used this with the Highlights slider inside a Graduated Filter to recover bright patches in a foreground that I was trying to warm up with a Temperature boost. I’ve also used Dehaze inside a radial filter on just a sky, then walked back the Exposure drop it caused. The tools inside Lightroom’s local adjustments aren’t just for adding things - they’re also for subtracting unintended consequences. Once you start thinking about it that way, the Graduated Filter goes from a blunt instrument to something genuinely surgical.
The single most important takeaway here is that the Shadows slider in a Graduated Filter affects only the dark areas inside the gradient zone - not the bright sky. That one fact, once understood, makes the Graduated Filter dramatically more useful on any image where a hard horizon line doesn’t exist. Apply the sky correction you actually want, then use Shadows to clean up the collateral damage.
Watch the full tutorial on YouTube to see Kloskowski demonstrate the before-and-after in real time - seeing that treeline bounce back while the sky stays dark is one of those small moments that makes you want to go edit something immediately.
Comments
Leave a Comment