
There’s a specific kind of frustration that comes with a technically perfect shot that has a stranger’s elbow in the corner, or a lighting assistant visible in the background. I’ve been there more times than I care to admit. Back when I was editing press photos for my band on a zero-dollar budget, every person in the background of a shot was a problem I had to solve in software, usually badly, usually late at night. The tools back then were clunky enough that you could almost always tell where someone had been removed. That era is over.
In this Aaron Nace (PHLEARN) tutorial, Watch the full tutorial on YouTube, Aaron walks through Lightroom Classic’s AI-powered object removal tool using a real RAW portrait session where two crew members holding lighting equipment need to be completely erased from the final image. The results are genuinely jaw-dropping, and the process is fast enough that you’ll wonder why you ever touched the clone stamp tool.
What makes this tutorial worth your time is that Aaron doesn’t just show you the happy path. He also points out where the older tools fall short, and he covers how to refine your selection when you inevitably miss a shadow or a stray reflector edge. Let me walk you through the whole thing.
Step 1: Open the Develop Module and Find the Remove Tool
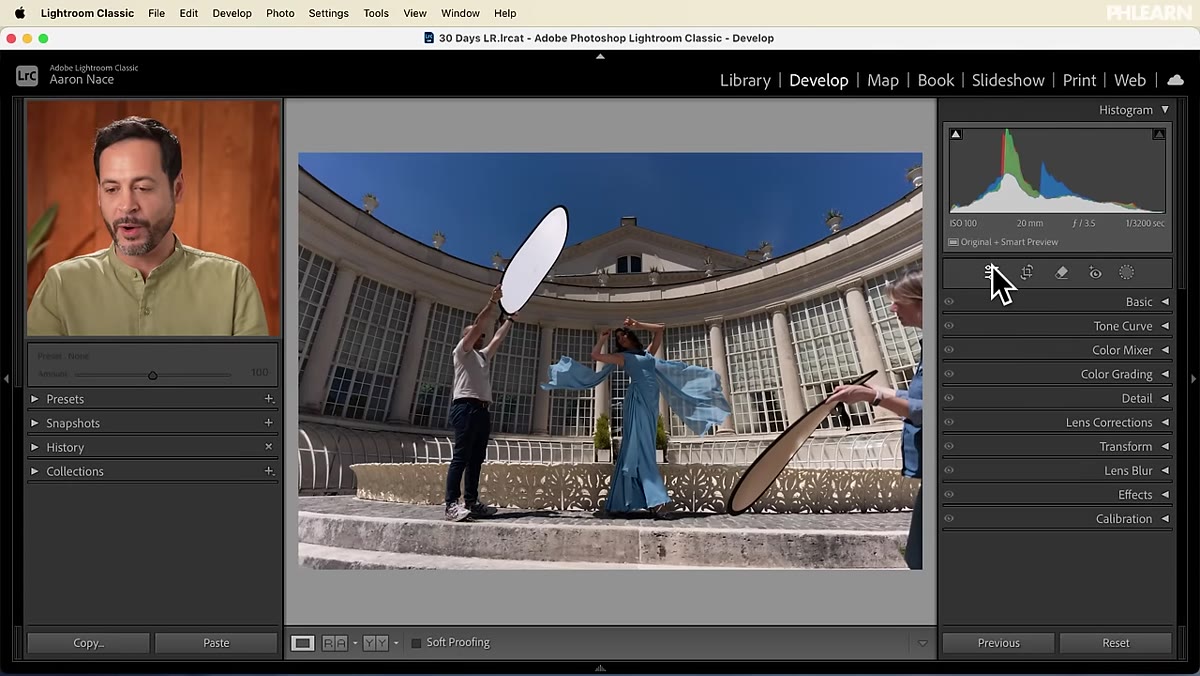 Navigating to the Remove tool inside the Develop module
Start in Lightroom Classic with your RAW file open. Head to the Develop module, then look for the healing and removal tools in the toolbar on the right side. The tool you want is labeled “Remove.” You can also get there fast by pressing Q on your keyboard. Either way works.
Navigating to the Remove tool inside the Develop module
Start in Lightroom Classic with your RAW file open. Head to the Develop module, then look for the healing and removal tools in the toolbar on the right side. The tool you want is labeled “Remove.” You can also get there fast by pressing Q on your keyboard. Either way works.
Before you paint a single pixel, check that “Use Generative AI” is toggled on. This is the step most people miss when they first try this feature, and it makes the difference between a result that looks like a vintage content-aware fill and one that looks like the person was never there.
Step 2: Paint Over the Object You Want to Remove
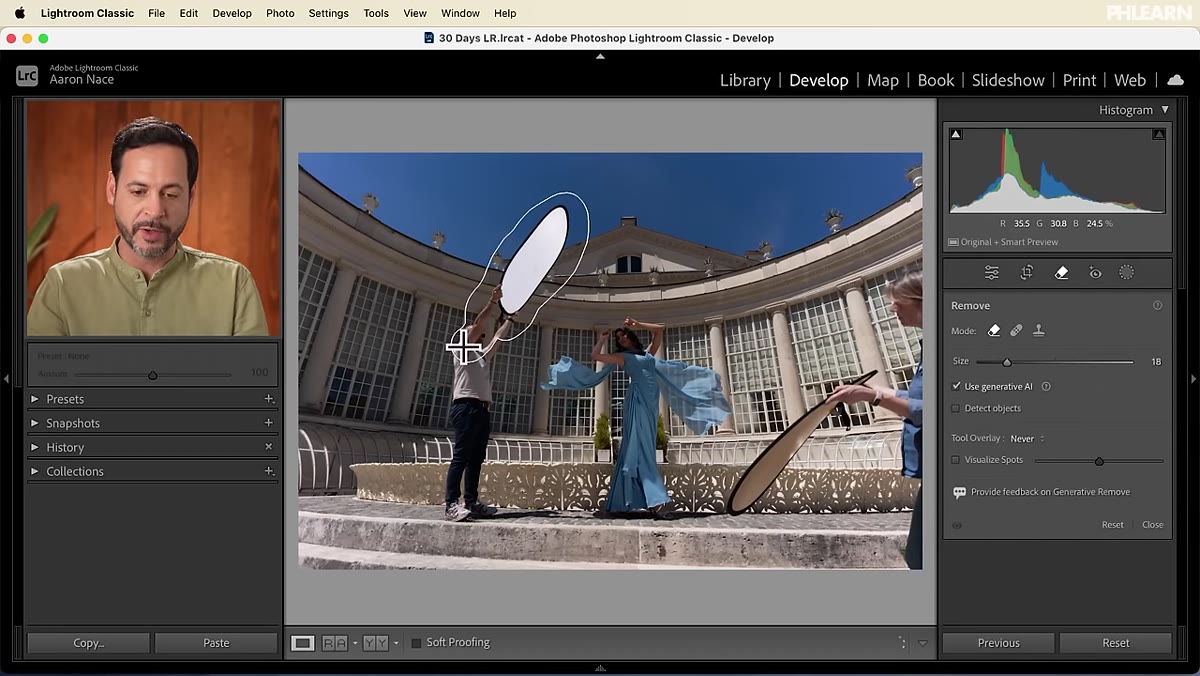 Red overlay brush covering a person and their shadow
With the Remove tool active, use your brush to paint over whatever you want gone. The bracket keys on your keyboard, the open bracket and close bracket, adjust brush size quickly without breaking your workflow. Paint generously. You don’t need to be surgical here.
Red overlay brush covering a person and their shadow
With the Remove tool active, use your brush to paint over whatever you want gone. The bracket keys on your keyboard, the open bracket and close bracket, adjust brush size quickly without breaking your workflow. Paint generously. You don’t need to be surgical here.
One thing Aaron emphasizes that I’d underline twice: include the shadow. If you’re removing a person and you leave their shadow on the ground, the result will immediately look wrong no matter how good the AI fill is. Paint a little past the edges of what you’re removing. The AI handles overlap well, and being too conservative is the more common mistake.
Step 3: Click Remove and Let the AI Do Its Thing
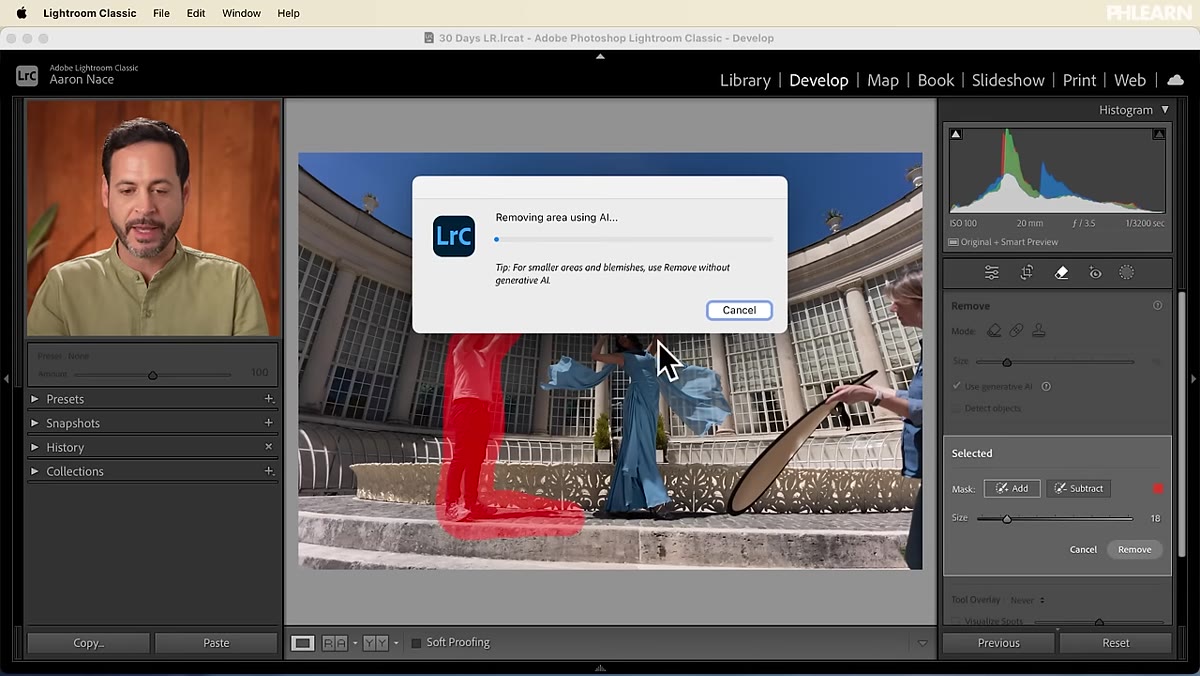 Lightroom processing the painted selection with AI removal
Once your selection looks solid, you’ll see a red overlay showing exactly what’s masked. Hit the “Remove” button and give Lightroom a few seconds to process. The AI analyzes the surrounding image content and synthesizes a fill that matches the background.
Lightroom processing the painted selection with AI removal
Once your selection looks solid, you’ll see a red overlay showing exactly what’s masked. Hit the “Remove” button and give Lightroom a few seconds to process. The AI analyzes the surrounding image content and synthesizes a fill that matches the background.
The first time I tried this on a complex background, I genuinely stopped and looked at the screen for a moment. It fills in grass, sky, or whatever happens to be behind your subject with a coherence that the old spot healing tool couldn’t touch. For Aaron’s image, it replaced two people and all their gear with a clean, natural-looking outdoor scene.
Step 4: Refine the Selection If You Missed Anything
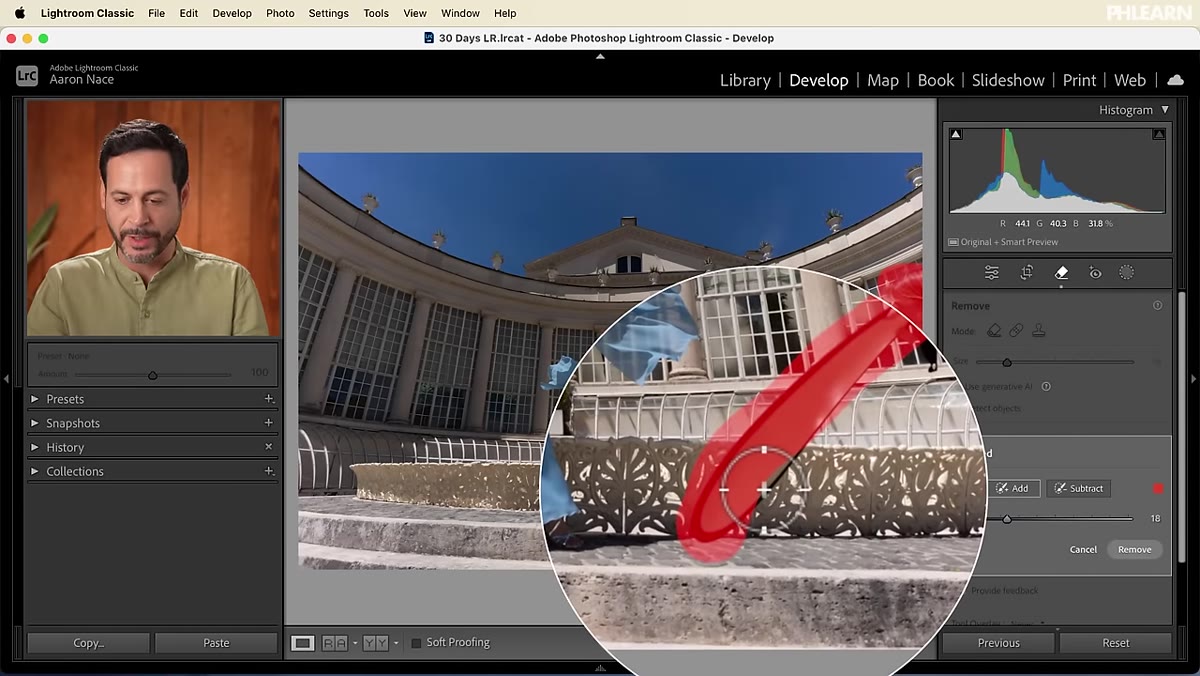 Using the Add option to extend the selection to a missed reflector edge
If you look at your result and notice a sliver of something still visible, like the edge of a reflector or a bit of shadow you didn’t catch, don’t restart. Switch the brush mode from the default to “Add” and paint over the missed area. This extends your existing mask rather than creating a new one.
Using the Add option to extend the selection to a missed reflector edge
If you look at your result and notice a sliver of something still visible, like the edge of a reflector or a bit of shadow you didn’t catch, don’t restart. Switch the brush mode from the default to “Add” and paint over the missed area. This extends your existing mask rather than creating a new one.
This is a small workflow detail that saves real time. You’re not undoing and repainting the whole thing. You’re just patching the gap. After adding to your selection, click Remove again and the AI will re-process the updated mask.
Step 5: Browse the AI Variations
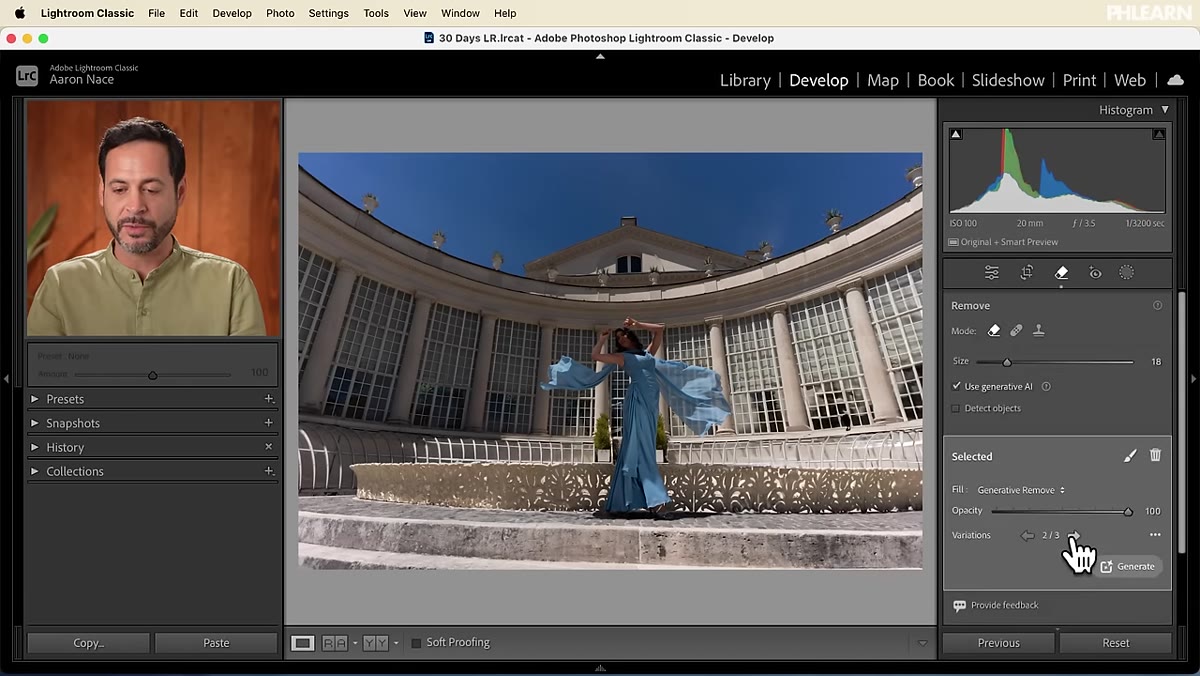 Clicking through multiple AI-generated variations of the removed area
Lightroom’s generative AI doesn’t just hand you one answer. It generates a few different versions of the fill, and you can cycle through them to pick the one that looks most natural in context. This works similarly to how Photoshop’s generative fill presents options.
Clicking through multiple AI-generated variations of the removed area
Lightroom’s generative AI doesn’t just hand you one answer. It generates a few different versions of the fill, and you can cycle through them to pick the one that looks most natural in context. This works similarly to how Photoshop’s generative fill presents options.
In practice, the first variation is usually good enough. But if you’re working with a tricky background, like a scene with repeating patterns or strong directional light, flipping through the options can surface one that tiles better or handles the lighting more convincingly.
Step 6: Do Your Basic Edits
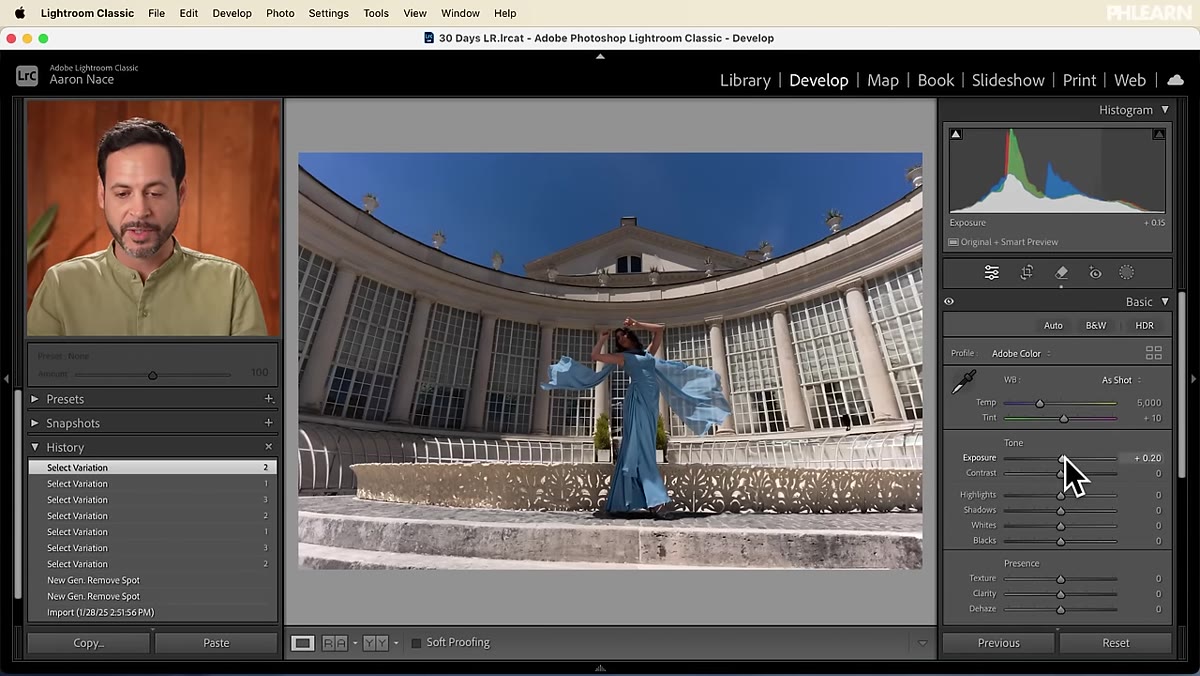 Adjusting Exposure and Vibrance sliders in the Basic panel
With the distractions removed, Aaron moves into the Basic panel to actually edit the photo. He brings up the exposure slightly, lifts the shadows to open up the darker areas of the image, and increases Vibrance to pull more saturation out of the sky without blowing out skin tones. These are bread-and-butter moves but they matter here because the object removal changes the overall feel of the image and you often need to rebalance after.
Adjusting Exposure and Vibrance sliders in the Basic panel
With the distractions removed, Aaron moves into the Basic panel to actually edit the photo. He brings up the exposure slightly, lifts the shadows to open up the darker areas of the image, and increases Vibrance to pull more saturation out of the sky without blowing out skin tones. These are bread-and-butter moves but they matter here because the object removal changes the overall feel of the image and you often need to rebalance after.
The slash key above Enter toggles a before-and-after comparison. Use it after your removal pass before you touch any other sliders. It helps you see whether the removal actually needs any touching up in isolation, before you start second-guessing yourself mid-grade.
Step 7: Use Masking to Selectively Brighten Your Subject
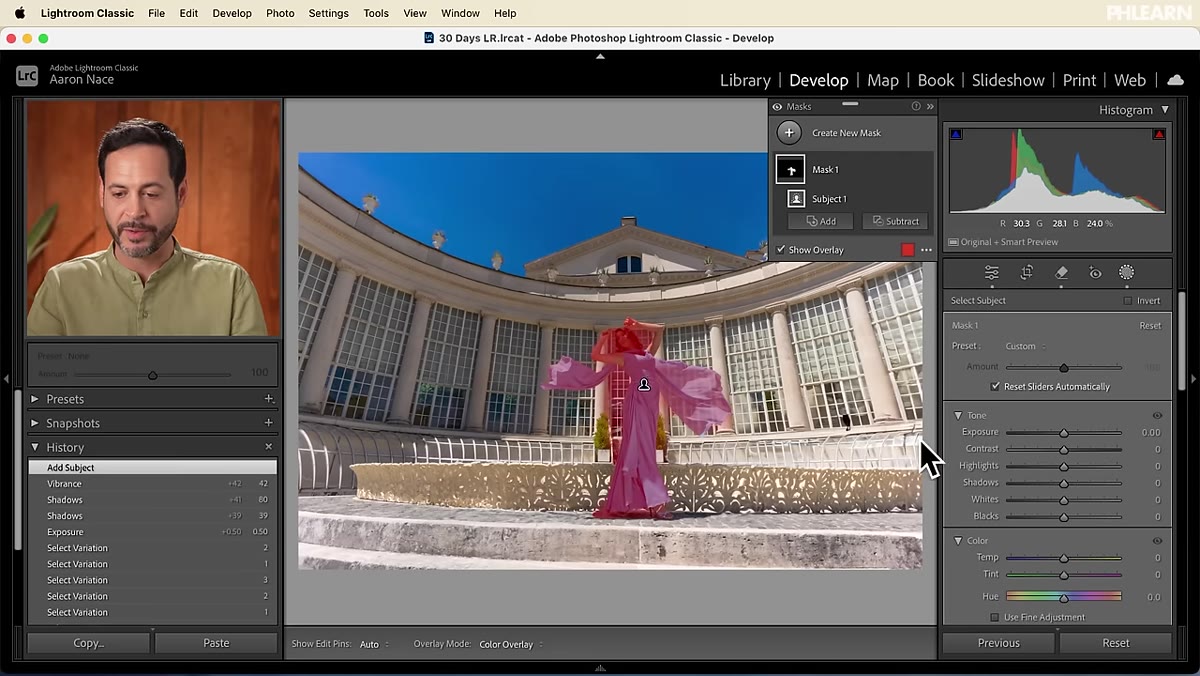 AI subject mask applied with Exposure adjustment in Masking panel
The last step Aaron covers is using Lightroom’s masking panel to select just the subject. Click into Masking, choose “Select Subject,” and Lightroom’s AI will trace around your main subject automatically. From there, you can apply a small positive exposure adjustment, just enough to separate them from the background without making the edit obvious.
AI subject mask applied with Exposure adjustment in Masking panel
The last step Aaron covers is using Lightroom’s masking panel to select just the subject. Click into Masking, choose “Select Subject,” and Lightroom’s AI will trace around your main subject automatically. From there, you can apply a small positive exposure adjustment, just enough to separate them from the background without making the edit obvious.
This is the kind of targeted adjustment that used to require a trip to Photoshop. Now it lives right here in the same panel you just used to remove people from the image. The workflow stays in one place, which keeps the editing momentum going.
A Note From My Own Workflow
Aaron mentions the spot healing brush and clone stamp briefly before dismissing them in favor of the AI remove tool. I agree with that call for complex removals. But I’ll add a caveat: for tiny sensor dust spots or a single small blemish on a clean background, the spot healing brush is still faster because it skips the AI processing time. It’s not that the old tools are broken. It’s that they have a narrower use case now. Know when to reach for which one.
The single most important takeaway here is the “Use Generative AI” toggle. Everything else in this workflow, brush size, adding to selections, browsing variations, builds on that foundation. If that checkbox is off, you’re using a significantly weaker tool and you might walk away thinking AI removal is overhyped. It’s not. You just need to turn it on.
Watch the full tutorial on YouTube to follow along with Aaron’s actual footage and see the before-and-after comparison in real time.
Comments
Leave a Comment