
Most photographers treat Lightroom like a one-trick pony. Import, edit, export. Repeat. But I’ve found that some of its most useful features have nothing to do with curves, color grading, or any of the things we usually talk about on this site. I use Lightroom as a full file management hub, and honestly, if I lost access to every other feature tomorrow, the batch rename tool alone would keep me subscribed.
In this Aaron Nace (PHLEARN) tutorial from his 30 Days of Lightroom series, he walks through exactly this idea. Watch the full tutorial on YouTube before or alongside this breakdown. The premise is simple: you don’t need to edit a single photo in Lightroom for it to earn its place in your workflow. If you’ve ever delivered a folder of files named “IMG_4872” through “IMG_4901” to a client and felt a quiet wave of embarrassment, this walkthrough is for you.
The scenario Nace uses is a set of vacation photos from a trip to Greece. Unedited JPEGs, default camera filenames, zero context baked into the file names. He imports them into Lightroom with the sole goal of getting them renamed and organized. No sliders touched. No color work. Just clean, logical file names that mean something to a real human being. Here’s how to do it yourself.
Step 1: Import Your Images With the “Add” Option
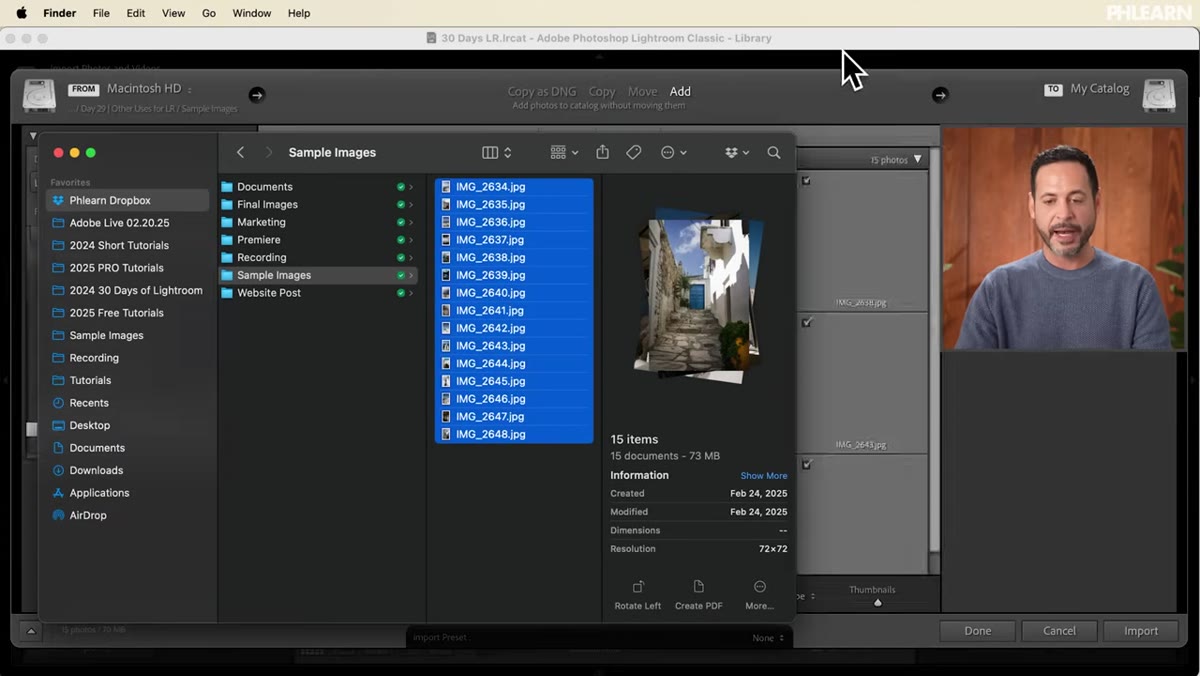 Lightroom import screen with Add option selected
Open Lightroom and locate your folder of images. Click and drag the files directly into the Library panel, or use File > Import. When the import dialog appears, choose “Add” rather than “Move” or “Copy.” This keeps your files exactly where they are on your hard drive. You’re not reorganizing folder structure right now. You’re just getting Lightroom to see the files so you can work with them.
Lightroom import screen with Add option selected
Open Lightroom and locate your folder of images. Click and drag the files directly into the Library panel, or use File > Import. When the import dialog appears, choose “Add” rather than “Move” or “Copy.” This keeps your files exactly where they are on your hard drive. You’re not reorganizing folder structure right now. You’re just getting Lightroom to see the files so you can work with them.
This matters because a lot of people over-engineer the import step. If you’re only here to rename, you don’t need to build a whole folder hierarchy. Add them, let Lightroom catalog them, and move on.
Step 2: Select All Images in the Library
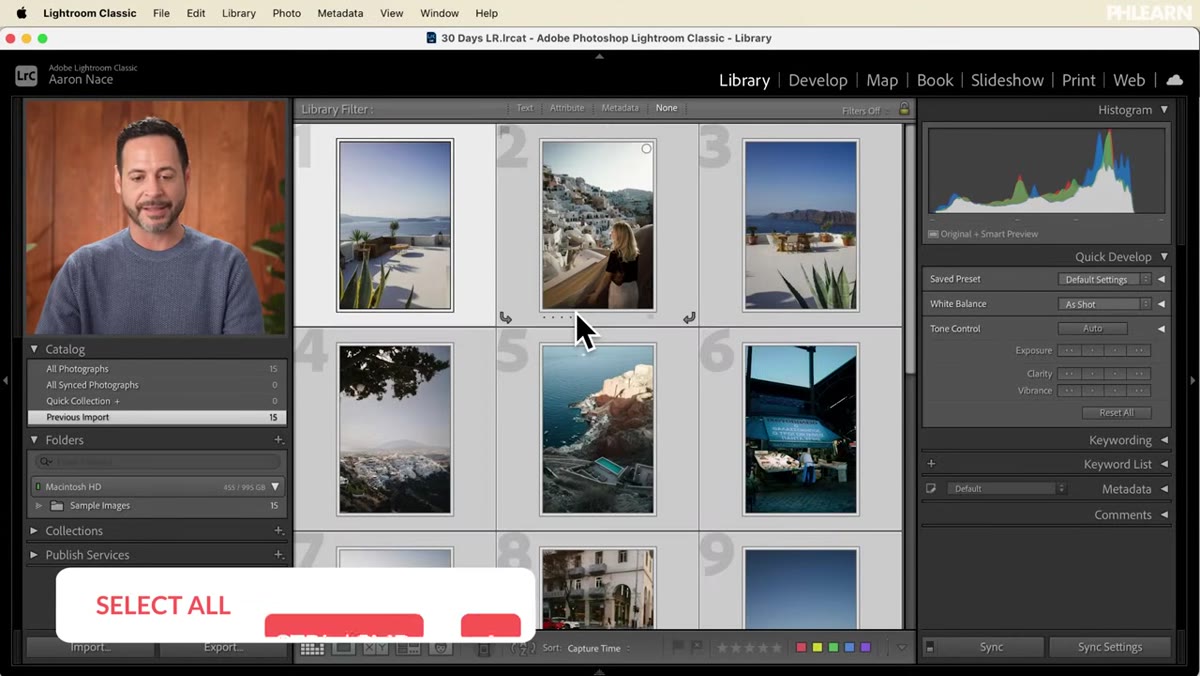 All images selected in Lightroom grid view
Once your images are imported, make sure you’re in the Library module and switch to Grid view if you aren’t already. Then hit Ctrl+A (Windows) or Command+A (Mac) to select everything. You’ll see all the thumbnails highlighted. This is your batch, and every rename operation you run next will apply to all of them simultaneously.
All images selected in Lightroom grid view
Once your images are imported, make sure you’re in the Library module and switch to Grid view if you aren’t already. Then hit Ctrl+A (Windows) or Command+A (Mac) to select everything. You’ll see all the thumbnails highlighted. This is your batch, and every rename operation you run next will apply to all of them simultaneously.
If you only want to rename a subset of the shoot, hold Shift and click to select a range, or Ctrl/Command-click to cherry-pick individual files. The rename tool respects whatever selection you have active.
Step 3: Open the Rename Photos Dialog
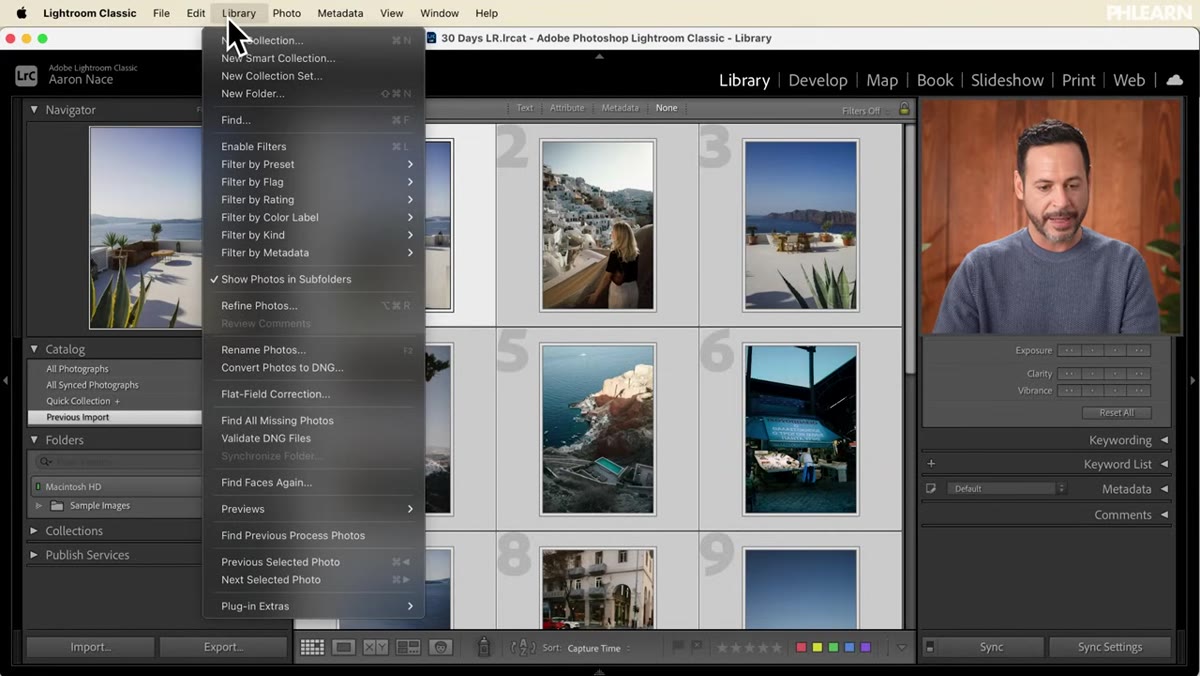 Library menu open showing Rename Photos option
With your images selected, go to Library in the top menu bar and choose “Rename Photos.” The keyboard shortcut is F2, and once you’ve done this a few times, you’ll start using the shortcut without thinking. A dialog box will appear with a dropdown labeled “File Naming.” This is where most people stop, pick something basic like “Custom Name - Sequence,” and call it a day. Don’t do that. Click “Edit” next to the dropdown and open the File Name Template Editor.
Library menu open showing Rename Photos option
With your images selected, go to Library in the top menu bar and choose “Rename Photos.” The keyboard shortcut is F2, and once you’ve done this a few times, you’ll start using the shortcut without thinking. A dialog box will appear with a dropdown labeled “File Naming.” This is where most people stop, pick something basic like “Custom Name - Sequence,” and call it a day. Don’t do that. Click “Edit” next to the dropdown and open the File Name Template Editor.
Step 4: Build a Custom Naming Template
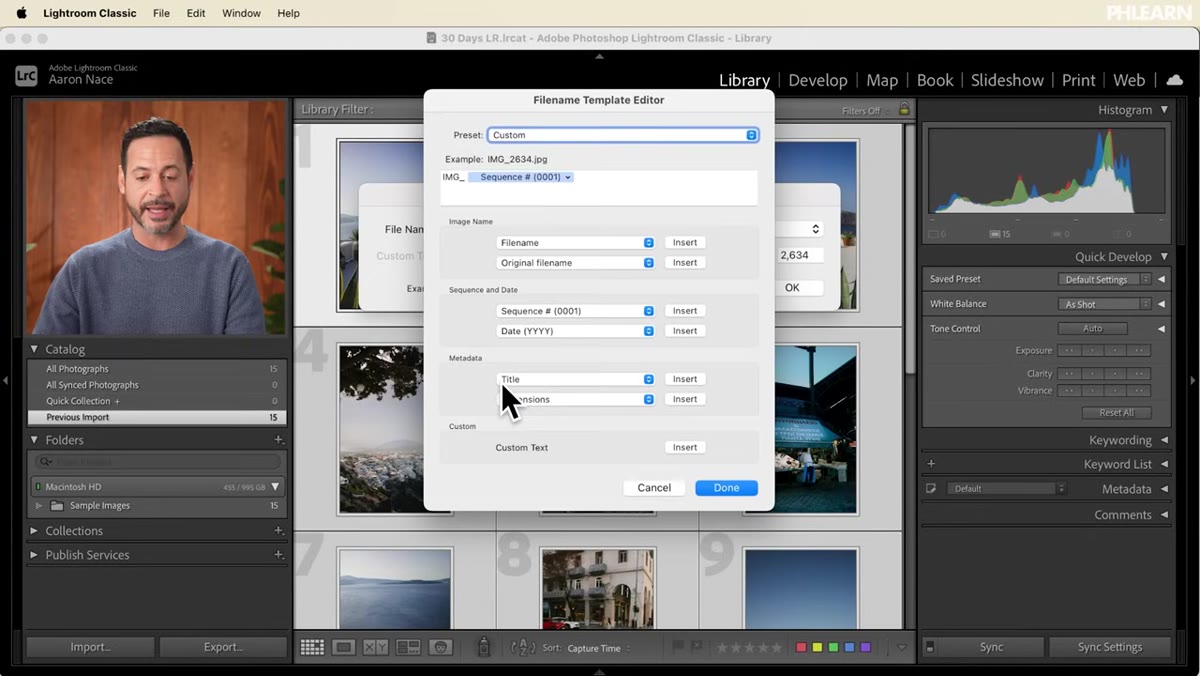 File Name Template Editor open with fields visible
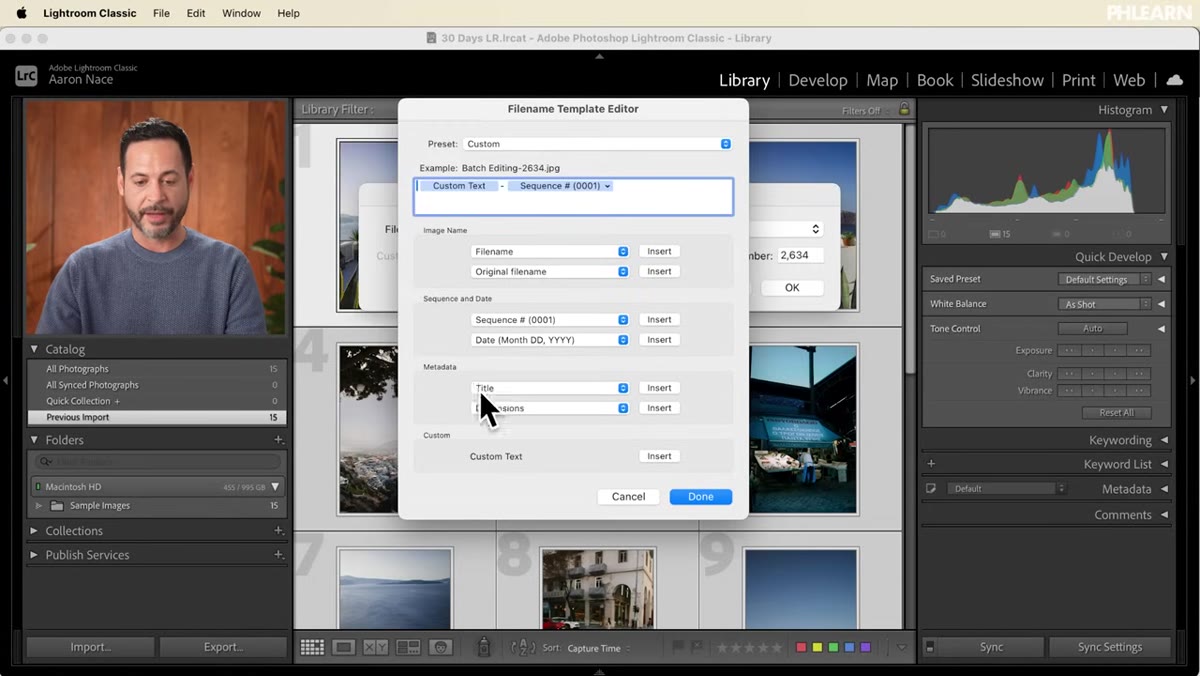
The File Name Template Editor is genuinely one of the most underappreciated corners of Lightroom. At first glance it looks intimidating, but the logic is straightforward. Whatever you type or insert into the template field becomes part of every file name. Clear out whatever is there by default first, then start building from scratch.
File Name Template Editor open with fields visible
The File Name Template Editor is genuinely one of the most underappreciated corners of Lightroom. At first glance it looks intimidating, but the logic is straightforward. Whatever you type or insert into the template field becomes part of every file name. Clear out whatever is there by default first, then start building from scratch.
Nace demonstrates a few different combinations here. You can type literal text, like the name of a project or client. You can insert tokens for date (year, month, day in various formats), custom text (which you fill in at rename time), and sequence numbers with configurable digit counts. A four-digit sequence like “0001” is a good default since it keeps files sorting correctly even if you eventually have hundreds of images. Combine these however your workflow demands. For the Greece example, a template of “CustomText-Sequence” and then typing “Greece” at the rename step produces files like Greece-0001.jpg, Greece-0002.jpg, and so on.
Step 5: Save Your Template and Set the Starting Number
 Rename dialog with custom text field and start number set
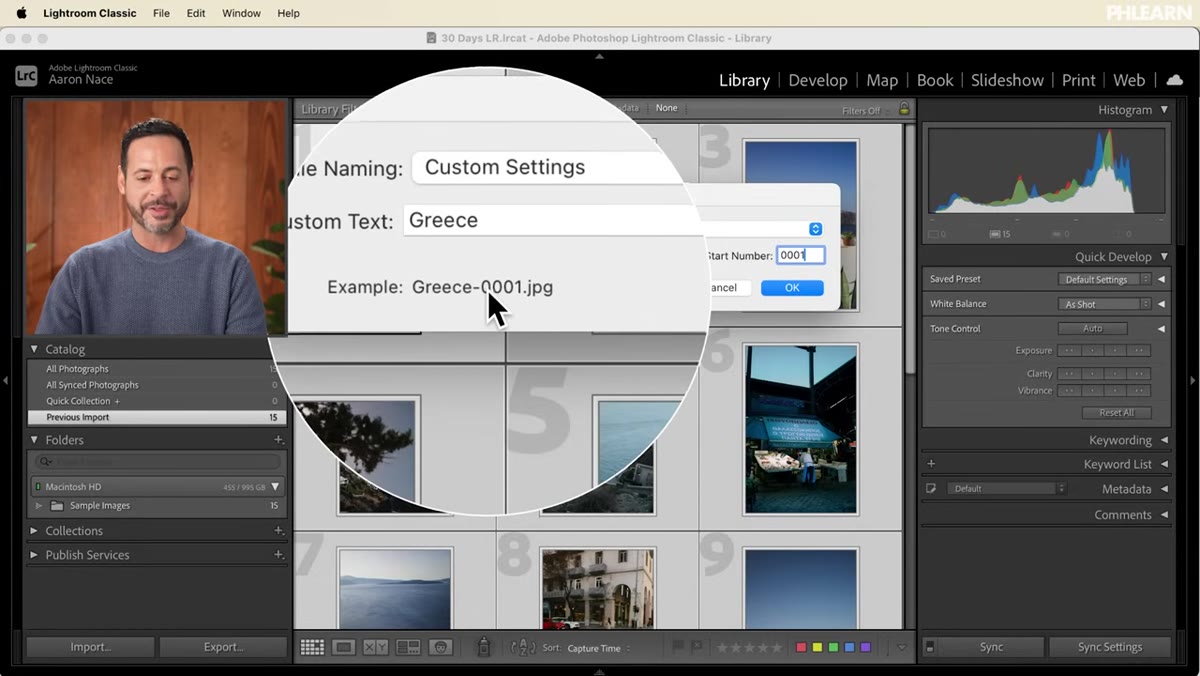
After you’ve built your template in the editor, click “Done” to return to the Rename Photos dialog. You’ll now see your template active in the File Naming dropdown. Below it, you’ll see fields for custom text (if you used that token) and a start number for your sequence.
Rename dialog with custom text field and start number set
After you’ve built your template in the editor, click “Done” to return to the Rename Photos dialog. You’ll now see your template active in the File Naming dropdown. Below it, you’ll see fields for custom text (if you used that token) and a start number for your sequence.
Type your project name or descriptor into the custom text field. For the start number, “001” works for most shoots, but if you’re renaming a second batch from the same session, you can set it to pick up where the previous batch left off. This is the kind of small detail that prevents duplicate file names from causing headaches later.
Step 6: Run the Rename and Verify
 Lightroom grid showing newly renamed files
Click OK and watch Lightroom rename every selected file in seconds. Then click on one of the images and press I to pull up the image info overlay. You’ll see the new file name confirmed right there. No need to open Finder or Explorer to double-check. Lightroom is showing you the actual file name as it now exists on disk.
Lightroom grid showing newly renamed files
Click OK and watch Lightroom rename every selected file in seconds. Then click on one of the images and press I to pull up the image info overlay. You’ll see the new file name confirmed right there. No need to open Finder or Explorer to double-check. Lightroom is showing you the actual file name as it now exists on disk.
At this point, your photos are renamed, still in their original location, and ready to hand off, archive, or import into a new project with a name that actually communicates what they are.
A Note From My Own Workflow: Don’t Sleep on Presets for Naming Templates
I’ve built about a dozen different naming templates in Lightroom over the years, each one saved as its own preset. I have one for client portraits, one for band shoots, one for product work, and one called “Archive” that front-loads the year so everything sorts cleanly in long-term storage. Each preset is named after a song, which is just how my brain works, but the point is that building these templates once means you never have to think about it again.
The bigger insight from Nace’s tutorial is permission to use Lightroom as infrastructure, not just an editing app. You might import a folder of images, batch rename them, and immediately export them to a client folder without touching a single slider. That is a completely valid use of the tool. I’ve had shoots where that was the entire job, and Lightroom handled it faster and more reliably than any Finder rename script or third-party app I’ve tried.
The single most important thing to take away: Lightroom’s value is not locked behind its editing features. The organizational layer, especially batch renaming with the File Name Template Editor, is powerful enough to justify the subscription on its own. Build a template once, save it, and every future project benefits from it.
Watch the full tutorial on YouTube to see Nace walk through the entire process live, including a few naming combinations worth stealing for your own projects.
Comments
Leave a Comment