Every few months I get the same DM from someone who just discovered Lightroom: “Can I blur the background without going into Photoshop?” For years, my honest answer was no. You could drag Texture and Clarity into the negatives and get something that looked like a photo taken through a shower door, but nothing that actually simulated a shallow depth of field. That was always a round-trip-to-Photoshop situation.
The October 2023 update to Lightroom Classic changes that answer, at least partially. Adobe added a Lens Blur panel to the Develop module, and it is genuinely useful for certain images. In this Matt Kloskowski tutorial, he walks through exactly what the new panel does, how the depth map works, and the realistic expectations you should bring to it. I spent an afternoon putting it through its paces on my own shoots, and what follows is my breakdown of the feature along with a few observations Matt didn’t cover.
Watch the full tutorial on YouTube
Step 1: Update Lightroom Classic to Version 13
 Creative Cloud updater showing Lightroom Classic version 13
Before you go hunting for this panel, make sure you are actually on Lightroom Classic version 13. Open the Creative Cloud desktop app, click “Check for Updates,” and let it do its thing. If the update isn’t showing up, restart the Creative Cloud app entirely. If it still doesn’t appear, restart your computer. Adobe rolls updates out in waves, so there can be a short delay before it reaches everyone.
Creative Cloud updater showing Lightroom Classic version 13
Before you go hunting for this panel, make sure you are actually on Lightroom Classic version 13. Open the Creative Cloud desktop app, click “Check for Updates,” and let it do its thing. If the update isn’t showing up, restart the Creative Cloud app entirely. If it still doesn’t appear, restart your computer. Adobe rolls updates out in waves, so there can be a short delay before it reaches everyone.
Once you confirm version 13 is installed, open any RAW file in the Develop module. The Lens Blur panel lives in the panel stack on the right side, and you will find it below the standard tone and color panels.
Step 2: Enable the Lens Blur Panel and Let Lightroom Analyze the Photo
 Lens Blur panel with Apply button and blur amount slider visible
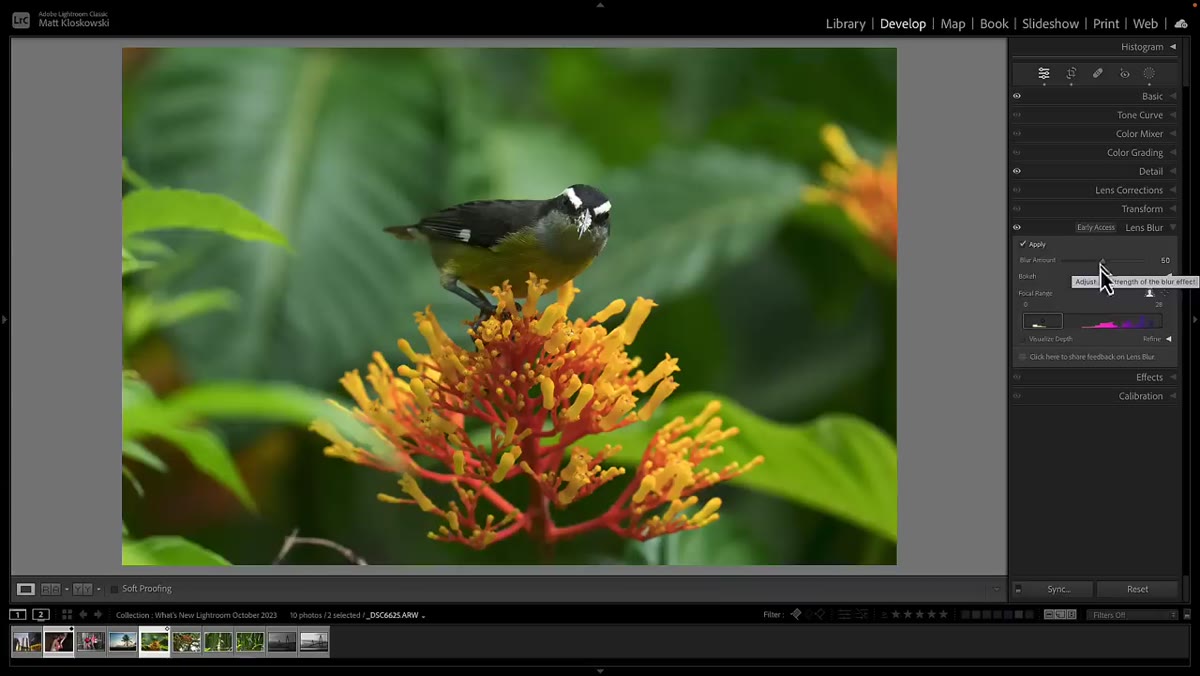
Click the “Apply” button inside the Lens Blur panel to activate it. The first thing Lightroom does is analyze the image to build a depth map behind the scenes. This is not instantaneous, especially on complex scenes, so give it a second. The depth map is what tells Lightroom what is close to the camera versus what is farther away, and it is the backbone of everything this panel does.
Lens Blur panel with Apply button and blur amount slider visible
Click the “Apply” button inside the Lens Blur panel to activate it. The first thing Lightroom does is analyze the image to build a depth map behind the scenes. This is not instantaneous, especially on complex scenes, so give it a second. The depth map is what tells Lightroom what is close to the camera versus what is farther away, and it is the backbone of everything this panel does.
Right away, manage your expectations based on your source photo. Kloskowski is direct about this: the tool works best when your photo already has some natural separation between subject and background. If you are starting with a flat, cluttered background shot on a wide-angle lens at f/8, the AI is going to struggle to build a believable depth map, and the result will look artificial.
Step 3: Adjust Blur Amount
 Blur amount slider being dragged with before/after visible
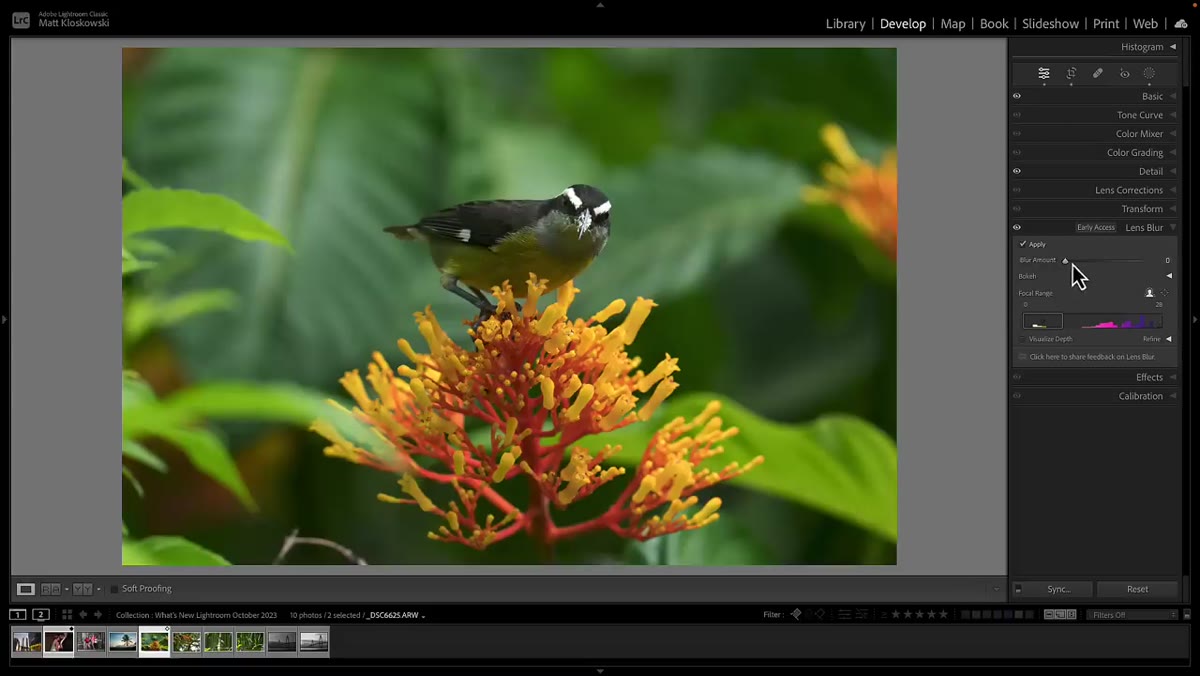
The Blur Amount slider runs from 0 to 100. Zero means nothing has changed. One hundred is the maximum the panel will apply. For most portraits and subjects, I find somewhere between 20 and 50 gives you the most natural result. Push it past 60 or 70 and the edges around your subject start to look like they were cut out with a dull pair of scissors.
Blur amount slider being dragged with before/after visible
The Blur Amount slider runs from 0 to 100. Zero means nothing has changed. One hundred is the maximum the panel will apply. For most portraits and subjects, I find somewhere between 20 and 50 gives you the most natural result. Push it past 60 or 70 and the edges around your subject start to look like they were cut out with a dull pair of scissors.
The temptation is to drag it all the way up to see what happens. Go ahead and do that once to understand the ceiling, then pull it back to where it actually looks like a lens did the work and not a slider.
Step 4: Choose Your Bokeh Shape
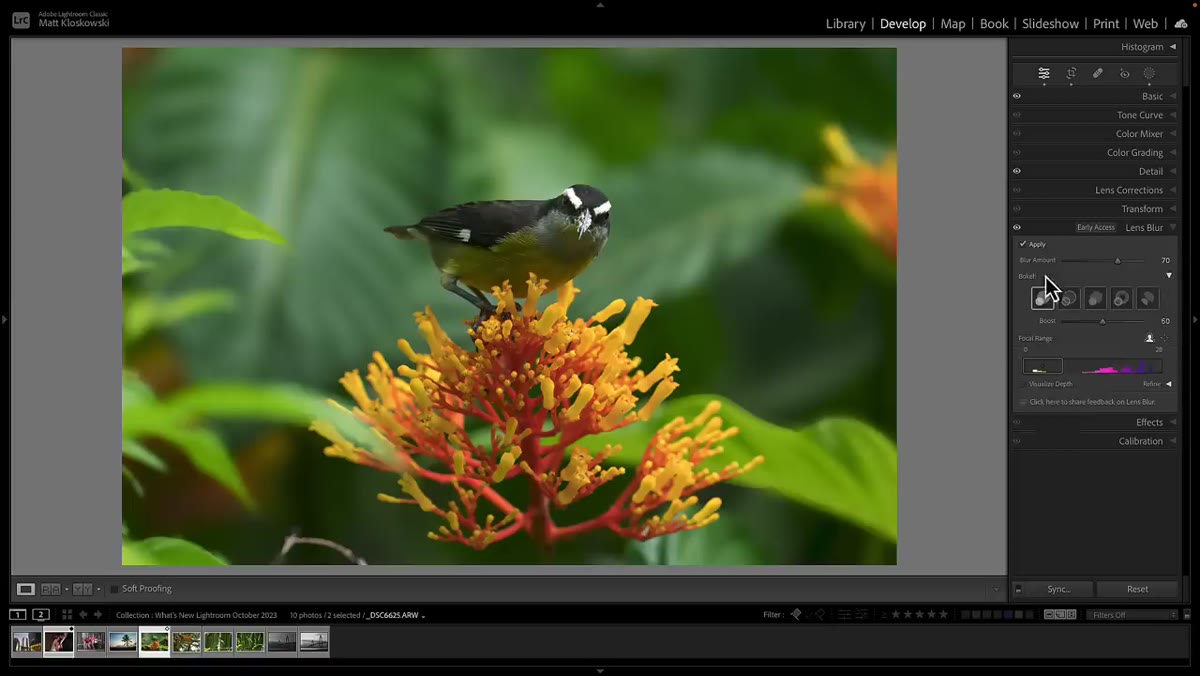 Bokeh shape selector panel showing various aperture blade options
Below the blur amount, there is a Bokeh section where you can select the shape of the out-of-focus highlights. The options represent different aperture blade configurations, from circular to hexagonal to more geometric shapes. The default is the most natural-looking option for the vast majority of photos, and Kloskowski is candid that he rarely changes it.
Bokeh shape selector panel showing various aperture blade options
Below the blur amount, there is a Bokeh section where you can select the shape of the out-of-focus highlights. The options represent different aperture blade configurations, from circular to hexagonal to more geometric shapes. The default is the most natural-looking option for the vast majority of photos, and Kloskowski is candid that he rarely changes it.
Where this becomes interesting is in images where you have distinct light sources in the background, like street lights at night or sunlight filtering through leaves. In those scenarios, swapping the bokeh shape can make the blur feel more intentional. For a standard portrait in daylight, leave it on the default and move on.
Step 5: Set Your Focal Range Using Subject Focus or Point Focus
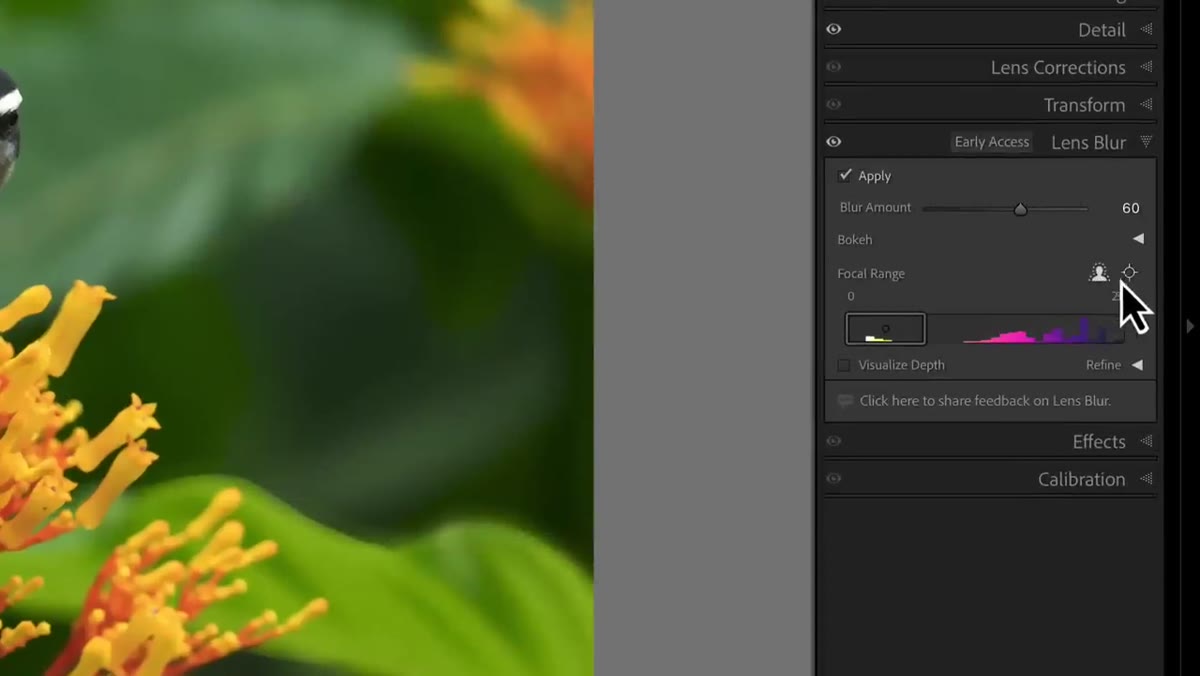 Focal range section showing Subject Focus and Point Focus toggle options
This is where the real decision-making happens. The panel gives you two ways to tell Lightroom where “in focus” should be. Subject Focus uses the same AI detection as Lightroom’s Select Subject masking feature, automatically identifying the main subject and keeping them sharp while blurring everything else. Point Focus lets you click anywhere in the image to manually define the focal point.
Focal range section showing Subject Focus and Point Focus toggle options
This is where the real decision-making happens. The panel gives you two ways to tell Lightroom where “in focus” should be. Subject Focus uses the same AI detection as Lightroom’s Select Subject masking feature, automatically identifying the main subject and keeping them sharp while blurring everything else. Point Focus lets you click anywhere in the image to manually define the focal point.
In practice, Subject Focus wins almost every time. The AI subject detection in Lightroom Classic has gotten genuinely good, and letting it identify the subject produces smoother, more convincing edge transitions than clicking around manually. Point Focus has its uses, mainly when your subject is not a person or obvious object, but if you are shooting portraits or wildlife, start with Subject Focus and only switch if something looks wrong.
Step 6: Visualize the Depth Map to Diagnose Problems
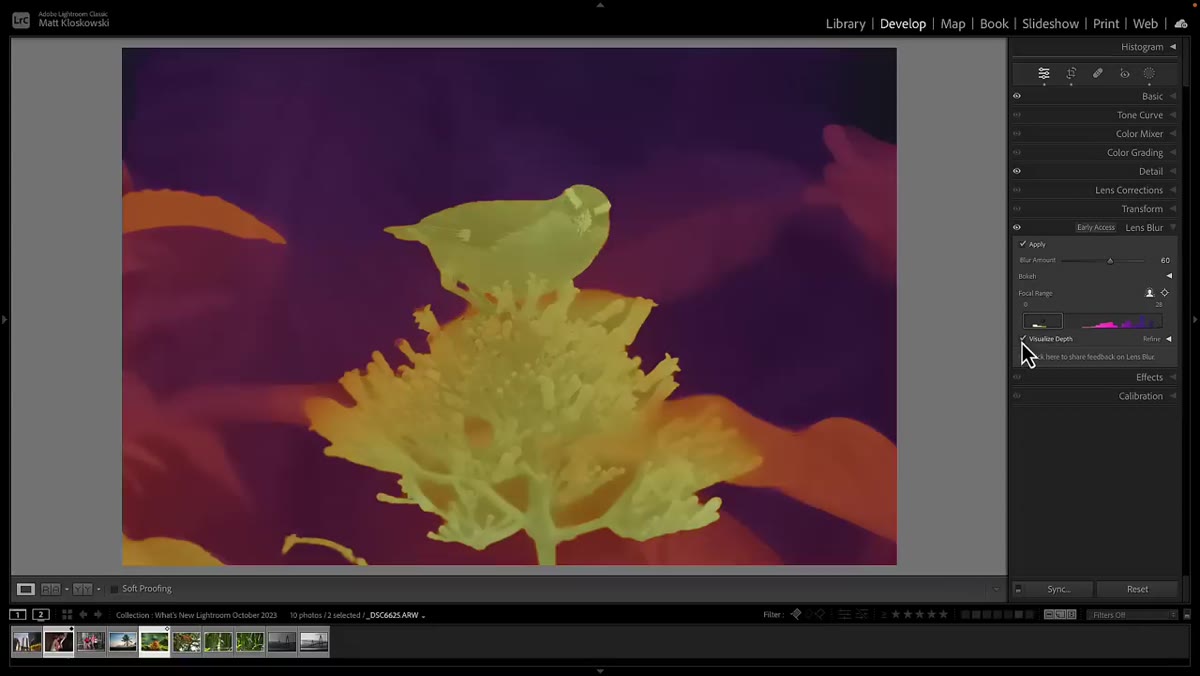 Visualize depth map overlay showing color-coded distance information
Tucked inside the Focal Range section is a “Visualize Depth” toggle that is one of the most useful diagnostic tools in the entire panel. Turn it on and your image is replaced with a color-coded overlay. Whites and yellows represent areas closest to the camera. As you move toward oranges and pinks, you are seeing things that are farther away.
Visualize depth map overlay showing color-coded distance information
Tucked inside the Focal Range section is a “Visualize Depth” toggle that is one of the most useful diagnostic tools in the entire panel. Turn it on and your image is replaced with a color-coded overlay. Whites and yellows represent areas closest to the camera. As you move toward oranges and pinks, you are seeing things that are farther away.
This is not a setting you leave on when exporting. It is a troubleshooting tool. If your subject is showing up in the wrong color zone, you will know immediately why the blur looks off. It is also just genuinely interesting to see how Lightroom is interpreting spatial depth in a flat image.
My Take: Where I Would and Wouldn’t Use This
The Lens Blur panel is a real feature, not a gimmick. But after testing it across about 50 images, I think of it as a refinement tool rather than a replacement for proper lens work. Photos where I already shot at f/2.8 or f/4 on a short telephoto came out looking polished with just a light amount applied. Photos from wide-angle lenses or f/8 and beyond mostly looked processed in a way that I would not want to deliver to a client.
The workflow I would actually recommend: if a photo is 80% of the way to the background blur you want, this panel gets you to 95% without leaving Lightroom. If the photo needs more heavy lifting than that, it is still a Photoshop job. The Neural Filter “Depth Blur” in Photoshop gives you more control over the depth map, and edge refinement tools there are more precise. Lightroom’s version is faster and simpler, which makes it genuinely useful for editorial work or delivering personal projects where a Photoshop round-trip is overkill.
Moderation is the whole game here. The photographers I respect most apply this kind of thing so subtly that you would never know software was involved. That is the target.
The single most important thing to take away: Lightroom’s new Lens Blur panel works best as a subtle enhancer on images that already have natural depth, not as a fix for photos that need a background completely transformed. Set realistic expectations, keep the blur amount moderate, and use “Visualize Depth” to understand what the AI is actually seeing.
Watch the full tutorial on YouTube to see Matt walk through the panel live with his own images, including comparisons that make the focal range controls a lot easier to understand visually.
Comments (5)
Great breakdown. The step-by-step approach really helps.
This should be required reading for anyone starting out.
Well explained. I think my audience would really benefit from this — mind if I link to it?
Printing this out and pinning it next to my monitor. That good.
Finally someone explains this in a way that actually makes sense.
Leave a Comment