
Every time I get back from a shoot in low light, I face the same silent negotiation with myself: do I sit here and run AI Denoise one photo at a time, or do I just hope for the best and export? For a long time I was doing it wrong on both ends, either skipping it entirely or babysitting each file like it owed me money. Then I watched Matt Kloskowski walk through his batch processing workflow after a bear photography trip in Alaska, and something clicked. Watch the full tutorial on YouTube — it’s worth your time even if you only take one thing from it.
The core problem Kloskowski identifies is one I know deeply: Lightroom’s AI Denoise is powerful, but it takes 30 to 45 seconds per image on a capable machine, and it creates a brand new DNG file for every photo it touches. Run it carelessly on 80 images from a high-ISO session and you’ve just doubled your file count and chewed through hard drive space on photos that were never going to make the cut anyway. The fix isn’t a setting. It’s a pre-workflow habit built around knowing which photos deserve the treatment before you ever open the Enhance dialog.
Here’s how he does it, broken down into steps you can follow right now in Lightroom Classic.
Step 1: Edit First, Rate Second
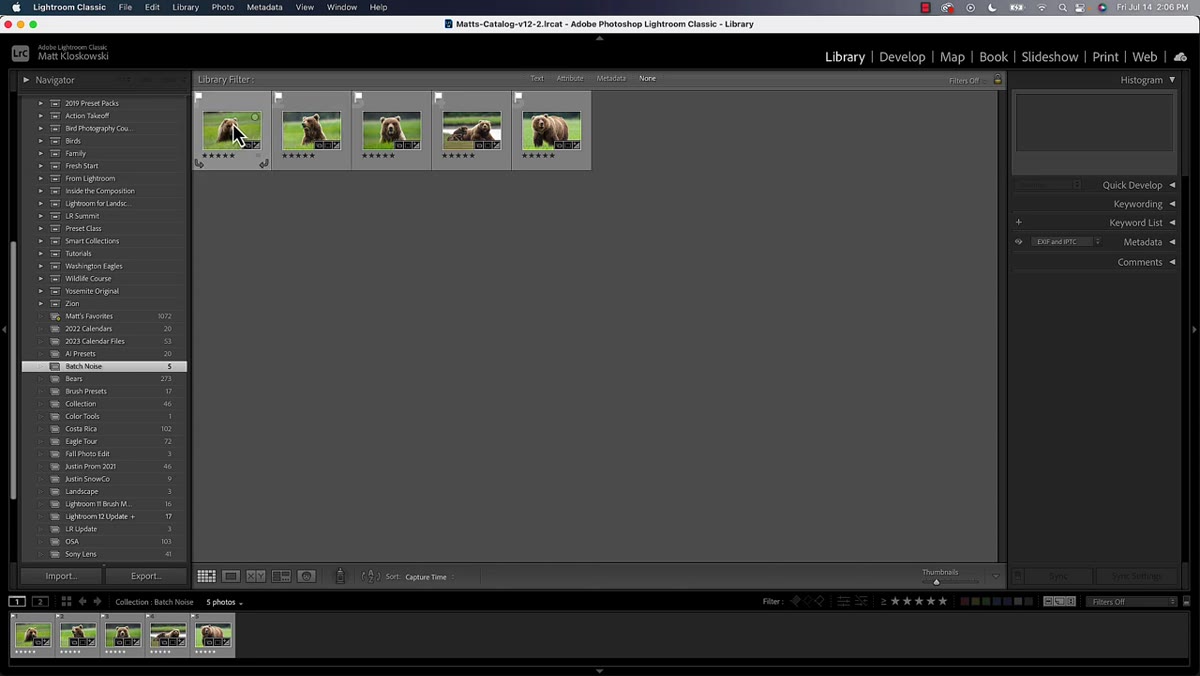 Five-star rating system shown in Lightroom grid view
Before you touch the Denoise tool, do your actual editing. Go into Develop, make your exposure and color decisions, and when a photo is genuinely ready to move forward, give it a five-star rating. That single habit is the whole foundation of this workflow. Five stars means “this one earned it.” Everything below that stays unprocessed, no derivative files, no bloated catalog.
Five-star rating system shown in Lightroom grid view
Before you touch the Denoise tool, do your actual editing. Go into Develop, make your exposure and color decisions, and when a photo is genuinely ready to move forward, give it a five-star rating. That single habit is the whole foundation of this workflow. Five stars means “this one earned it.” Everything below that stays unprocessed, no derivative files, no bloated catalog.
The rating system acts as a gate. You’re not just organizing your photos, you’re making a concrete decision about which images justify the extra processing time and storage cost. On a culling session of 200 wildlife shots, this alone can save you from running Denoise on 150 files that were never going to export anyway.
Step 2: Collect Your Keepers
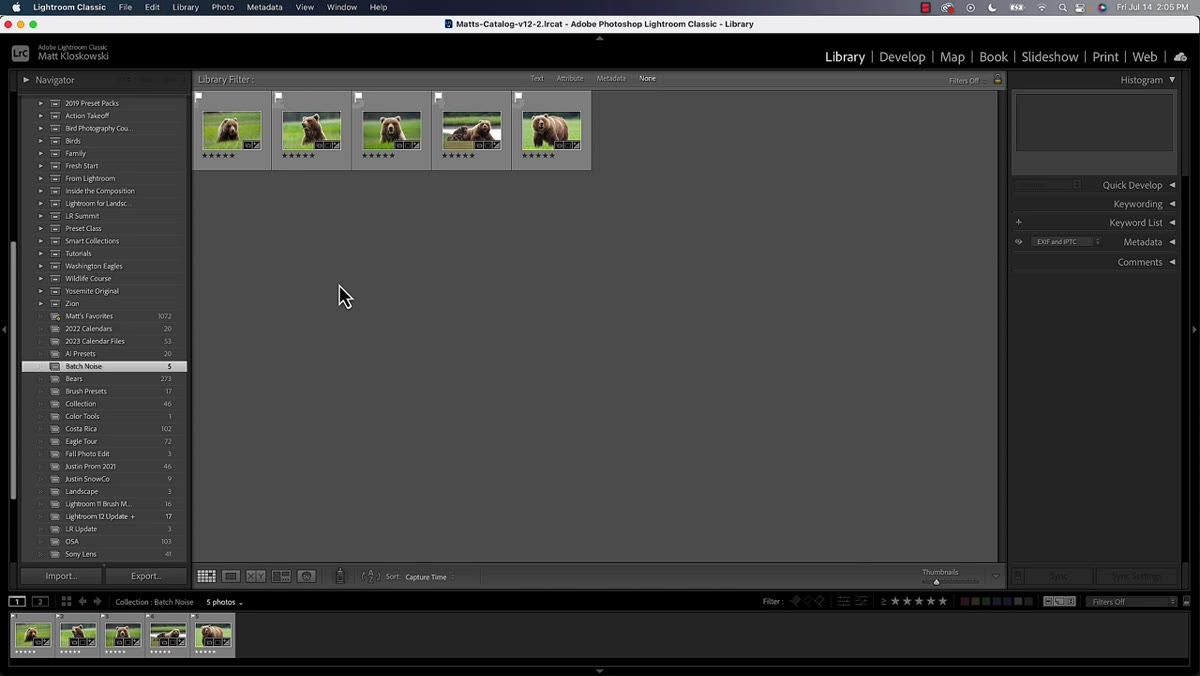 Small photo collection shown in Lightroom’s Collections panel
Once you’ve gone through your shoot and five-starred your selects, get them into a single view. Kloskowski uses a Collection for this, which is a clean approach because it gives you one place to look at only the photos you’ve committed to processing. You could also filter by five stars in the grid view if Collections aren’t part of your usual setup.
Small photo collection shown in Lightroom’s Collections panel
Once you’ve gone through your shoot and five-starred your selects, get them into a single view. Kloskowski uses a Collection for this, which is a clean approach because it gives you one place to look at only the photos you’ve committed to processing. You could also filter by five stars in the grid view if Collections aren’t part of your usual setup.
The point is visual clarity before you execute. You want to see exactly the photos that are about to go through the pipeline, nothing more. When you’re about to kick off a process that runs for several minutes and creates new files, there’s real value in pausing to confirm you’re looking at the right ones.
Step 3: Select All and Open Enhance
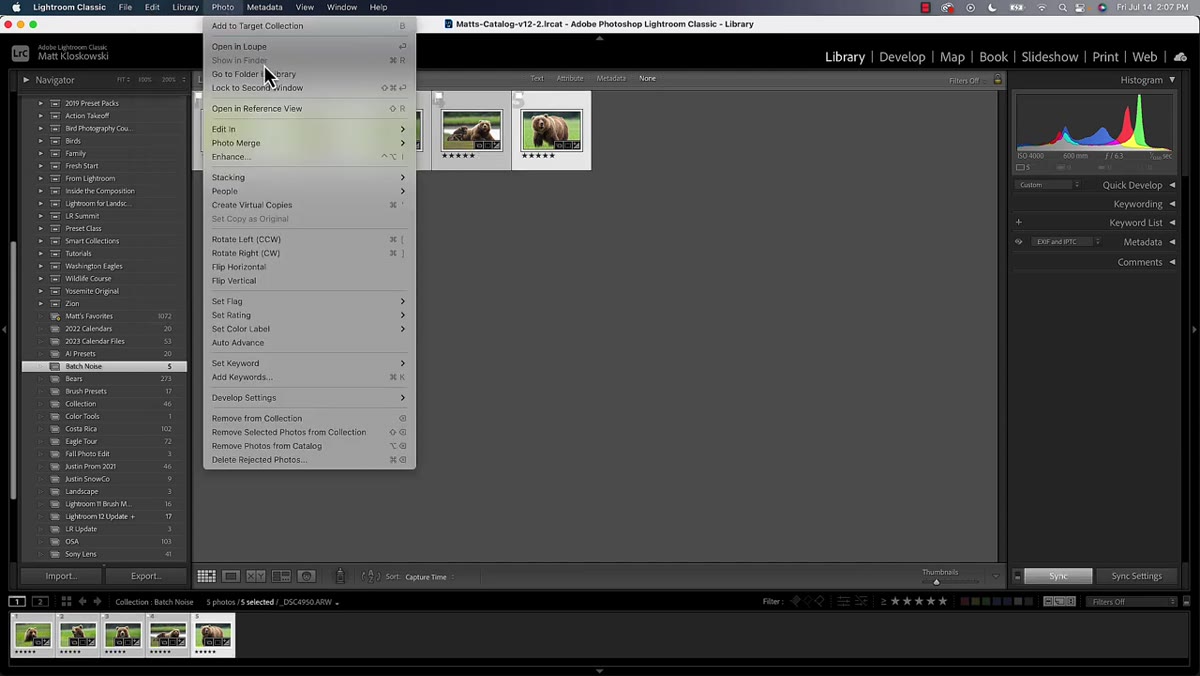 Photo menu open with Enhance option highlighted
With your photos visible in Grid view, hit Edit, then Select All. From there, go to the Photo menu at the top of the screen and scroll down to Enhance. This is the same dialog you’d use for a single image, but Lightroom is smart enough to queue up every selected file.
Photo menu open with Enhance option highlighted
With your photos visible in Grid view, hit Edit, then Select All. From there, go to the Photo menu at the top of the screen and scroll down to Enhance. This is the same dialog you’d use for a single image, but Lightroom is smart enough to queue up every selected file.
One important baseline to keep in mind: AI Denoise only works on RAW files. It will not process JPEGs, TIFFs, or PSDs. If your selection includes any of those formats, Lightroom will simply skip them. So if you’re shooting RAW plus JPEG, make sure your selection is clean before you proceed.
Step 4: Configure the Enhance Dialog Correctly
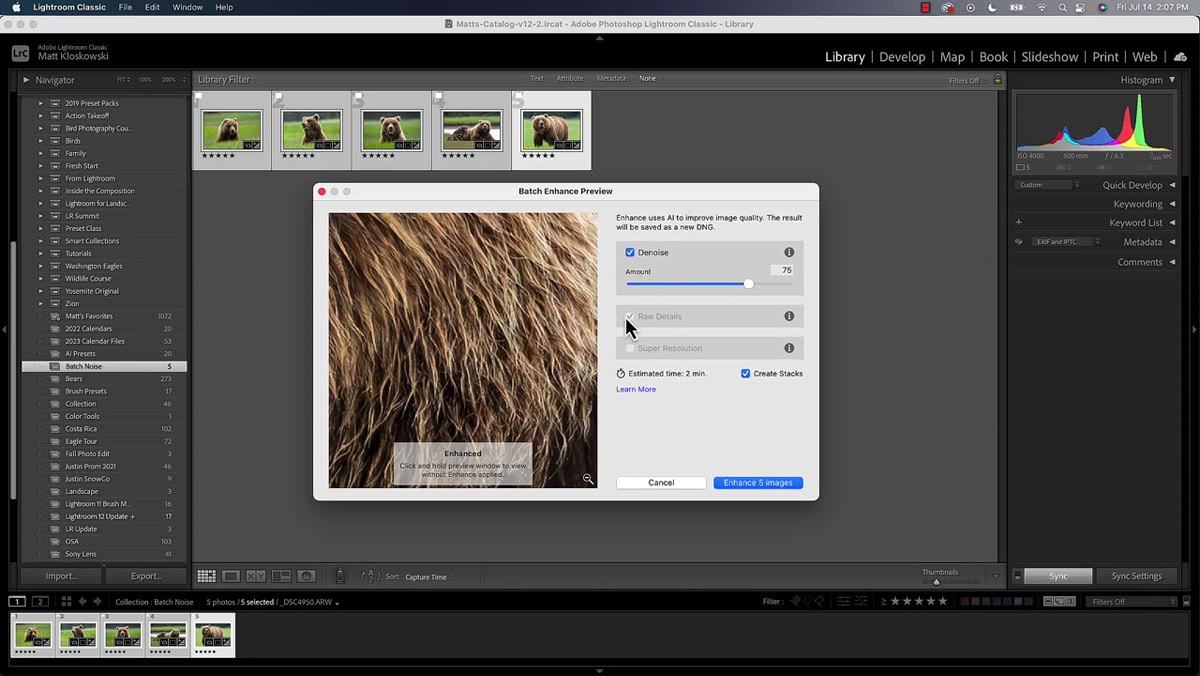 Enhance dialog with Denoise checked and Super Resolution unchecked
When the Enhance dialog opens, you’ll see a few checkboxes. Check Denoise. You’ll also notice Raw Details gets auto-checked alongside it, which adds a modest detail enhancement pass, and that’s fine to leave on. The one to skip is Super Resolution. Kloskowski is direct about this: there’s no practical reason to run it alongside Denoise in this context, and it adds processing overhead without meaningful benefit for most use cases.
Enhance dialog with Denoise checked and Super Resolution unchecked
When the Enhance dialog opens, you’ll see a few checkboxes. Check Denoise. You’ll also notice Raw Details gets auto-checked alongside it, which adds a modest detail enhancement pass, and that’s fine to leave on. The one to skip is Super Resolution. Kloskowski is direct about this: there’s no practical reason to run it alongside Denoise in this context, and it adds processing overhead without meaningful benefit for most use cases.
Also check “Create Stack” if that option is available in your version. This keeps the new Denoise DNG paired with its original in the catalog, which becomes important in the cleanup step. Without stacking, you end up with a flat grid of doubles and it gets visually chaotic fast.
Step 5: Run It and Step Away
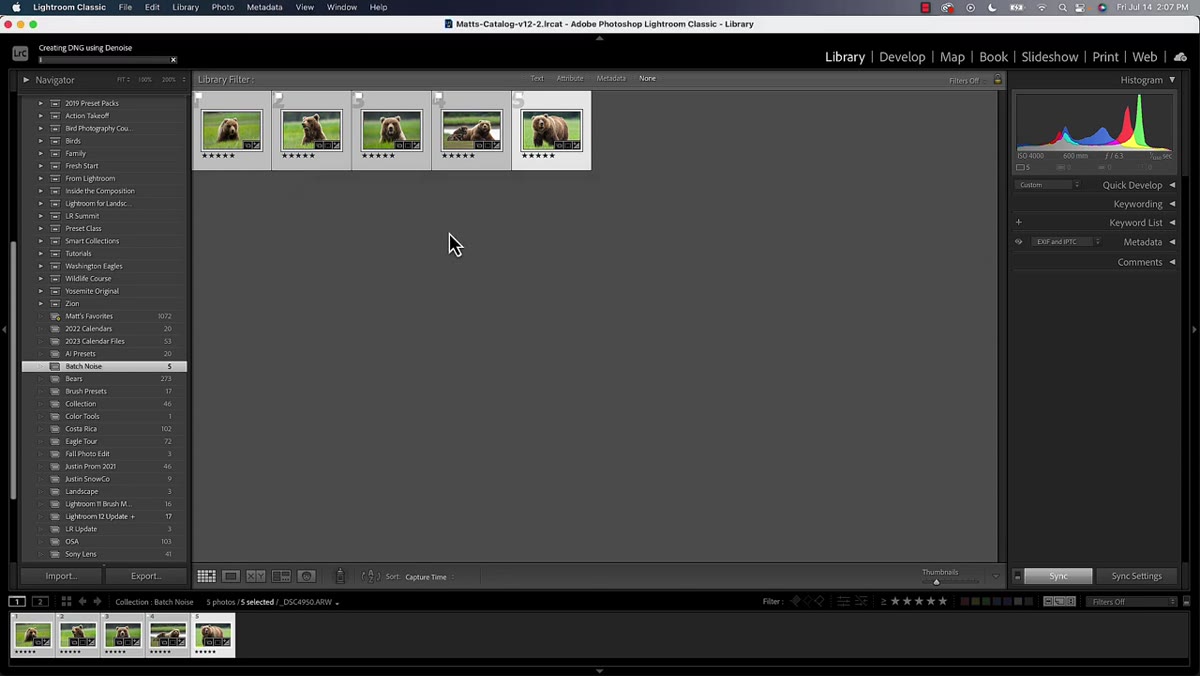 Progress bar showing batch Enhance processing underway
Hit Enhance for however many images you’ve selected and then genuinely walk away. On a five-image batch, Kloskowski notes you’re looking at a few minutes of processing. Scale that up to 20 or 30 photos and you could be waiting ten to twenty minutes depending on your hardware. This is not a “watch the progress bar” situation. Go make coffee. Flip a record. Come back when it’s done.
Progress bar showing batch Enhance processing underway
Hit Enhance for however many images you’ve selected and then genuinely walk away. On a five-image batch, Kloskowski notes you’re looking at a few minutes of processing. Scale that up to 20 or 30 photos and you could be waiting ten to twenty minutes depending on your hardware. This is not a “watch the progress bar” situation. Go make coffee. Flip a record. Come back when it’s done.
The process is creating a brand new DNG file for each image, applying the AI noise reduction directly into that file rather than as an adjustment layer. This is why it’s nondestructive from the perspective of your original RAW, but it is a permanent, baked-in change to the new DNG. Your originals remain untouched.
Step 6: Clean Up the Doubles
 Two files visible per photo showing original and new DNG
When processing finishes, your catalog now has two files for every image you processed. If you enabled stacking, they’ll be grouped together, which makes this step much easier. The Denoise DNG is the one you’ll edit and export from. The original RAW is your safety net, and you probably don’t need to look at it again unless something goes sideways.
Two files visible per photo showing original and new DNG
When processing finishes, your catalog now has two files for every image you processed. If you enabled stacking, they’ll be grouped together, which makes this step much easier. The Denoise DNG is the one you’ll edit and export from. The original RAW is your safety net, and you probably don’t need to look at it again unless something goes sideways.
Decide now on a cleanup policy and stick to it. Some photographers archive the originals to a separate drive. Others leave them stacked and collapsed so they stay out of the way. Whatever you choose, make it consistent, because catalog clutter compounds fast when you’re batch processing regularly.
My Addition: Build the Rating Habit Before the Trip Ends
The step that Kloskowski demonstrates but maybe undersells is how early in the process the five-star rating needs to happen. I used to rate photos as a final step, basically as an export checklist. Now I rate during editing, the moment I know a photo has legs. That way the batch Denoise workflow is already primed by the time I’m ready to run it.
If you wait until the end of a culling session to assign ratings, you’re adding a whole extra pass to your workflow. Integrate the rating into the editing moment itself and the batch process becomes nearly automatic.
The single most valuable thing in this workflow is the gate you build before you ever open the Enhance dialog. Batch processing AI Denoise without a selection criteria is just a faster way to make a mess. Rate intentionally, collect deliberately, then let Lightroom do the heavy lifting.
Watch the full tutorial on YouTube to see the full walkthrough, including the stacking behavior and how Matt handles the catalog cleanup after processing.
Comments (3)
This is going in my reference folder. Incredibly useful.
I've been looking for exactly this kind of tutorial. Perfect timing.
Well explained. I think my audience would really benefit from this — mind if I link to it?
Leave a Comment