
Every photographer I know has a version of this story. You upload a clean, well-edited image to Instagram or a portfolio site, and a few weeks later you spot it somewhere else with zero credit. It happened to me early on, back when I was editing band press shots in a one-bedroom apartment and had no idea that a watermark was even something I could automate. I just assumed you had to manually stamp every single file before sharing, which meant I never did it at all.
That stops the moment you set this up in Lightroom. In this Aaron Nace (PHLEARN) tutorial, the whole workflow gets broken into two clean phases: prep your signature or logo as a proper PNG in Photoshop, then configure Lightroom’s watermark editor so it applies automatically every time you export. Watch the full tutorial on YouTube if you want to follow along with the video, or use this walkthrough to move at your own pace.
The end result is a saved preset you fire once per export job. No extra steps, no forgetting, no naked files going out into the world.
Step 1: Open Your Signature or Logo in Photoshop
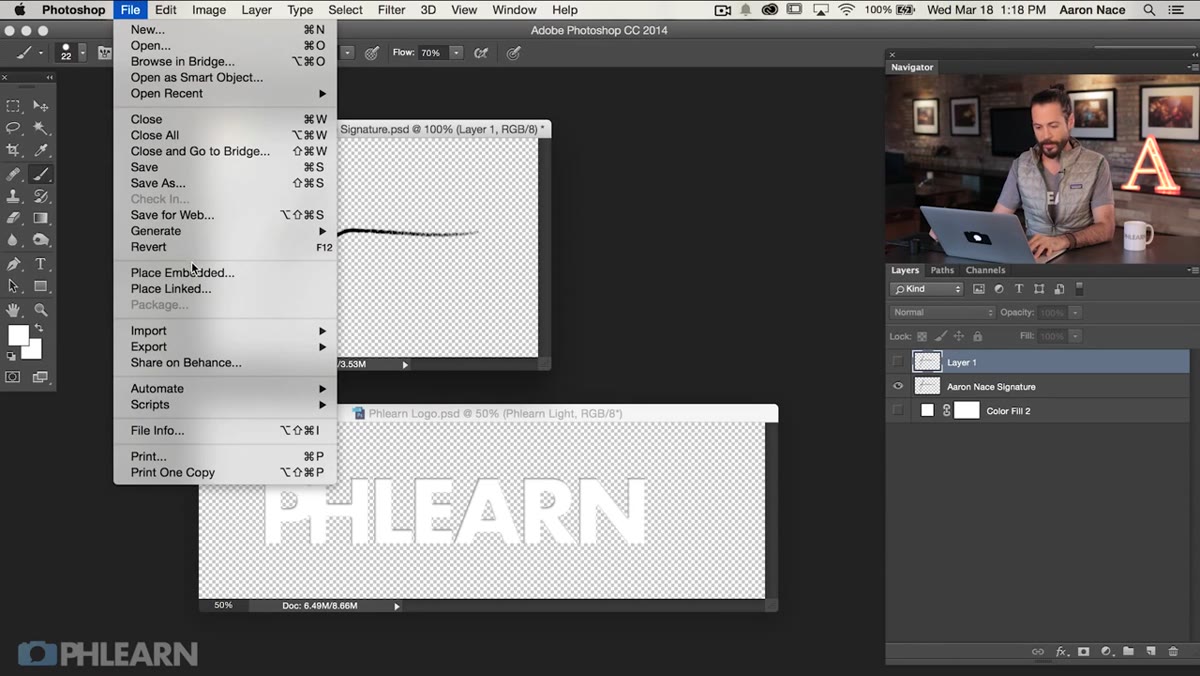
 Photoshop canvas showing logo and signature files
You need two things before Lightroom is even part of the conversation: your artwork and a transparent background. Aaron works with two examples here, a logo and a handwritten signature, and both are sitting on a transparent canvas (that classic grey checkerboard pattern). If your signature is a scan on white paper, that’s a quick fix. Go to Select, choose Color Range, click on the white area of the image, hit OK, then press Delete. The white disappears and you’re left with just the ink on a transparent layer. Done.
Photoshop canvas showing logo and signature files
You need two things before Lightroom is even part of the conversation: your artwork and a transparent background. Aaron works with two examples here, a logo and a handwritten signature, and both are sitting on a transparent canvas (that classic grey checkerboard pattern). If your signature is a scan on white paper, that’s a quick fix. Go to Select, choose Color Range, click on the white area of the image, hit OK, then press Delete. The white disappears and you’re left with just the ink on a transparent layer. Done.
If you want your signature to be white instead of black for use over darker images, hit Command+I (Mac) or Ctrl+I (Windows) to invert the colors before you save. That single keyboard shortcut saves you a rebuild later.
Step 2: Save as PNG Using “Save for Web”
 Save for Web dialog with PNG-24 selected
This is the step where people trip up. You have to save as PNG, not JPEG. JPEG does not support transparency, which means your watermark will come out with an ugly white or colored box around it sitting on top of your photo. That defeats the entire purpose.
Save for Web dialog with PNG-24 selected
This is the step where people trip up. You have to save as PNG, not JPEG. JPEG does not support transparency, which means your watermark will come out with an ugly white or colored box around it sitting on top of your photo. That defeats the entire purpose.
Go to File, then Save for Web (not just Save As). In that dialog, switch the format dropdown from JPEG to PNG. Once you do, you’ll see the checkerboard transparency appear in the preview window, confirming your background will stay transparent when the file is placed over an image. Save it somewhere you’ll actually remember, your desktop or a dedicated assets folder both work.
Step 3: Open Lightroom’s Watermark Editor
 Lightroom menu with watermark preferences dialogue open
Here’s where Lightroom enters the picture. Jump over from Photoshop and in Lightroom go to the Lightroom menu (Mac) or Edit menu (Windows), then look for Edit Watermarks. This opens the Watermark Editor, which is its own dedicated panel and not something most people stumble onto by accident.
Lightroom menu with watermark preferences dialogue open
Here’s where Lightroom enters the picture. Jump over from Photoshop and in Lightroom go to the Lightroom menu (Mac) or Edit menu (Windows), then look for Edit Watermarks. This opens the Watermark Editor, which is its own dedicated panel and not something most people stumble onto by accident.
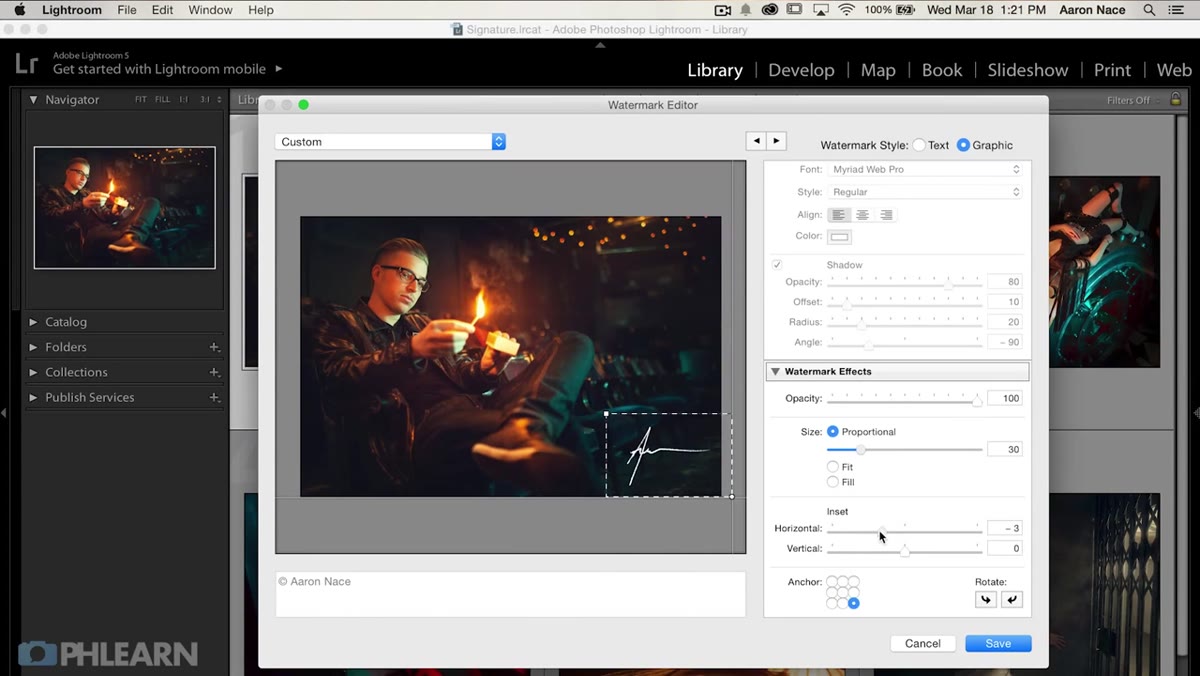
You’ll see two watermark style options at the top right: Text and Graphic. Since you’ve already built your PNG, choose Graphic. This is the setting that lets you import your custom file rather than just typing text across your image.
Step 4: Import Your PNG File
 Watermark Editor with graphic option and file import prompt
Once you select Graphic, Lightroom will prompt you to locate your PNG file. Navigate to wherever you saved it in Step 2 and load it in. You should immediately see your signature or logo appear as an overlay on the preview image inside the editor.
Watermark Editor with graphic option and file import prompt
Once you select Graphic, Lightroom will prompt you to locate your PNG file. Navigate to wherever you saved it in Step 2 and load it in. You should immediately see your signature or logo appear as an overlay on the preview image inside the editor.
From here the layout controls become available: anchor point (which corner or edge your watermark snaps to), size as a percentage of the image width, and inset values that push it away from the edges. Aaron keeps it clean by anchoring to a corner and adjusting the inset so it doesn’t crowd the frame. There’s no universal right answer for size, but somewhere in the 10-20% range tends to be readable without being distracting. Bump it up if you’re primarily sharing on mobile where small details disappear.
Step 5: Save It as a Watermark Preset
 Lightroom watermark preset save option in dropdown
This is the step that turns a one-time setup into a permanent workflow tool. In the top left of the Watermark Editor, there’s a preset dropdown that defaults to Custom. Click it, choose Save Current Settings as New Preset, and give it a name. I name all my presets after songs, so mine might be something like “Rumours White Corner” depending on what was on the turntable when I built it.
Lightroom watermark preset save option in dropdown
This is the step that turns a one-time setup into a permanent workflow tool. In the top left of the Watermark Editor, there’s a preset dropdown that defaults to Custom. Click it, choose Save Current Settings as New Preset, and give it a name. I name all my presets after songs, so mine might be something like “Rumours White Corner” depending on what was on the turntable when I built it.
Save it, close the editor. Your watermark preset now lives in Lightroom permanently and will show up every time you access the watermark settings.
Step 6: Apply the Preset During Export
 Export dialog showing watermark checkbox and preset selector
The final piece is wiring your preset into the export process. When you’re ready to export images, open the Export dialog (File, Export, or Shift+Command+E on Mac). Scroll down to the Watermarking section, check the box to enable it, and select your saved preset from the dropdown.
Export dialog showing watermark checkbox and preset selector
The final piece is wiring your preset into the export process. When you’re ready to export images, open the Export dialog (File, Export, or Shift+Command+E on Mac). Scroll down to the Watermarking section, check the box to enable it, and select your saved preset from the dropdown.
Every file that exports from that job gets your watermark applied automatically, positioned and sized exactly the way you configured it. Change the preset once in the Watermark Editor if you ever want to update it, and all future exports pick up the new version.
One Thing I’d Add: Build Two Versions
Aaron’s tutorial gives you a solid single-watermark setup, and for most photographers that’s enough. But after spending a weekend building out a preset pack a while back, I learned the hard way that one watermark does not fit all situations. A white bottom-right watermark disappears into a bright sky. A black one vanishes over dark shadows.
My recommendation: build two versions of your PNG file (one white, one black or dark grey), then create two separate presets in Lightroom named accordingly. When you export, take five seconds to look at your images and pick the one that actually shows up. The whole point of a watermark is that people can read it.
The biggest shift this tutorial creates is mental. Once your watermark is saved as a preset, protecting your images requires zero extra effort. It just happens inside the export you were already running.
If you’re uploading photos to any public platform and you’re not watermarking them, this is the workflow that fixes that today.
Watch the full tutorial on YouTube to see Aaron walk through the Photoshop prep and Lightroom setup in real time.
Comments (1)
Bookmarked. Coming back to this one for sure.
Leave a Comment