
I used to lose entire afternoons to culling. Shoot a portrait session, come home, pour a drink, and then spend two hours clicking through near-identical frames trying to decide which version of someone blinking was less bad. It was the part of my workflow I dreaded most, and honestly the part I was worst at, because decision fatigue sets in fast and suddenly you’re keeping photos you have no business keeping. So when Adobe started rolling out AI-assisted culling inside Lightroom Classic, I paid attention.
In this Aaron Nace (PHLEARN) tutorial, he walks through the full AI culling workflow from the moment you drag your photos into Lightroom all the way through making your final selects. Watch the full tutorial on YouTube if you want to see it in motion, but the breakdown below will get you through the process step by step.
What makes this feature genuinely useful rather than just flashy is the timing. The AI does its analysis at import, before the photos are even on your machine. That means by the time your catalog is ready, Lightroom has already done a first pass on focus, eye detection, and exposure quality. You’re not starting from zero. You’re editing a shortlist.
Step 1: Drag Your Photos Into Lightroom Classic to Trigger Import
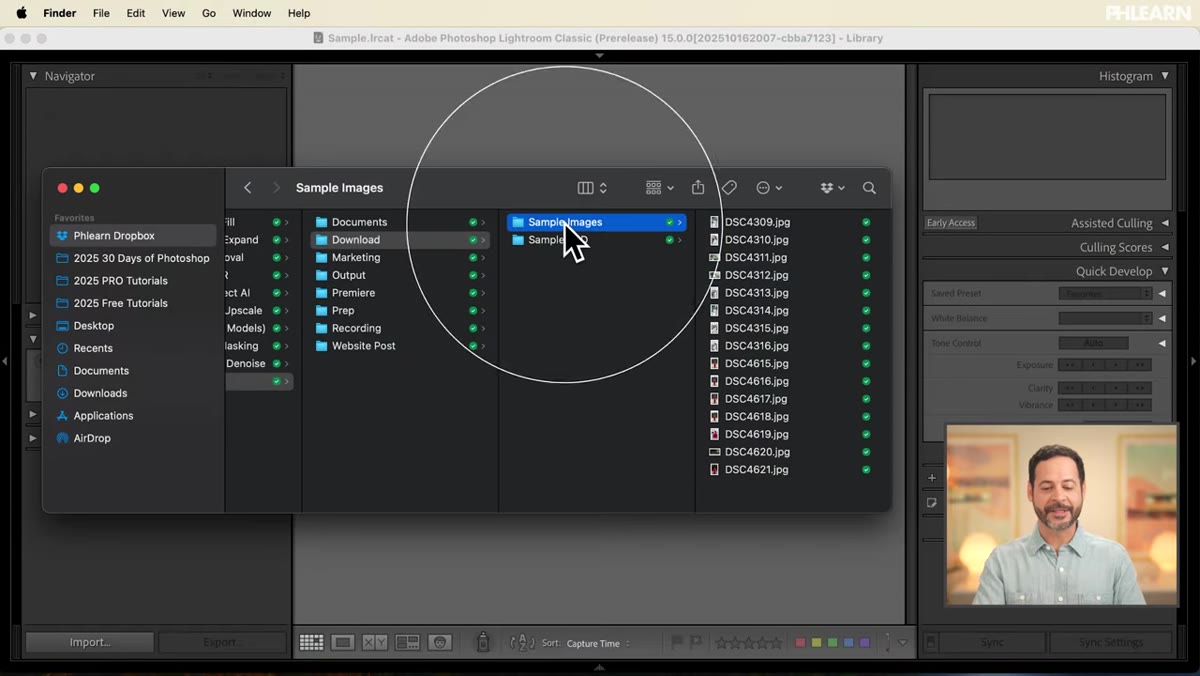 Dragging sample images into Lightroom Classic import screen
Start by dragging your image folder directly into Lightroom Classic. The familiar import dialog opens, but this time there’s something new sitting at the top of the panel: the AI-assisted culling option. Click it immediately, before you do anything else. Lightroom will analyze your entire batch right there, and it moves faster than you’d expect. The analysis runs across every frame before you’ve committed to importing a single one.
Dragging sample images into Lightroom Classic import screen
Start by dragging your image folder directly into Lightroom Classic. The familiar import dialog opens, but this time there’s something new sitting at the top of the panel: the AI-assisted culling option. Click it immediately, before you do anything else. Lightroom will analyze your entire batch right there, and it moves faster than you’d expect. The analysis runs across every frame before you’ve committed to importing a single one.
Step 2: Enable Subject Focus Detection
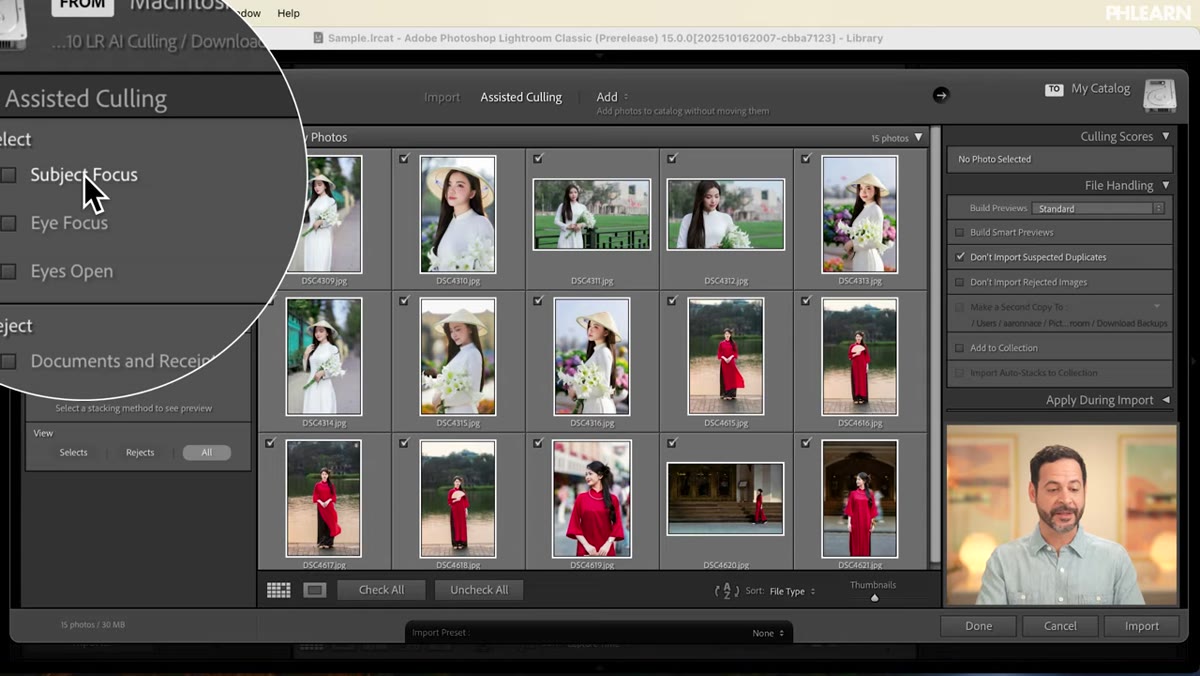 Green checkboxes and red X marks appearing on thumbnail images
Once AI analysis finishes, turn on the subject focus filter. Lightroom immediately overlays your thumbnails with visual indicators: green checkboxes for images where the subject is sharp, red X marks for frames that missed focus. This is the core of the whole feature. Instead of squinting at 200 thumbnails and trying to spot the soft ones, the AI flags them for you. A photo with a focused background and a soft subject gets caught here, which is exactly the kind of mistake that’s easy to miss when you’re tired and rushing.
Green checkboxes and red X marks appearing on thumbnail images
Once AI analysis finishes, turn on the subject focus filter. Lightroom immediately overlays your thumbnails with visual indicators: green checkboxes for images where the subject is sharp, red X marks for frames that missed focus. This is the core of the whole feature. Instead of squinting at 200 thumbnails and trying to spot the soft ones, the AI flags them for you. A photo with a focused background and a soft subject gets caught here, which is exactly the kind of mistake that’s easy to miss when you’re tired and rushing.
You can also toggle on eye focus and eye-open detection at this stage. If you’re shooting portraits, turn both on. Lightroom will tell you whether the eyes specifically are in focus and whether they’re actually open, separately from the overall subject focus score.
Step 3: Set Your Rejection Criteria for Problem Exposures
 Reject options panel showing misfires and exposure issue checkboxes
Beyond focus, the AI culling panel includes rejection filters for common technical failures: misfires, documents or receipts accidentally captured, and images that are significantly overexposed or underexposed. You may not need all of these depending on your shoot, but the exposure option alone is worth knowing about. If you shoot tethered or in tricky lighting, it’s easy to end up with a handful of completely blown-out or crushed frames. Checking this box automatically flags those for rejection so you don’t have to hunt for them manually.
Reject options panel showing misfires and exposure issue checkboxes
Beyond focus, the AI culling panel includes rejection filters for common technical failures: misfires, documents or receipts accidentally captured, and images that are significantly overexposed or underexposed. You may not need all of these depending on your shoot, but the exposure option alone is worth knowing about. If you shoot tethered or in tricky lighting, it’s easy to end up with a handful of completely blown-out or crushed frames. Checking this box automatically flags those for rejection so you don’t have to hunt for them manually.
Step 4: Use Auto Stack to Separate Multiple Shoots or Group Similar Frames
 Auto stack by capture time showing two distinct photo shoot groups
This is the step most tutorials skip over, and it’s one of the more practical ones. If your memory card has images from more than one session, auto stacking by capture time will separate them into distinct groups automatically. Drag the capture time slider down until you can see your shoots split into their own stacks. Lightroom shows a number badge on each stack so you know how many frames are inside.
Auto stack by capture time showing two distinct photo shoot groups
This is the step most tutorials skip over, and it’s one of the more practical ones. If your memory card has images from more than one session, auto stacking by capture time will separate them into distinct groups automatically. Drag the capture time slider down until you can see your shoots split into their own stacks. Lightroom shows a number badge on each stack so you know how many frames are inside.
The visual similarity option works differently. Instead of grouping by when photos were taken, it groups by how similar they look, which is useful for burst shooting where you fired five frames in a second and need to pick the sharpest one from a nearly identical sequence. Both methods are non-destructive at this point. You’re just organizing for review, not deleting anything yet.
Step 5: Review Individual Culling Scores Before You Commit
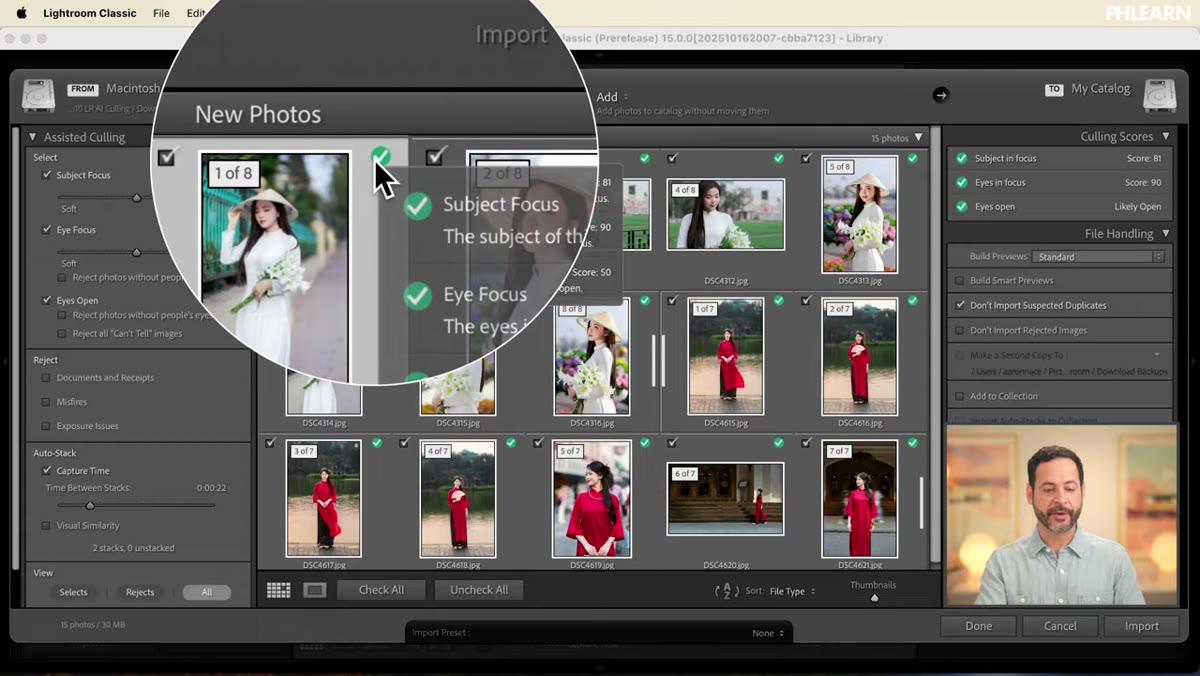 Culling scores panel showing subject focus score of 81 and eye focus score of 90
Click on any individual thumbnail and Lightroom reveals the actual numeric scores behind the AI’s judgment. You’ll see a subject focus score, an eye focus score, and a plain-language readout of whether eyes are open or closed. These numbers matter more than the pass/fail overlay because they give you context. A subject focus score of 81 means something different from a score of 49. One is a judgment call, the other is a clear reject.
Culling scores panel showing subject focus score of 81 and eye focus score of 90
Click on any individual thumbnail and Lightroom reveals the actual numeric scores behind the AI’s judgment. You’ll see a subject focus score, an eye focus score, and a plain-language readout of whether eyes are open or closed. These numbers matter more than the pass/fail overlay because they give you context. A subject focus score of 81 means something different from a score of 49. One is a judgment call, the other is a clear reject.
Aaron’s example makes this concrete: one frame scores 81 on subject focus and 90 on eye focus with eyes confirmed open. The next frame scores 49 on subject focus despite eyes being sharp at 100. The subject is just soft. The scores let you see exactly why a photo got flagged rather than just trusting a red X.
Step 6: Adjust the Focus Threshold Slider to Match Your Standards
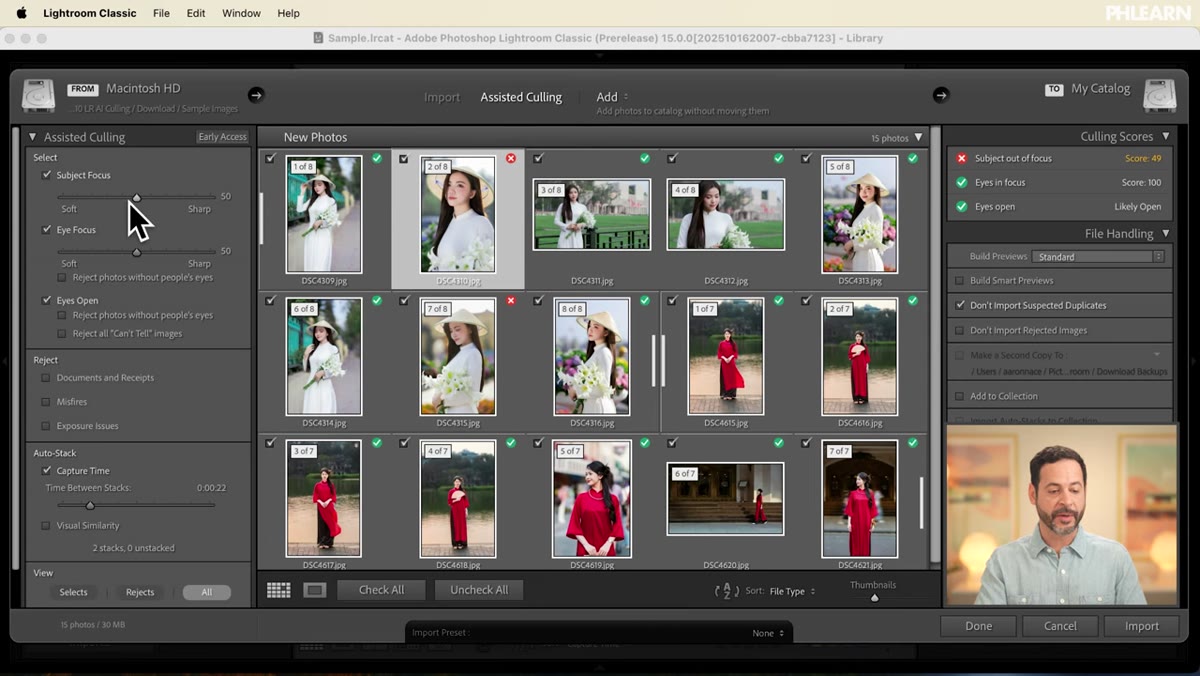 Subject focus slider being moved right, more thumbnails gaining red X marks
The default threshold for what counts as “in focus” isn’t fixed. There’s a slider you can move left or right to make Lightroom stricter or more forgiving. Pull it right and the bar rises, so images that would have passed at the default setting start picking up red X marks. The frame that scored 81 on subject focus, for example, will fail once the threshold climbs past that number.
Subject focus slider being moved right, more thumbnails gaining red X marks
The default threshold for what counts as “in focus” isn’t fixed. There’s a slider you can move left or right to make Lightroom stricter or more forgiving. Pull it right and the bar rises, so images that would have passed at the default setting start picking up red X marks. The frame that scored 81 on subject focus, for example, will fail once the threshold climbs past that number.
This is where the tool becomes genuinely yours to configure. If you’re shooting commercial work where sharpness is non-negotiable, push the slider right and be ruthless. If you’re shooting something more atmospheric where a slightly soft frame might still work stylistically, give yourself more room on the left. The slider doesn’t change the AI’s scores. It just changes where you draw the line.
Step 7: Filter to View Selects and Import Only What Passes
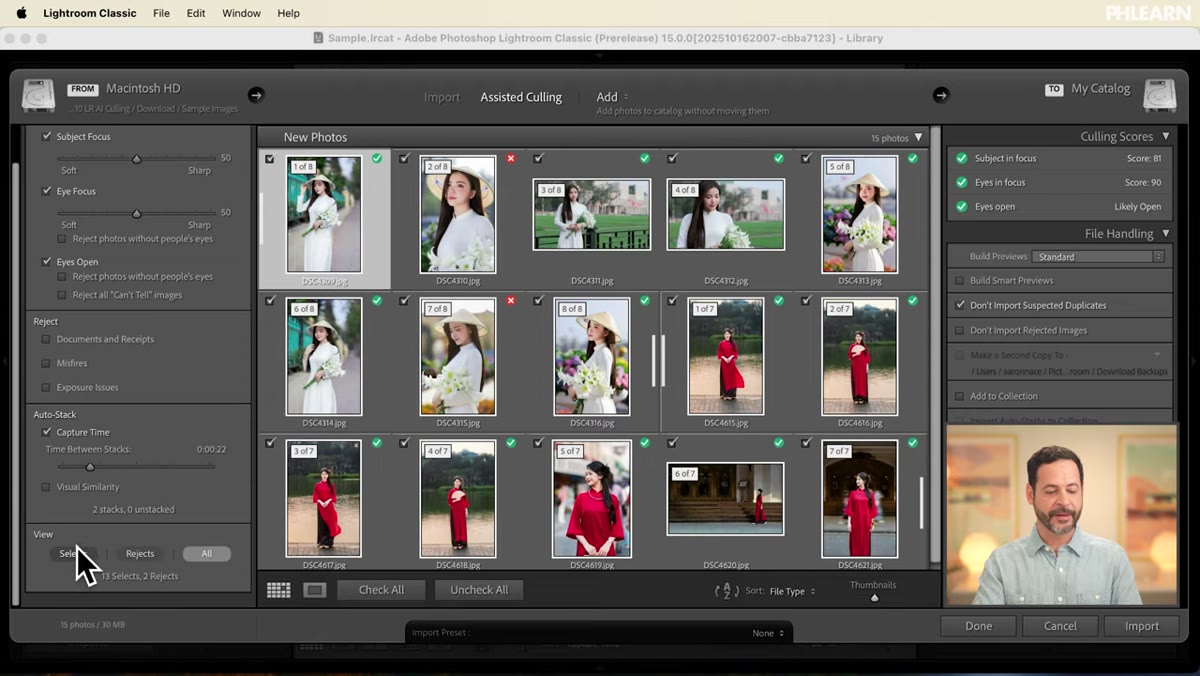 View selects option at bottom of import panel filtering out rejected images
At the bottom of the import view, switch from showing all photos to showing only your selects. The rejected and flagged images disappear from the preview, and you’re left with only the frames that met your criteria. This is the final checkpoint before anything lands on your drive. Review this filtered view, make any last manual overrides if something looks wrong, and then import.
View selects option at bottom of import panel filtering out rejected images
At the bottom of the import view, switch from showing all photos to showing only your selects. The rejected and flagged images disappear from the preview, and you’re left with only the frames that met your criteria. This is the final checkpoint before anything lands on your drive. Review this filtered view, make any last manual overrides if something looks wrong, and then import.
One Thing I’d Add From My Own Workflow
The AI culling scores are excellent for technical quality, but they don’t know anything about expression. A portrait with a focus score of 95 and eyes wide open can still be a throwaway if the subject looks uncomfortable or the moment is flat. I use the AI pass to eliminate the technically broken frames, and then I do one quick manual pass through the surviving selects looking only at expression and energy. The AI cuts my culling time by more than half. That second pass takes maybe fifteen minutes. Together they’re faster and more accurate than doing everything by eye from scratch.
The biggest shift this feature creates isn’t speed, though that’s real. It’s clarity. When Lightroom has already eliminated the soft frames and the blown exposures, the manual choices you’re left with are actually interesting ones. You’re deciding between two good photos instead of fifty mediocre ones. That’s a different, better problem to have.
Watch the full tutorial on YouTube to see Aaron walk through each step with live examples, including the sample images you can download and follow along with yourself.
Comments (4)
Clear and practical. No fluff. Appreciate that.
This saved me so much time on my last edit. Wish I'd found this sooner.
The before and after really sells it. Incredible difference.
Simple but effective. Sometimes that's all you need.
Leave a Comment