Every time I hand off a gallery to a client, somebody’s arm is too bright. It doesn’t matter how careful I am on location — the highlights blow out, the frilly dress turns into a white rectangle, and suddenly I’m the photographer who didn’t know how to expose properly. I’ve been editing long enough to know this isn’t really an exposure problem. It’s a recovery problem, and Lightroom’s Basic panel is where you fix it.
In this Aaron Nace (PHLEARN) tutorial from his 30 Days of Lightroom series, he walks through every tone slider in the Basic panel and shows how they connect directly to the histogram sitting at the top of the Develop module. I’ve watched a lot of Lightroom content over the years, and what Nace does well is something I always try to do in my own tutorials: he makes the histogram feel like a tool you actually want to use, not a graph you ignore. Watch the full tutorial on YouTube
The workflow he demonstrates is simple on the surface, but it builds a habit that changes how you approach every raw file. Let’s go through it step by step.
Step 1: Open Your Raw File in the Develop Module
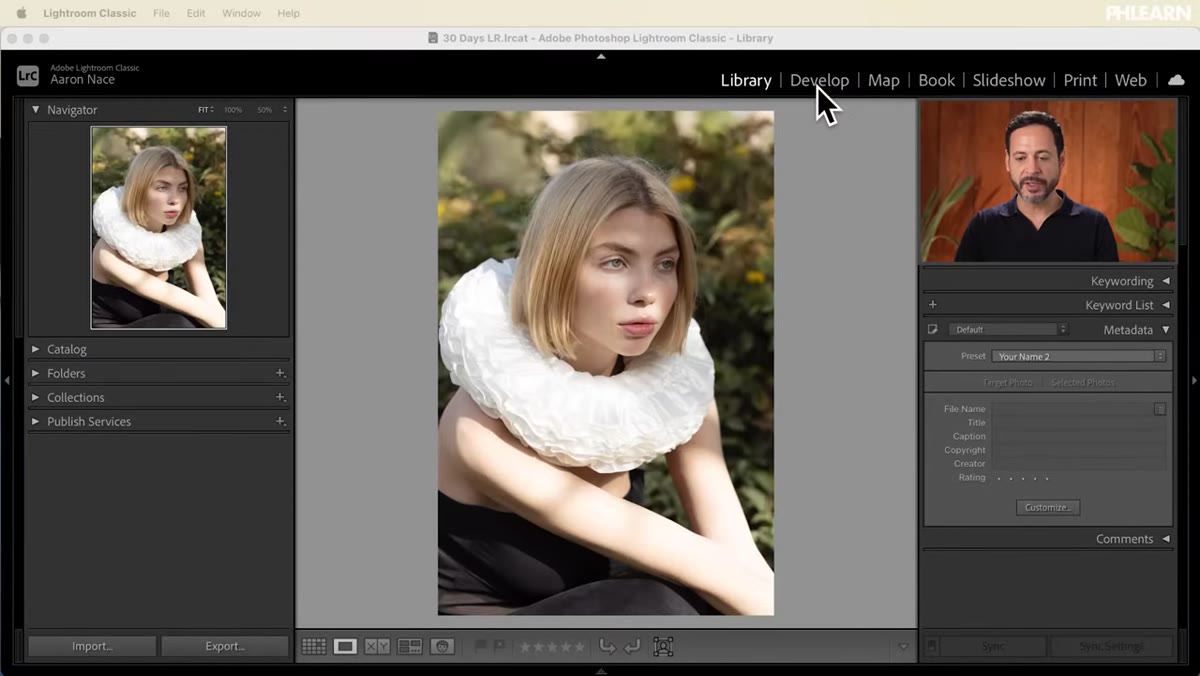 Lightroom Develop module open with raw photo loaded
Start with a raw file. This matters more than people admit. A JPEG has already had its highlights clipped and its shadows crushed by your camera’s processor. A raw file holds onto that information, and the Basic panel is how you get it back. Once your image is open, click into the Develop module and look to the right panel. You’ll see a histogram at the top and the Basic panel just below it. Scroll down slightly inside Basic until you see the section labeled Tone.
Lightroom Develop module open with raw photo loaded
Start with a raw file. This matters more than people admit. A JPEG has already had its highlights clipped and its shadows crushed by your camera’s processor. A raw file holds onto that information, and the Basic panel is how you get it back. Once your image is open, click into the Develop module and look to the right panel. You’ll see a histogram at the top and the Basic panel just below it. Scroll down slightly inside Basic until you see the section labeled Tone.
Step 2: Understand the Histogram Before You Touch a Slider
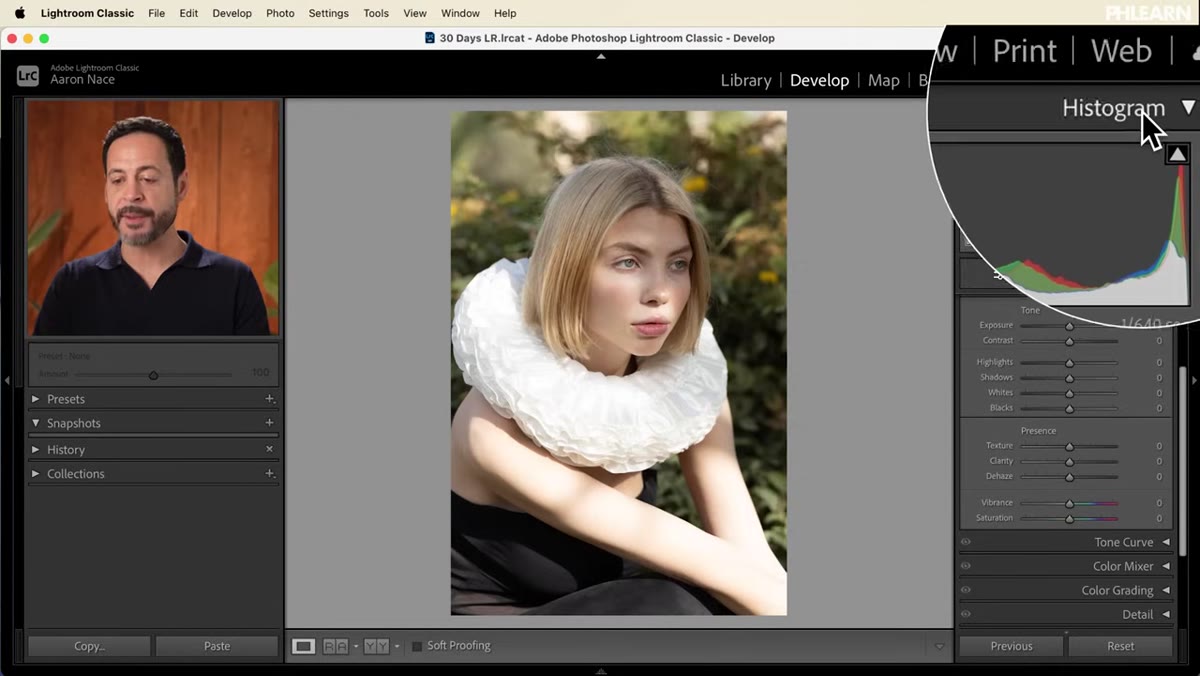 Histogram with labeled zones: blacks, shadows, exposure, highlights, whites
Before you reach for anything, hover your cursor across the histogram. As you move from left to right, Lightroom highlights the corresponding zone: Blacks on the far left, then Shadows, then Exposure in the middle (your midtones), then Highlights, then Whites on the far right. Underneath your cursor, a label appears telling you which zone you’re in. This is a genuinely useful feature that most people skip past. Spend thirty seconds doing this on your next image. Once you see how the histogram maps to the sliders below, you stop guessing and start making intentional decisions.
Histogram with labeled zones: blacks, shadows, exposure, highlights, whites
Before you reach for anything, hover your cursor across the histogram. As you move from left to right, Lightroom highlights the corresponding zone: Blacks on the far left, then Shadows, then Exposure in the middle (your midtones), then Highlights, then Whites on the far right. Underneath your cursor, a label appears telling you which zone you’re in. This is a genuinely useful feature that most people skip past. Spend thirty seconds doing this on your next image. Once you see how the histogram maps to the sliders below, you stop guessing and start making intentional decisions.
Step 3: Recover Your Highlights by Dragging Left
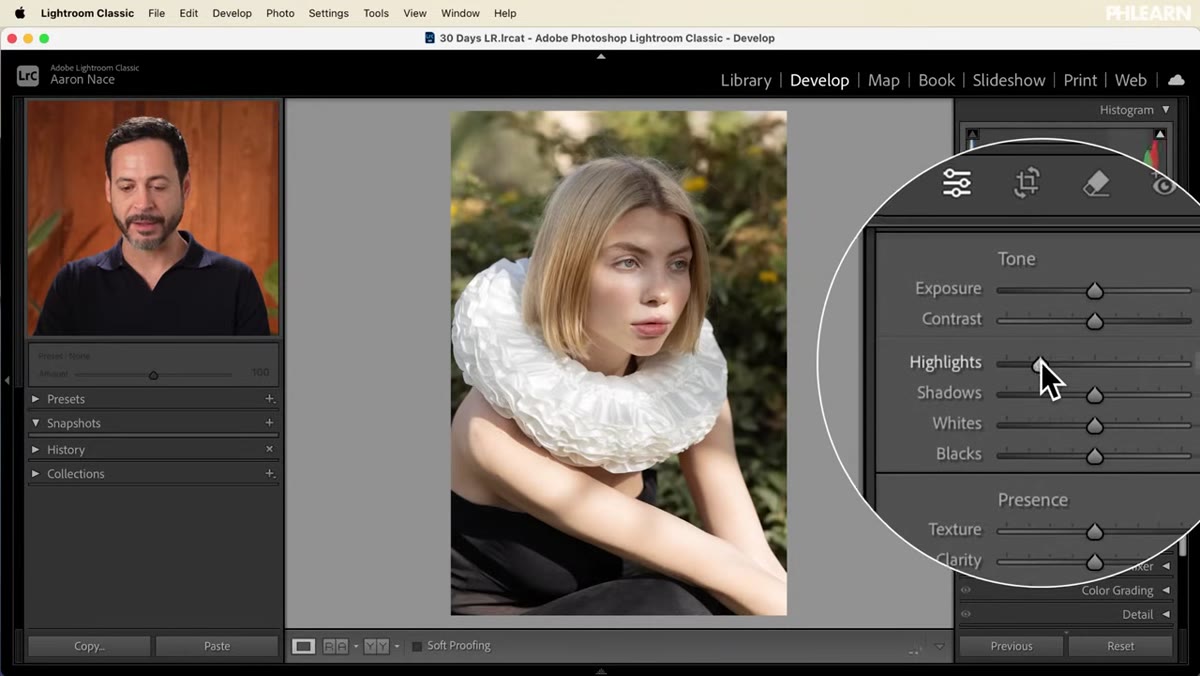 Highlights slider being dragged left, image showing recovery on arm and fabric
Now look at your image. If a subject’s arm, a white shirt, or any bright fabric is losing detail, your highlights are too hot. Find the Highlights slider in the Tone section and drag it left. You’ll see the bright areas in your photo settle down almost immediately, and detail starts to appear where there was pure white before. How far left? That depends on your image, but I generally don’t stop until I can see texture in the brightest area I care about. Dragging right makes highlights brighter, which is rarely what you need during a recovery pass, so pull left first and evaluate.
Highlights slider being dragged left, image showing recovery on arm and fabric
Now look at your image. If a subject’s arm, a white shirt, or any bright fabric is losing detail, your highlights are too hot. Find the Highlights slider in the Tone section and drag it left. You’ll see the bright areas in your photo settle down almost immediately, and detail starts to appear where there was pure white before. How far left? That depends on your image, but I generally don’t stop until I can see texture in the brightest area I care about. Dragging right makes highlights brighter, which is rarely what you need during a recovery pass, so pull left first and evaluate.
Step 4: Interact with the Histogram Directly
 Cursor clicking and dragging in the highlights zone of the histogram
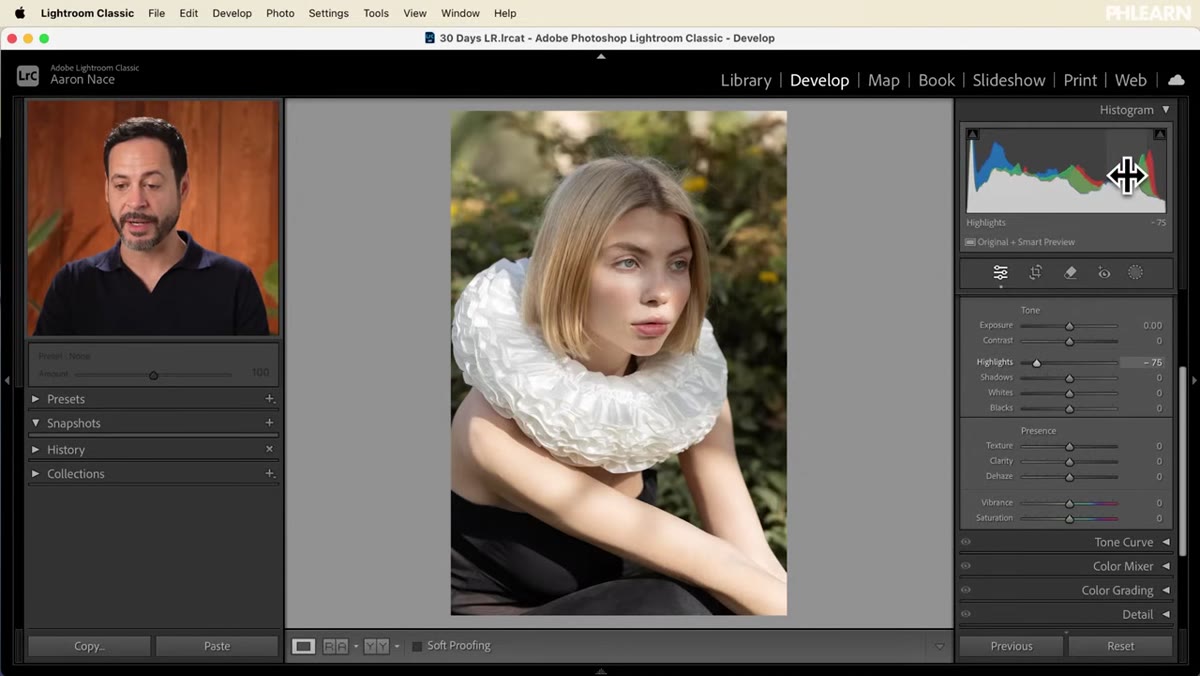
Here’s where things get interesting. Instead of using the slider, you can click directly inside the histogram on whichever zone you want to adjust, then drag left or right. The corresponding slider below moves in real time. This isn’t just a shortcut. It’s a different way of thinking about the image, because you’re working from the data rather than from the slider label. When I’m doing a first pass on a batch of shots, I sometimes prefer working in the histogram because I can see the shape of the light changing as I drag. Try both approaches and see which one clicks for you.
Cursor clicking and dragging in the highlights zone of the histogram
Here’s where things get interesting. Instead of using the slider, you can click directly inside the histogram on whichever zone you want to adjust, then drag left or right. The corresponding slider below moves in real time. This isn’t just a shortcut. It’s a different way of thinking about the image, because you’re working from the data rather than from the slider label. When I’m doing a first pass on a batch of shots, I sometimes prefer working in the histogram because I can see the shape of the light changing as I drag. Try both approaches and see which one clicks for you.
Step 5: Lift Your Shadows by Dragging Right
 Shadows slider dragged right, darker areas of image becoming visible
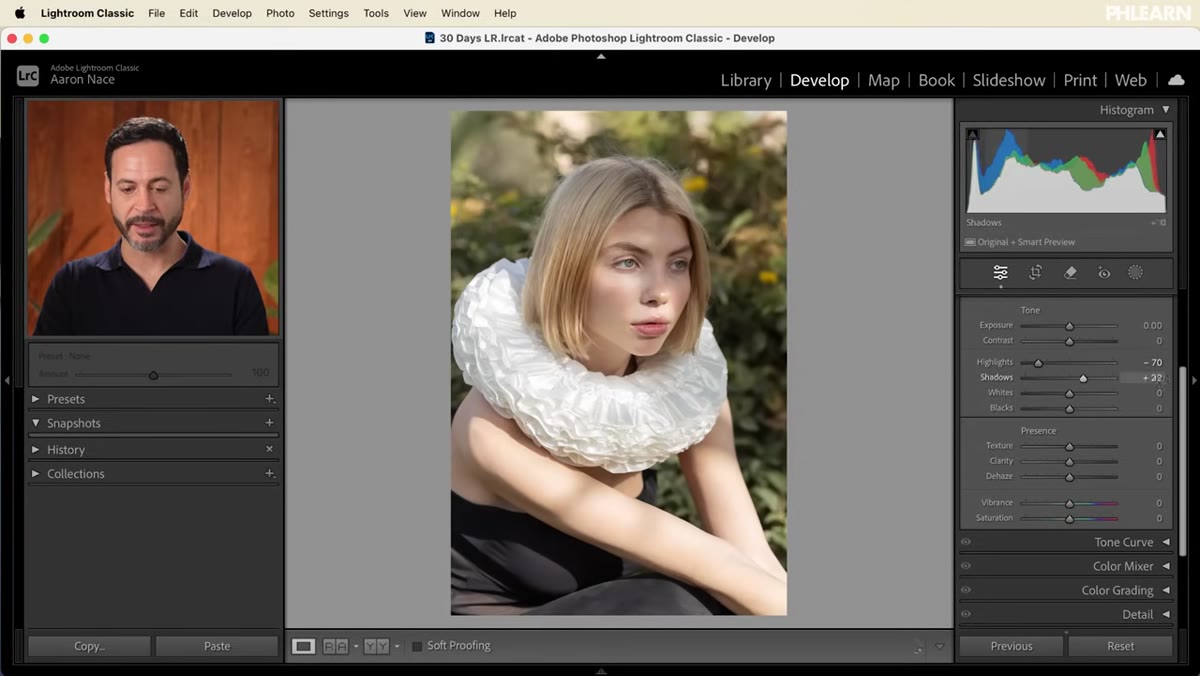
Once your highlights are handled, move to the Shadows slider. Drag it right to open up the dark areas of your frame. You can also do this in the histogram by clicking in the Shadows zone on the left side and dragging right. This is where a lot of the mood lives in a portrait, so be deliberate. A small move, maybe 20 to 30 points, can reveal detail in a jacket or background without making the image look flat. Push it too far and you get that overprocessed, HDR look where nothing has depth anymore. Nace demonstrates this balance on a portrait, and it’s a good reference point for what “enough” looks like.
Shadows slider dragged right, darker areas of image becoming visible
Once your highlights are handled, move to the Shadows slider. Drag it right to open up the dark areas of your frame. You can also do this in the histogram by clicking in the Shadows zone on the left side and dragging right. This is where a lot of the mood lives in a portrait, so be deliberate. A small move, maybe 20 to 30 points, can reveal detail in a jacket or background without making the image look flat. Push it too far and you get that overprocessed, HDR look where nothing has depth anymore. Nace demonstrates this balance on a portrait, and it’s a good reference point for what “enough” looks like.
Step 6: Reset the Tone Section Without Starting Over
 Alt/Option key held over Tone label, showing “Reset Tone” option
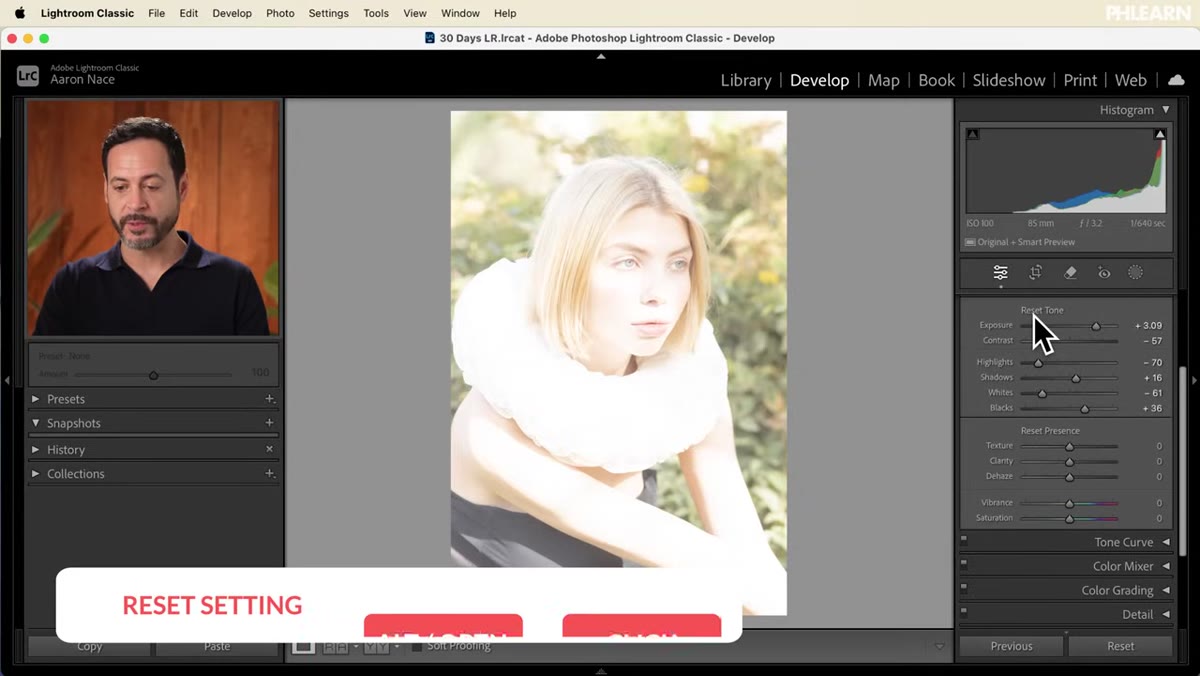
This one saved me hours of frustration early on. If you’ve gone too far and want to start the tone adjustments fresh without touching your white balance or any other settings, hold Alt (Windows) or Option (Mac) and hover over the word “Tone” in the Basic panel. The label changes to “Reset Tone.” Click it, and all five sliders snap back to zero. Only the Tone sliders reset. Everything else stays exactly where it was. It’s a clean undo for a specific section, and it’s the kind of keyboard shortcut that should be tattooed on every beginner’s desk.
Alt/Option key held over Tone label, showing “Reset Tone” option
This one saved me hours of frustration early on. If you’ve gone too far and want to start the tone adjustments fresh without touching your white balance or any other settings, hold Alt (Windows) or Option (Mac) and hover over the word “Tone” in the Basic panel. The label changes to “Reset Tone.” Click it, and all five sliders snap back to zero. Only the Tone sliders reset. Everything else stays exactly where it was. It’s a clean undo for a specific section, and it’s the kind of keyboard shortcut that should be tattooed on every beginner’s desk.
What I’d Add From My Own Editing Workflow
Nace keeps the tutorial focused on the mechanics, which is exactly right for a beginner series. But when I’m working on a portrait session, I almost never adjust the Highlights slider alone. I move Highlights and Whites together, because they affect overlapping areas of the image and what you do to one changes how the other reads. Pull Highlights left, then nudge Whites slightly left as well, and you get a more natural-looking recovery than either slider delivers on its own. Think of Highlights as the gentle recovery tool and Whites as the ceiling stop. Same logic applies to Shadows and Blacks on the dark end. Shadows lifts the midrange darkness, Blacks sets the floor. Work them in pairs and your edits start feeling more cohesive.
The histogram interaction Nace demonstrates is also worth turning into a deliberate habit. Every session, try making at least one adjustment directly in the histogram rather than the sliders. You build a visual literacy around tone that influences how you shoot, not just how you edit.
The single most important takeaway here is this: the histogram and the sliders are the same control, displayed two different ways. Once that clicks, the Basic panel stops feeling like a guessing game and starts feeling like a conversation with your image. Lightroom is telling you where the information lives. You’re just deciding how much to use.
Watch the full tutorial on YouTube and follow along with the sample images Nace links in the description. Working on the same file while you watch is how this actually sticks.
Comments (1)
Tried this technique this morning. Game changer for real.
Leave a Comment