Every Lightroom user has a version of the same story. You spend twenty minutes getting a raw file exactly right, the tones are balanced, the colors are singing, and then you notice the power line cutting across the sky. Or the tourist walking through the background. Or the trash can that somehow ended up in the perfect composition. And just like that, you’re exporting to Photoshop, doing the thing, exporting back, and now you’ve got a TIFF sitting next to your raw file like a receipt you didn’t want.
That workflow tax is real. I’ve lost hours to it over the years, and honestly it’s one of the main reasons I still get messages from readers asking whether they should just switch to Photoshop for everything. My answer has always been “not yet” and this update is part of why. In this Matt Kloskowski tutorial covering the May 2024 Lightroom release, he walks through the new generative AI erase tool, and after spending a few days with it myself, I think it changes the calculus on how often you actually need to leave your raw editor.
Watch the full tutorial on YouTube
The short version: Adobe added real generative AI removal to Lightroom Classic 13.3, Lightroom 7.3, and Adobe Camera Raw. Not the old content-aware patch that was fine for sensor dust. Actual object removal with multiple generated variations to choose from. Here’s how to use it.
Step 1: Update to the Right Version First
 Adobe Creative Cloud update screen showing version numbers
Before anything else, check your version numbers. This feature lives in Lightroom Classic 13.3 and Lightroom 7.3. If you’re not there yet, open Adobe Creative Cloud and run your updates. The feature won’t appear at all on older builds, so if you open the healing panel and nothing looks different, that’s the first thing to check. Adobe’s update servers can be slow, so give it a few minutes if it doesn’t show up immediately.
Adobe Creative Cloud update screen showing version numbers
Before anything else, check your version numbers. This feature lives in Lightroom Classic 13.3 and Lightroom 7.3. If you’re not there yet, open Adobe Creative Cloud and run your updates. The feature won’t appear at all on older builds, so if you open the healing panel and nothing looks different, that’s the first thing to check. Adobe’s update servers can be slow, so give it a few minutes if it doesn’t show up immediately.
Step 2: Find the Eraser Tool in the Healing Panel
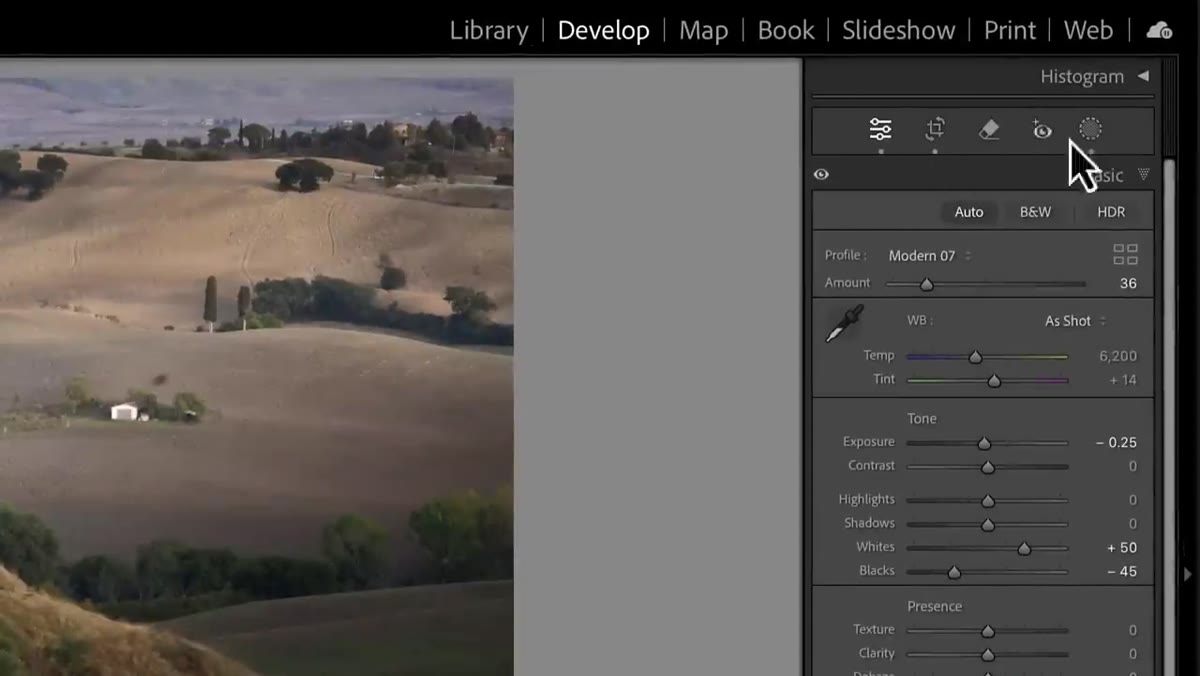 Lightroom Classic toolbar showing the eraser icon above the Basic panel
The tool lives in the same place it always has: the small toolbar sitting just above the Basic panel on the right side. You’re looking for the eraser icon. Matt mentions it used to look like a band-aid, and if you’ve been using Lightroom for years you probably recognize that panel as the spot you visit mostly to clean up sensor dust. That’s about to change. Click the eraser to open the removal options, and you’ll see the panel has a couple of new checkboxes that weren’t there before.
Lightroom Classic toolbar showing the eraser icon above the Basic panel
The tool lives in the same place it always has: the small toolbar sitting just above the Basic panel on the right side. You’re looking for the eraser icon. Matt mentions it used to look like a band-aid, and if you’ve been using Lightroom for years you probably recognize that panel as the spot you visit mostly to clean up sensor dust. That’s about to change. Click the eraser to open the removal options, and you’ll see the panel has a couple of new checkboxes that weren’t there before.
Step 3: Turn On Generative AI
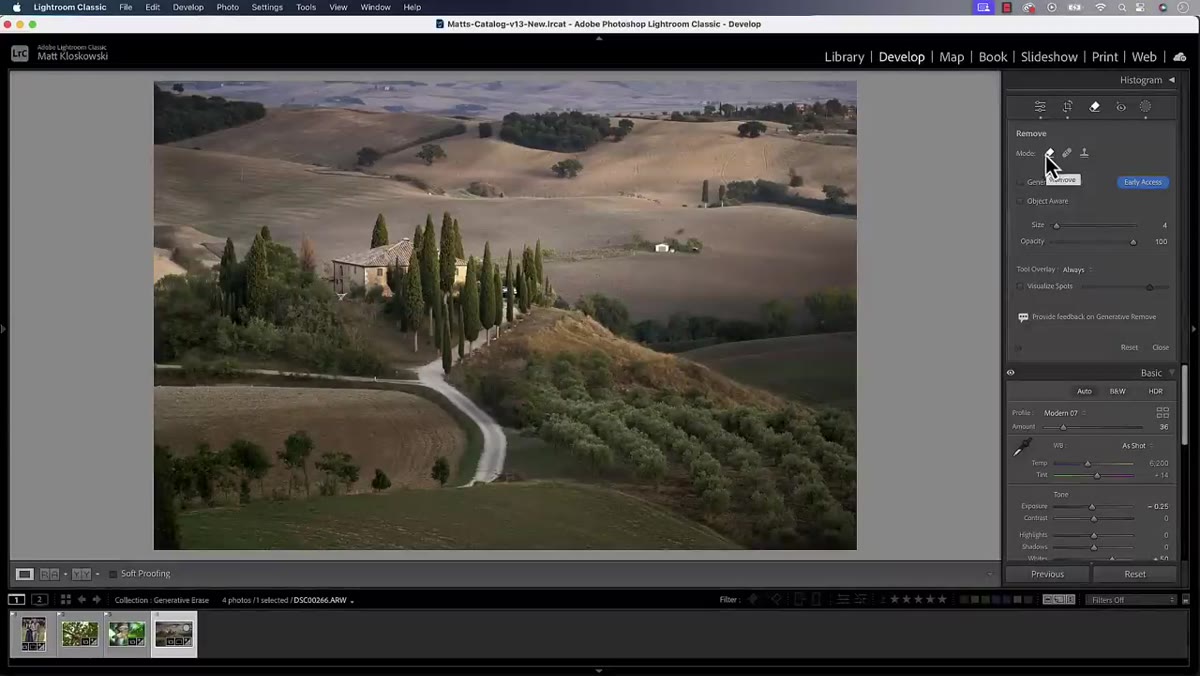 Healing panel with Generative AI checkbox highlighted
The first checkbox you’ll see is the one that enables generative AI. Toggle it on. This is what separates the new behavior from the old content-aware erase that’s been in Lightroom for a while. The legacy version could handle small blemishes and the occasional stray branch, but anything larger than a few hundred pixels tended to produce smearing or obvious texture mismatches. With generative AI enabled, the tool is sending your selection to Adobe’s cloud processing, which means it takes a few seconds longer, but the quality difference on larger objects is significant.
Healing panel with Generative AI checkbox highlighted
The first checkbox you’ll see is the one that enables generative AI. Toggle it on. This is what separates the new behavior from the old content-aware erase that’s been in Lightroom for a while. The legacy version could handle small blemishes and the occasional stray branch, but anything larger than a few hundred pixels tended to produce smearing or obvious texture mismatches. With generative AI enabled, the tool is sending your selection to Adobe’s cloud processing, which means it takes a few seconds longer, but the quality difference on larger objects is significant.
Step 4: Decide Whether to Use Object Aware Mode
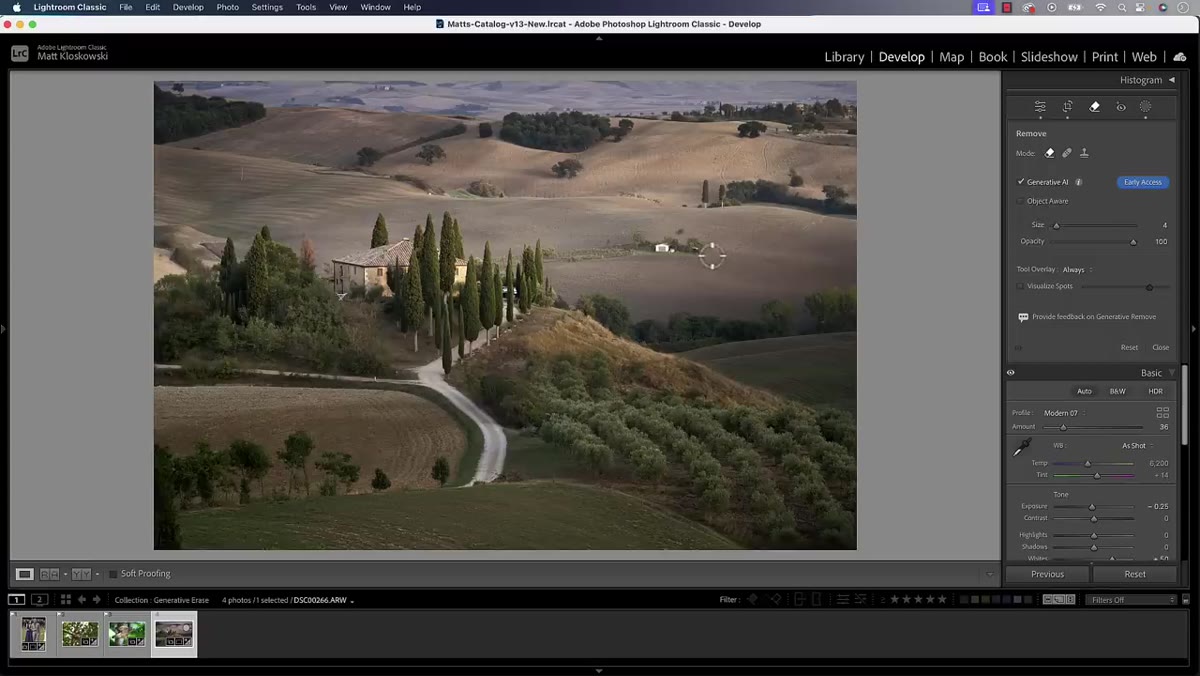 Object Aware checkbox in the healing panel options
The second checkbox is labeled Object Aware, and it changes how you paint your selection. With Object Aware turned off, the tool removes exactly what you brush over, pixel for pixel. With it turned on, Lightroom tries to detect the boundaries of whatever object you’re painting near and automatically snaps the selection to its edges. Think of it as a lighter version of the object masking tool you might already use for targeted adjustments. You don’t have to be precise. A rough stroke across a barn, a person, a sign is usually enough for Lightroom to figure out what you’re trying to remove. For irregular shapes with complex edges, Object Aware is almost always the better choice.
Object Aware checkbox in the healing panel options
The second checkbox is labeled Object Aware, and it changes how you paint your selection. With Object Aware turned off, the tool removes exactly what you brush over, pixel for pixel. With it turned on, Lightroom tries to detect the boundaries of whatever object you’re painting near and automatically snaps the selection to its edges. Think of it as a lighter version of the object masking tool you might already use for targeted adjustments. You don’t have to be precise. A rough stroke across a barn, a person, a sign is usually enough for Lightroom to figure out what you’re trying to remove. For irregular shapes with complex edges, Object Aware is almost always the better choice.
Step 5: Paint Over the Object You Want Removed
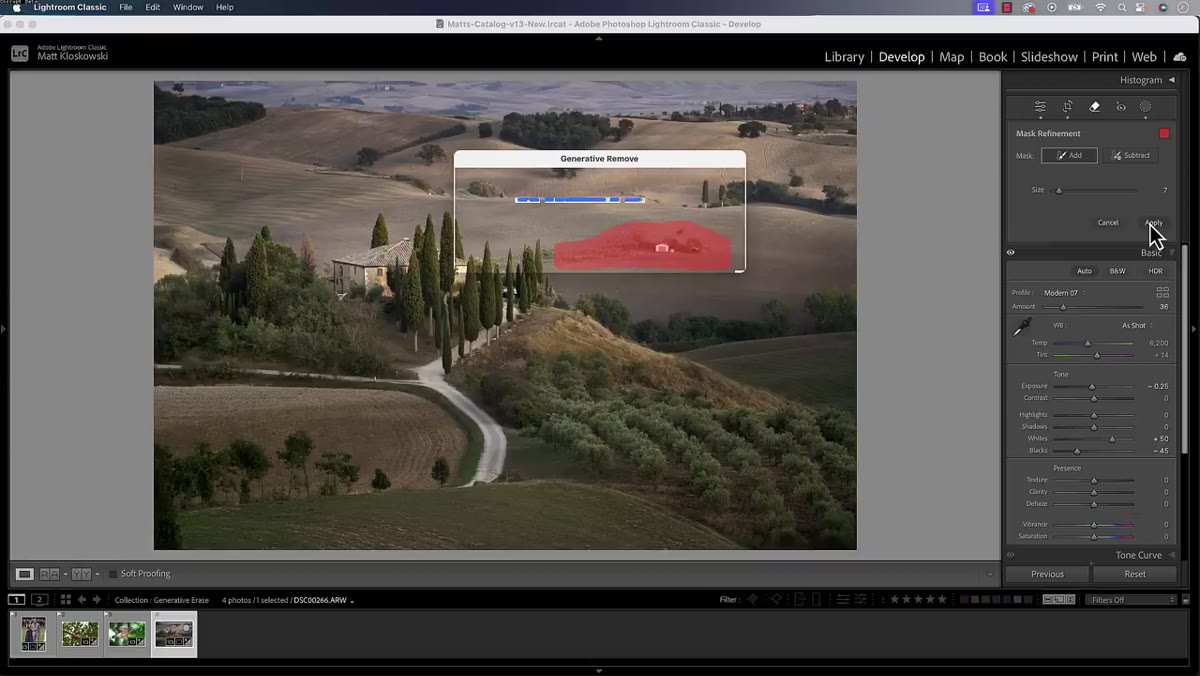 Brush stroke being painted over a barn structure in the photo
With your settings dialed in, just paint over the thing you want gone. You can adjust brush size with the bracket keys, and you can add to or subtract from your selection before you apply. If Object Aware is on, you’ll notice the selection snap and expand slightly to follow the object’s real edges rather than your exact brush path. Once your selection covers the target, hit Apply. The tool connects to Adobe’s generative AI cloud, so expect a few seconds of processing time. This is normal and not something to troubleshoot. It’s doing actual AI inference remotely, not running a local algorithm.
Brush stroke being painted over a barn structure in the photo
With your settings dialed in, just paint over the thing you want gone. You can adjust brush size with the bracket keys, and you can add to or subtract from your selection before you apply. If Object Aware is on, you’ll notice the selection snap and expand slightly to follow the object’s real edges rather than your exact brush path. Once your selection covers the target, hit Apply. The tool connects to Adobe’s generative AI cloud, so expect a few seconds of processing time. This is normal and not something to troubleshoot. It’s doing actual AI inference remotely, not running a local algorithm.
Step 6: Cycle Through the Variations and Refresh If Needed
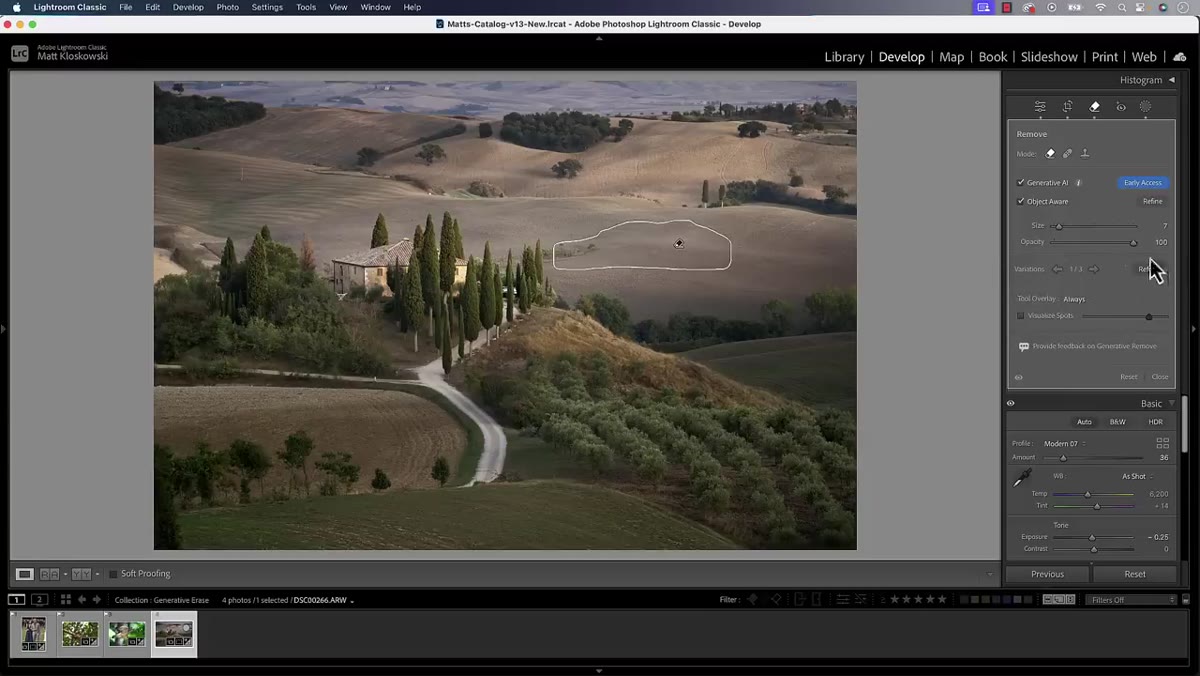 Variations panel showing three AI-generated removal options
Once processing finishes, Lightroom doesn’t just hand you one result. It generates three variations of the removal, and you can cycle through them using the right arrow key in the Variations section of the panel. This is one of those features that sounds like a small detail but genuinely matters in practice. Some variations will blend better with your specific background texture, and the difference between option one and option three can be the difference between something that looks real and something that looks edited. If all three variations miss the mark, hit the Refresh button and Lightroom will generate three entirely new options. You’re not locked into anything until you click Done.
Variations panel showing three AI-generated removal options
Once processing finishes, Lightroom doesn’t just hand you one result. It generates three variations of the removal, and you can cycle through them using the right arrow key in the Variations section of the panel. This is one of those features that sounds like a small detail but genuinely matters in practice. Some variations will blend better with your specific background texture, and the difference between option one and option three can be the difference between something that looks real and something that looks edited. If all three variations miss the mark, hit the Refresh button and Lightroom will generate three entirely new options. You’re not locked into anything until you click Done.
What I’d Add From My Own Experience
The tool handles sky replacements and open backgrounds extremely well in my testing. Straight horizon lines, grassy fields, clean wall textures: these come back looking convincing on the first or second variation most of the time. Where it still struggles is with foreground objects that have complex overlapping elements, like a person standing in front of detailed architecture. In those cases I’ll run the generative erase to handle the bulk of the removal, then do a quick pass with the healing tool to clean up any edge artifacts. It’s not a perfect one-click solution for every scenario, but it cuts my Photoshop round-trips down by probably sixty to seventy percent. For most of my work, that’s enough to keep the whole edit inside one application.
One practical note: because the processing happens in Adobe’s cloud, you need an active internet connection and an Adobe account with generative AI credits. Adobe includes a monthly allotment with most Creative Cloud plans, and removals don’t burn through them at a scary rate, but it’s worth knowing the tool isn’t fully offline.
The single most important thing this update changes is where you set your default. For years the default assumption has been “if I need to remove something substantial, I’m going to Photoshop.” That assumption is now worth questioning every single time. The generative AI erase in Lightroom 13.3 is good enough to be the first tool you reach for, not a consolation option while you wait to open Photoshop.
Watch the full tutorial on YouTube to see Matt walk through the live removal on an actual photo, including the moment one of the variations generated an entirely new barn where he was trying to remove one.
Comments
Leave a Comment