Last week I was editing a golden hour shot I’d been excited about since I pulled the memory card. Gorgeous light, perfect composition, the whole thing. Then I opened it in Lightroom and the sky was absolutely cooked. Not a little hot. Blown. The histogram was stacked against the right wall like it was trying to escape. My first instinct, same as it’s always been, was to reach for the Highlights slider, drag it left, and hope for the best.
Sometimes that works. This time it didn’t move the needle enough. The detail just wasn’t coming back.
That’s when I went looking for a more systematic approach and landed on this Mark Denney tutorial, which reframed how I think about overexposed areas entirely.
The Difference Between “Blown” and “Unrecoverable”
The most useful thing Mark establishes right away is the distinction between highlights that look blown and highlights that are actually gone. This sounds obvious but it changes everything about how you start an edit.
A highlight that looks blown on screen might still have recoverable data in the RAW file. A truly clipped highlight, one where all three RGB channels have hit 255 simultaneously, has no data left to recover. The pixel is pure white. Lightroom cannot invent information that was never recorded.
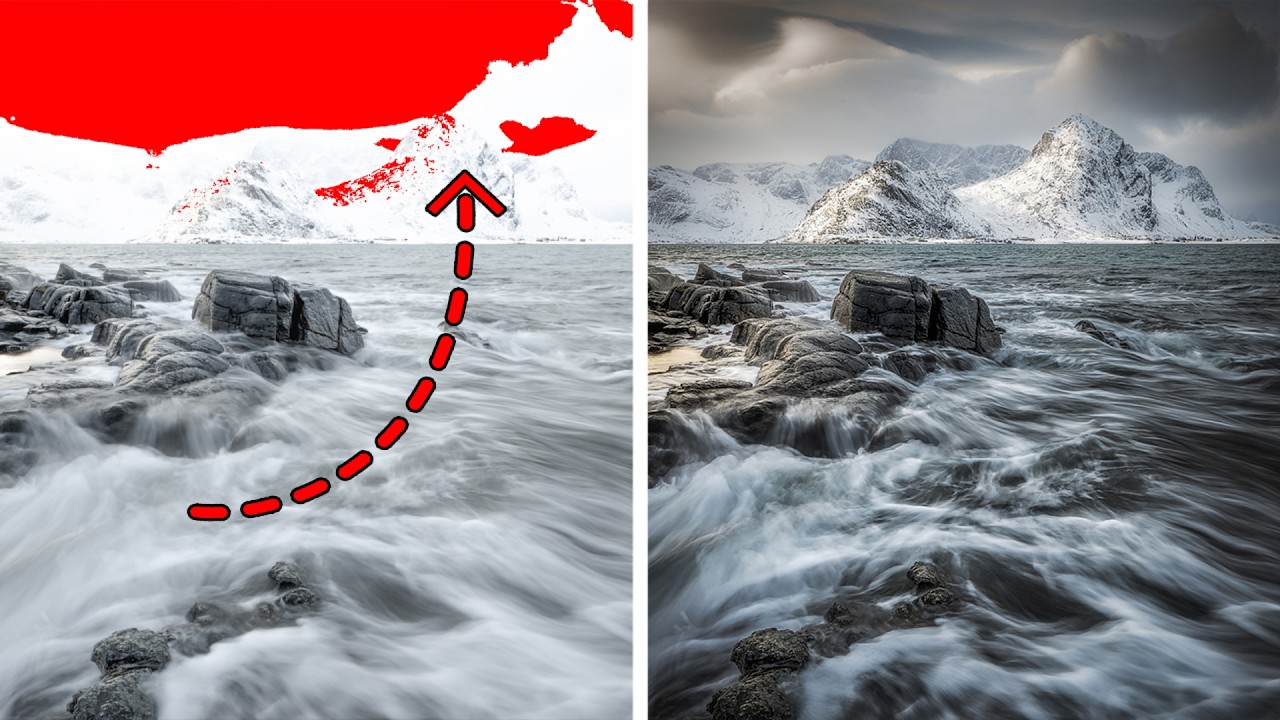
The way to check which situation you’re in is the clipping warning in Lightroom, the little triangle in the top-right corner of the histogram. Toggle it on and any area with blown highlights turns red. If only part of the sky is showing red, you likely have data to work with. If the entire bright region is screaming red, you’ll need to manage expectations before you touch a single slider.
The Lightroom Slider Sequence That Actually Works
Once you’ve confirmed the highlights are recoverable, Mark walks through a specific order of operations in the Basic panel. This sequence matters more than any individual slider value.
Start with Exposure. Bring it down enough to pull the overall image back from the edge, even if it feels like you’re losing too much in the shadows. You’re not done yet. Then pull Highlights all the way to -100. Not partway. All the way. From there, move to Whites and drag that down until the clipping indicator turns off or reduces significantly. The key thing Mark points out is that Whites and Highlights are doing different jobs. Highlights targets the brightest midtones and upper tones, while Whites is addressing the absolute ceiling of the exposure range. You need both working together.
After that, bring Shadows back up to compensate for the darker exposure, and use the Tone Curve to refine how the recovery looks rather than just how it measures. A slight S-curve with the upper anchor point pulled down keeps contrast in the scene while letting the sky breathe.
When Lightroom Tops Out and Photoshop Has to Step In
Here’s where the tutorial gets genuinely useful for anyone shooting in high-contrast situations. If you’ve run Highlights to -100, pulled Whites down, adjusted Exposure, and the clipping warning is still lighting up, Lightroom has given you everything it can. The data isn’t there, or the RAW file’s dynamic range just wasn’t wide enough to capture both ends of the scene.
Mark’s solution at that point is a luminosity-based sky replacement or blending workflow in Photoshop. Not the auto Sky Replacement tool in Photoshop, which tends to look like a postcard, but a manual luminosity mask approach where you isolate the sky, bring in a second exposure or a bracketed shot, and blend the two using a mask built from the image’s own tonal values. The mask follows the natural edges of the scene instead of trying to guess where the sky stops and the land begins.
This is the professional move. It takes longer, but it produces results that hold up under scrutiny.
Where I’d Push Back Slightly
I’ve used this workflow enough now that I trust it, but there’s one situation where it falls down and I want to be honest about that: images with specular highlights. Think water reflecting direct sunlight, metal surfaces, a lighthouse lens in direct afternoon light. Those individual pinpoints of pure white are not the same as an overexposed sky. They’re supposed to be white. Chasing them with Highlights and Whites will flatten the image and make those natural reflections look muddy and gray.
My rule now is to look at what the blown areas actually are before I start pulling sliders. Sky, snow, fog, overexposed skin tones: those are worth recovering. A sun reflection on a lake? Let it be white. Trying to recover a specular highlight is one of the fastest ways to make a photo look over-processed.
The Actual Takeaway
Blown highlights are a technical problem with a technical solution, and most of the time that solution exists in the RAW file if you know where to look and in what order to look for it. Check your clipping warning before you touch anything, run your slider sequence deliberately, and know when Photoshop is the more honest tool for the job rather than an admission of defeat.
Watch Mark Denney’s full tutorial for the visual walkthrough, especially the Photoshop section, because seeing the luminosity mask built in real time is worth more than any written description of it.
Comments
Leave a Comment