
There’s a specific kind of editing problem that used to eat my lunch every time: a landscape shot where the sky is blowing out, the foreground is too dark, but the foreground also has bright spots that make a single global exposure adjustment completely useless. You bring the sky down and the boats (or rocks, or buildings) go muddy. You lift the shadows and the sky turns white. Classic trap. I’ve been editing landscape photos for years and this balancing act still requires a real strategy, not just a drag of the Exposure slider.
In this Matt Kloskowski tutorial, Watch the full tutorial on YouTube, he walks through a full start-to-finish edit on exactly this kind of image, moving from a raw file with no adjustments all the way to a finished photo via Lightroom and Photoshop. What I like about his approach is that he’s not just running through features. He’s narrating his actual decision-making, which is the part most tutorials skip. This breakdown follows his workflow in order, with my own notes layered in.
Step 1: Crop First, and Crop With Intent
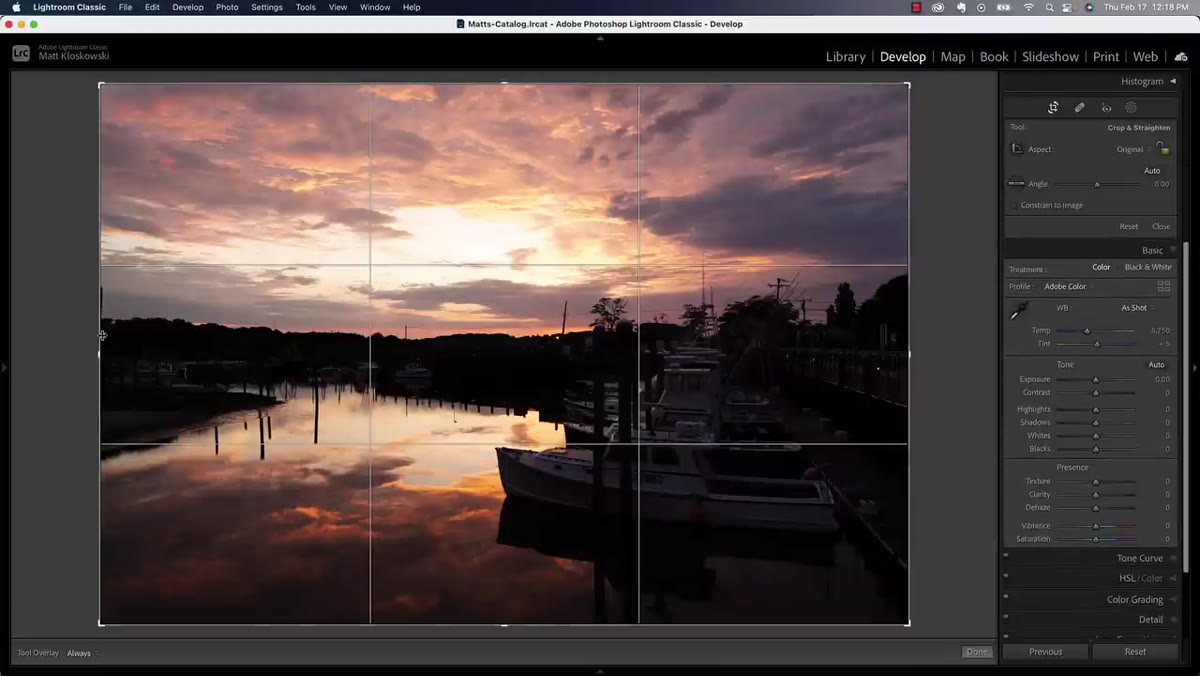 Lightroom Develop module with crop tool active
Before touching a single tonal adjustment, get your crop locked in. Matt handles this early because cropping affects everything that follows, especially if you’re planning to mask specific areas. The crop isn’t just about trimming edges. It’s about deciding what the photo is actually about before you start sculpting light around a composition you might change later.
Lightroom Develop module with crop tool active
Before touching a single tonal adjustment, get your crop locked in. Matt handles this early because cropping affects everything that follows, especially if you’re planning to mask specific areas. The crop isn’t just about trimming edges. It’s about deciding what the photo is actually about before you start sculpting light around a composition you might change later.
If you have a print size in mind, crop to that ratio now. If you’re sharing online, crop for what looks strongest visually and move on. Don’t overthink it. Get it done so every subsequent decision is made on the photo you’re actually going to deliver.
Step 2: Handle the Technical Corrections Early
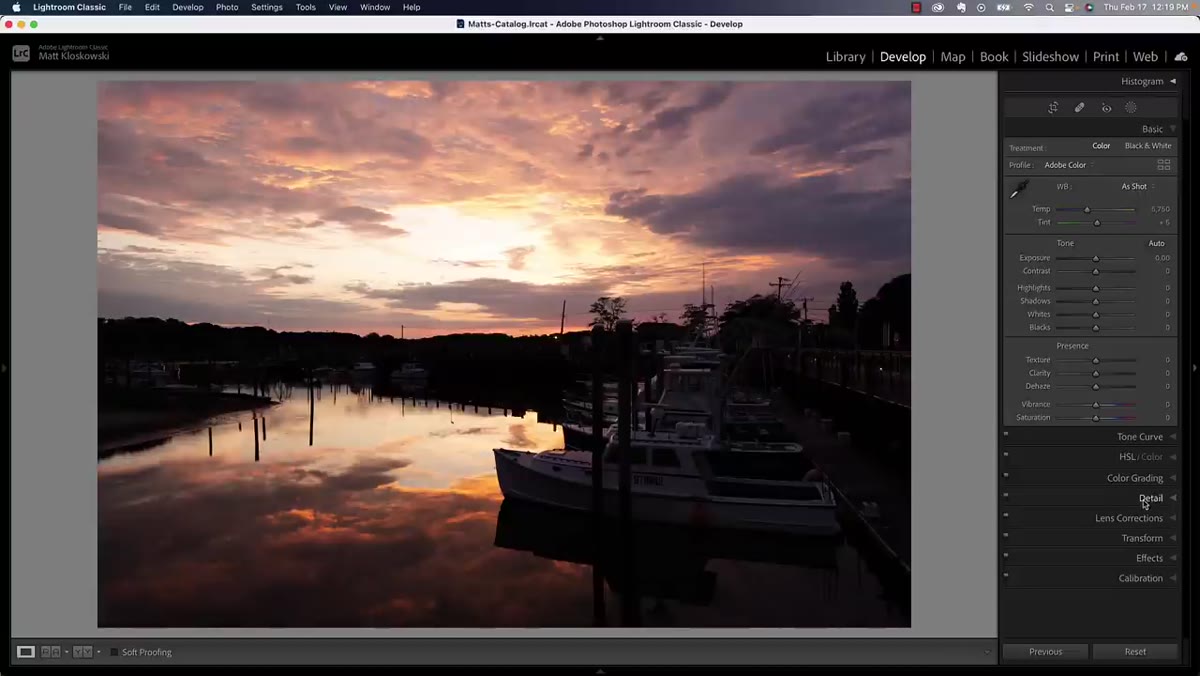 Detail panel open, Lens Corrections checked in Lightroom
Once the crop is set, Matt makes a pass through the technical corrections before any creative work. This means lens corrections (he checks chromatic aberration removal), and a guided perspective fix using Lightroom’s Upright tool. The perspective correction here isn’t dramatic, but there’s enough of a lean in the image that it reads as slightly off. Two guided lines placed along elements that should be vertical straighten it out cleanly.
Detail panel open, Lens Corrections checked in Lightroom
Once the crop is set, Matt makes a pass through the technical corrections before any creative work. This means lens corrections (he checks chromatic aberration removal), and a guided perspective fix using Lightroom’s Upright tool. The perspective correction here isn’t dramatic, but there’s enough of a lean in the image that it reads as slightly off. Two guided lines placed along elements that should be vertical straighten it out cleanly.
Noise reduction and sharpening live here too, in the Detail panel. Matt skips these during the walkthrough to keep the pace up, but in a real workflow you’d make those calls based on your ISO and how much you’re planning to crop into the image. For most daylight landscapes, default sharpening is fine. High-ISO shots at dusk are a different conversation.
Step 3: Use Sky Select as Your Starting Point, Not Your Final Answer
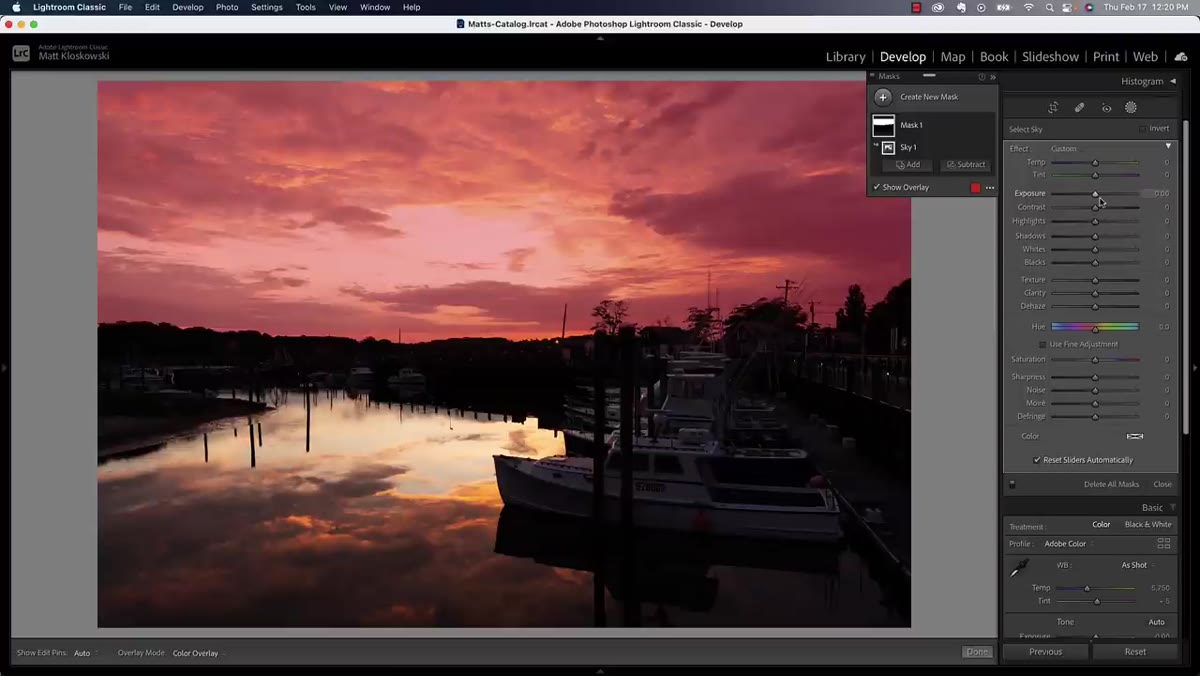 Select Sky mask active with exposure pulled down in Lightroom
Here’s where the real work starts. Matt heads into Lightroom’s Masking panel and uses Select Sky to create an automatic selection of the sky. From there, he pulls exposure down and drags highlights lower to recover the brightest areas. The sky selection in Lightroom is genuinely good these days. On complex subjects with trees or irregular horizons it can struggle, but on a harbor or landscape with a clean-ish horizon it does most of the work for you.
Select Sky mask active with exposure pulled down in Lightroom
Here’s where the real work starts. Matt heads into Lightroom’s Masking panel and uses Select Sky to create an automatic selection of the sky. From there, he pulls exposure down and drags highlights lower to recover the brightest areas. The sky selection in Lightroom is genuinely good these days. On complex subjects with trees or irregular horizons it can struggle, but on a harbor or landscape with a clean-ish horizon it does most of the work for you.
The important thing to understand is that this selection is a starting point. Matt doesn’t treat it as done. He turns the mask overlay off and on to evaluate the effect, and what he notices is that while the bright areas of the sky are improving, the darker clouds are getting pushed too far. They’re going gray and heavy in a way that doesn’t look natural. That observation leads directly to the next step.
Step 4: Refine with Luminance Range Masking
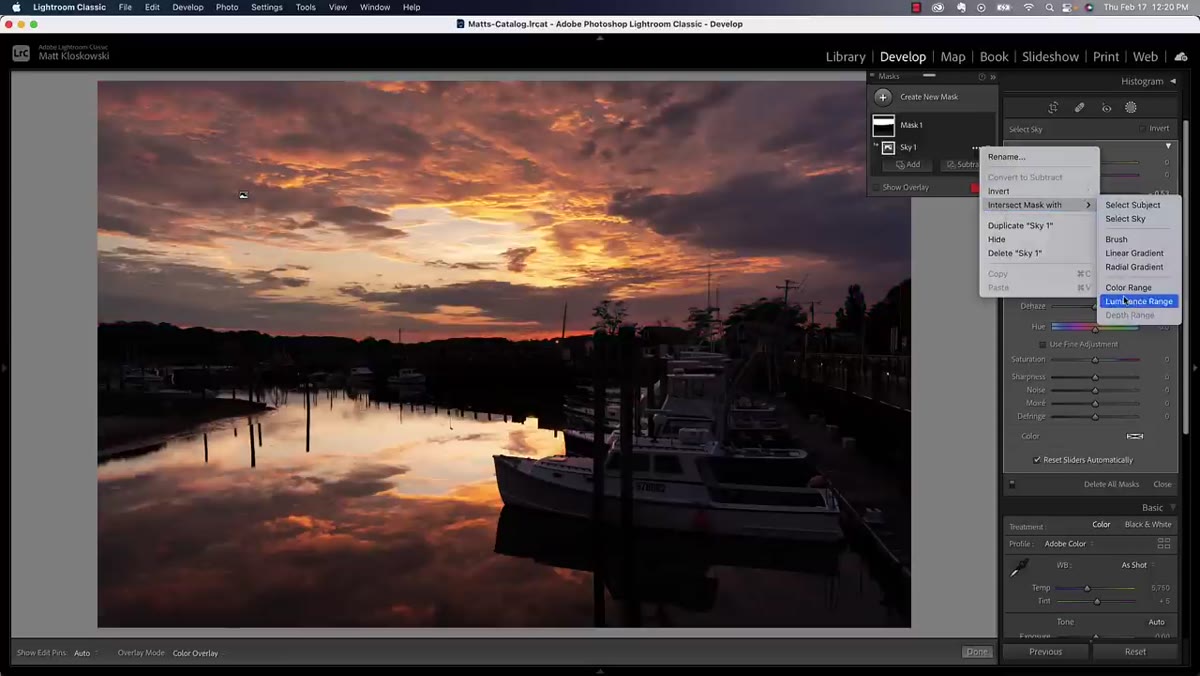 Intersect with Luminance Range option shown in mask panel
This is the step that separates people who know Lightroom from people who really know Lightroom. With the sky mask active, Matt opens the mask options and chooses to intersect the existing sky selection with a Luminance Range. What this does is narrow the selection to only affect pixels that fall within a specific brightness range inside the sky.
Intersect with Luminance Range option shown in mask panel
This is the step that separates people who know Lightroom from people who really know Lightroom. With the sky mask active, Matt opens the mask options and chooses to intersect the existing sky selection with a Luminance Range. What this does is narrow the selection to only affect pixels that fall within a specific brightness range inside the sky.
By targeting the luminance range in the middle tones, he’s essentially telling Lightroom: apply this darkening adjustment only to the bright parts of the sky, and leave the darker clouds alone. The result is a sky that looks balanced without the shadows getting crushed. This technique works anywhere you have a subject with extreme variation in brightness within a single selection. It’s one of those tools that feels like it was built for exactly this problem, because it was.
Step 5: Build Separate Masks for the Foreground
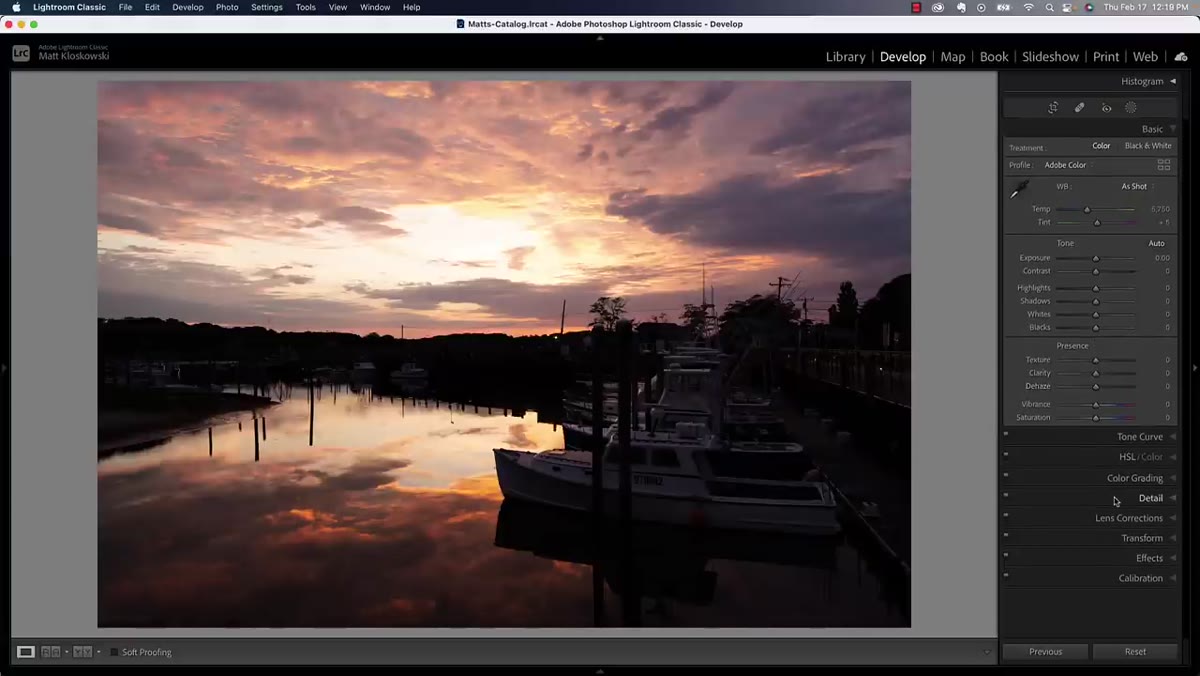 Masking panel open, foreground area selected separately
The foreground in this shot is the harder problem, and Matt addresses it with the same masking workflow. A sky selection handles the top half of the image, but the foreground needs its own mask, and possibly more than one. Bright spots in the foreground respond differently to exposure adjustments than the darker areas around them, so trying to fix everything with a single gradient or luminance mask won’t cut it.
Masking panel open, foreground area selected separately
The foreground in this shot is the harder problem, and Matt addresses it with the same masking workflow. A sky selection handles the top half of the image, but the foreground needs its own mask, and possibly more than one. Bright spots in the foreground respond differently to exposure adjustments than the darker areas around them, so trying to fix everything with a single gradient or luminance mask won’t cut it.
The approach is methodical: identify which tonal zones in the foreground need different treatment, build a mask for each one, and adjust each independently. This is where time gets spent in a real edit. Don’t rush it. A good mask is invisible in the final image. A bad one shows up immediately as a halo or an unnatural-looking brightness shift.
Step 6: Move to Photoshop for Distraction Removal
 Before and after comparison showing final retouched version
Once the tonal work is done in Lightroom, Matt moves the file into Photoshop to finish it off. The main task there is distraction removal, cleaning up elements in the frame that pull the eye away from the subject. He doesn’t go deep into the Photoshop side in this tutorial, but the workflow is standard: use Content-Aware Fill or the Clone Stamp for smaller distractions, and Generative Fill for anything more complex.
Before and after comparison showing final retouched version
Once the tonal work is done in Lightroom, Matt moves the file into Photoshop to finish it off. The main task there is distraction removal, cleaning up elements in the frame that pull the eye away from the subject. He doesn’t go deep into the Photoshop side in this tutorial, but the workflow is standard: use Content-Aware Fill or the Clone Stamp for smaller distractions, and Generative Fill for anything more complex.
The reason to do this in Photoshop rather than Lightroom is control. Lightroom’s Healing Brush has gotten better, but for anything that requires real precision or blending across a complex background, Photoshop is still the right tool.
My Take: The Masking Order Matters More Than the Tools
When I work through edits like this, I’ve found that the order you build your masks in changes the result. I always start with the sky because it anchors my exposure decisions for everything else. If I try to fix the foreground first, I end up chasing a moving target when I come back to darken the sky. Matt’s workflow reflects this same logic even if he doesn’t explicitly call it out.
The luminance range intersect is a technique I now use on almost every landscape. It’s become as automatic as lens correction for me. If you’ve never used it, your next landscape edit is the place to try it.
The single most transferable idea from this tutorial is that global adjustments are almost never enough for a high-contrast scene. The real work happens inside your masks, in how precisely you can tell the software exactly which pixels to change and which ones to leave alone. That precision is what makes an edit look finished rather than processed.
Watch the full tutorial on YouTube to see Matt’s full decision-making process in real time, including the Photoshop cleanup pass that takes the image across the finish line.
Comments (2)
This should be required reading for anyone starting out.
Simple but effective. Sometimes that's all you need.
Leave a Comment