
Every few months Adobe drops an update that makes me reconsider a chunk of my workflow. Most of the time it’s incremental, a slider moved, a panel reorganized. But the April 2023 release of Lightroom Classic 12.3 landed differently. It touched two areas I deal with constantly: noise reduction and masking. And in both cases, the changes weren’t cosmetic.
In this Matt Kloskowski tutorial, he walks through the new Denoise button and the expanded masking options that shipped with version 12.3. Watch the full tutorial on YouTube if you want to follow along with his footage, but I’m going to break down every step below with enough detail that you can work through it on your own photos without pausing the video every thirty seconds.
The noise reduction piece is the one I was most curious about. I shoot a lot in low light, and for years my go-to was a third-party plugin that worked fine but added friction to the process. Having something AI-powered baked directly into Lightroom, no export, no round-trip, changes the math on that pretty significantly.
Step 1: Confirm You’re on the Right Version
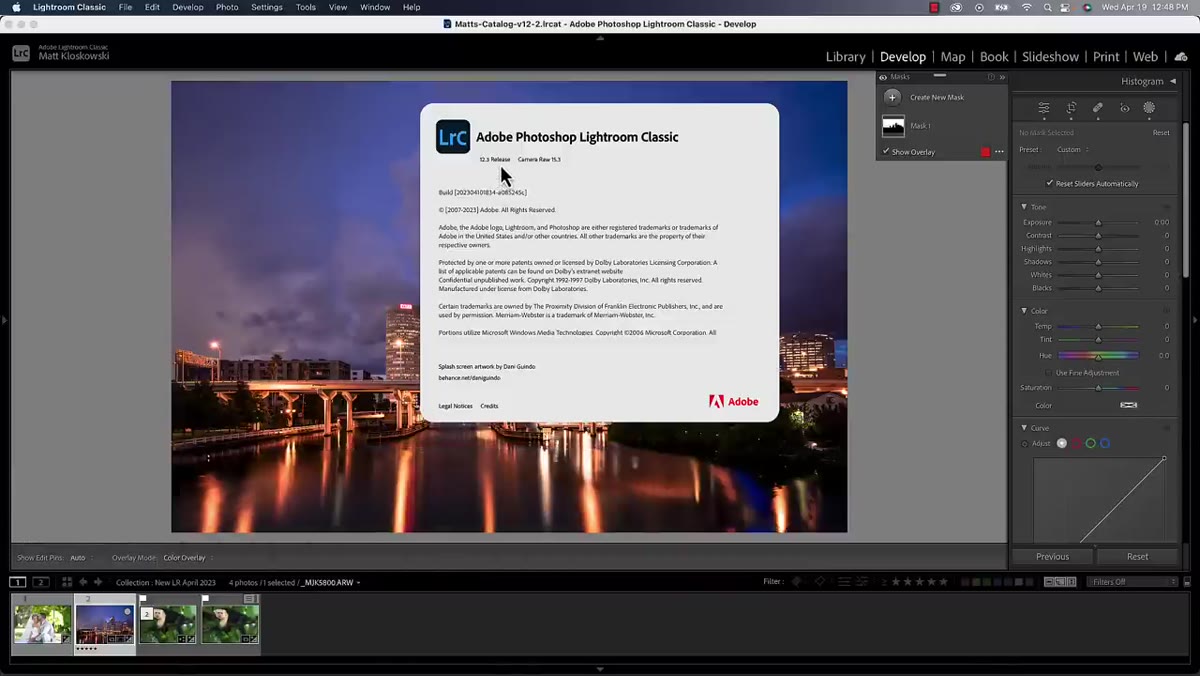 About Lightroom screen showing version 12.3
Before anything else, check that you’re actually running 12.3. Go to the Lightroom menu and choose “About Lightroom Classic.” You’re looking for version 12.3. If you’re working in Camera Raw instead, the equivalent version is 15.3. If you’re on an older build, the Denoise button simply won’t be there, and you’ll spend a frustrating few minutes wondering what you’re missing. Adobe manages the update process through Creative Cloud, so if you need help getting there, that’s a question for their support docs.
About Lightroom screen showing version 12.3
Before anything else, check that you’re actually running 12.3. Go to the Lightroom menu and choose “About Lightroom Classic.” You’re looking for version 12.3. If you’re working in Camera Raw instead, the equivalent version is 15.3. If you’re on an older build, the Denoise button simply won’t be there, and you’ll spend a frustrating few minutes wondering what you’re missing. Adobe manages the update process through Creative Cloud, so if you need help getting there, that’s a question for their support docs.
Step 2: Find the New Denoise Button in the Detail Panel
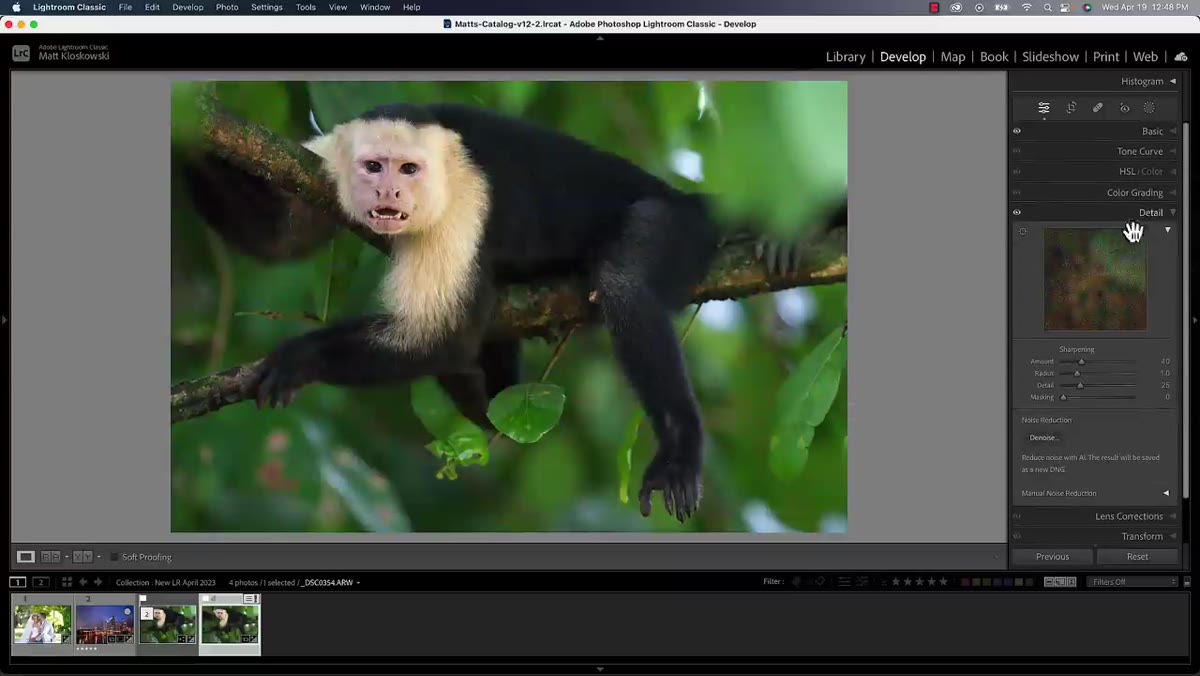 Detail panel open showing Denoise button and Manual Noise Reduction
Head into the Develop module and scroll down to the Detail panel. This panel has been around forever, but it got a significant reorganization here. The noise reduction controls you already know are still present, but they’ve been relabeled “Manual Noise Reduction” and tucked under a collapsible arrow. What’s new is the prominent Denoise button sitting above them. If your Detail panel is collapsed or the manual section is hiding the button, twirl things open until you see it. It took me a second to spot it the first time because I was looking in the wrong place out of habit.
Detail panel open showing Denoise button and Manual Noise Reduction
Head into the Develop module and scroll down to the Detail panel. This panel has been around forever, but it got a significant reorganization here. The noise reduction controls you already know are still present, but they’ve been relabeled “Manual Noise Reduction” and tucked under a collapsible arrow. What’s new is the prominent Denoise button sitting above them. If your Detail panel is collapsed or the manual section is hiding the button, twirl things open until you see it. It took me a second to spot it the first time because I was looking in the wrong place out of habit.
Step 3: Open the Enhanced Dialog and Set Your Denoise Amount
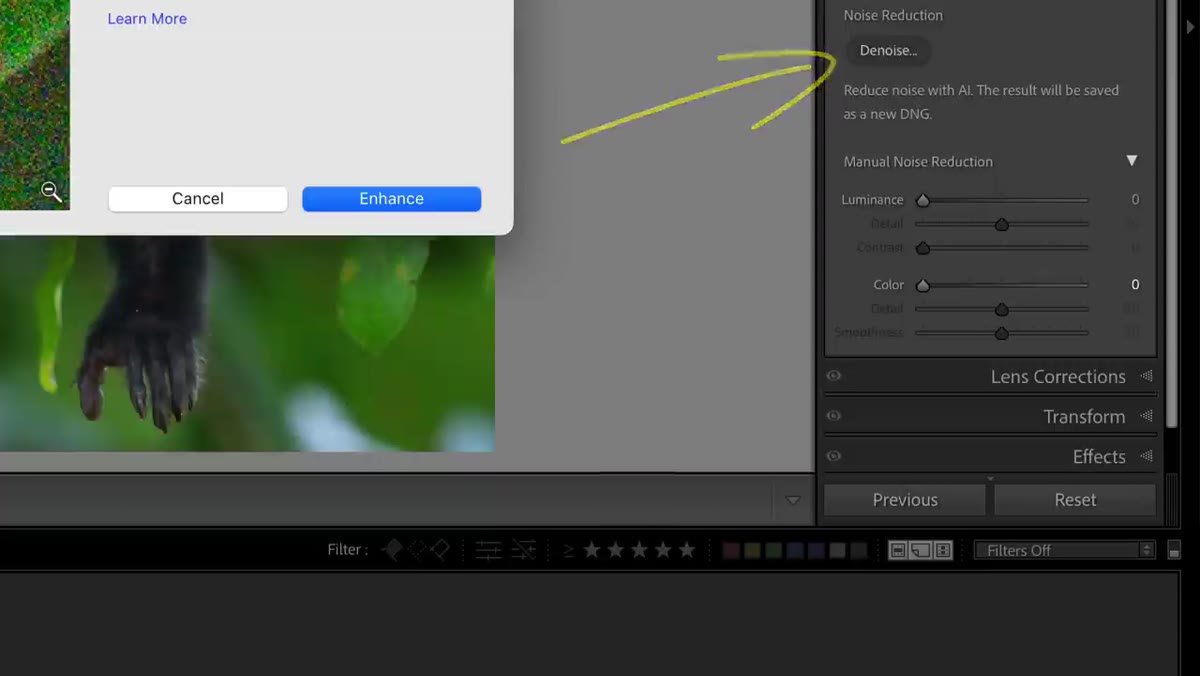 Enhanced dialog window open with Denoise slider visible
Clicking Denoise opens the Enhanced dialog window, which is the same panel that houses Raw Details and Super Resolution. The Denoise feature is the new addition here. The interface is deliberately simple: one slider, running from 0 to 100. Kloskowski’s advice is solid, and I’d echo it from my own experience: drag to the extremes first so you understand the range, then work your way to something that holds actual texture. Cranking it to 100 tends to produce that smooth, waxy look that makes skin or fur feel like a painting. Somewhere in the 50-60 range is a reasonable starting point for most images, but trust your eyes over any number I give you.
Enhanced dialog window open with Denoise slider visible
Clicking Denoise opens the Enhanced dialog window, which is the same panel that houses Raw Details and Super Resolution. The Denoise feature is the new addition here. The interface is deliberately simple: one slider, running from 0 to 100. Kloskowski’s advice is solid, and I’d echo it from my own experience: drag to the extremes first so you understand the range, then work your way to something that holds actual texture. Cranking it to 100 tends to produce that smooth, waxy look that makes skin or fur feel like a painting. Somewhere in the 50-60 range is a reasonable starting point for most images, but trust your eyes over any number I give you.
The dialog also includes a zoom control so you can click around the frame and inspect specific areas at close range. Use it. Edges, hair, and fabric are where over-processing shows up first, and you want to catch that before you commit.
Step 4: Render and Review the New DNG
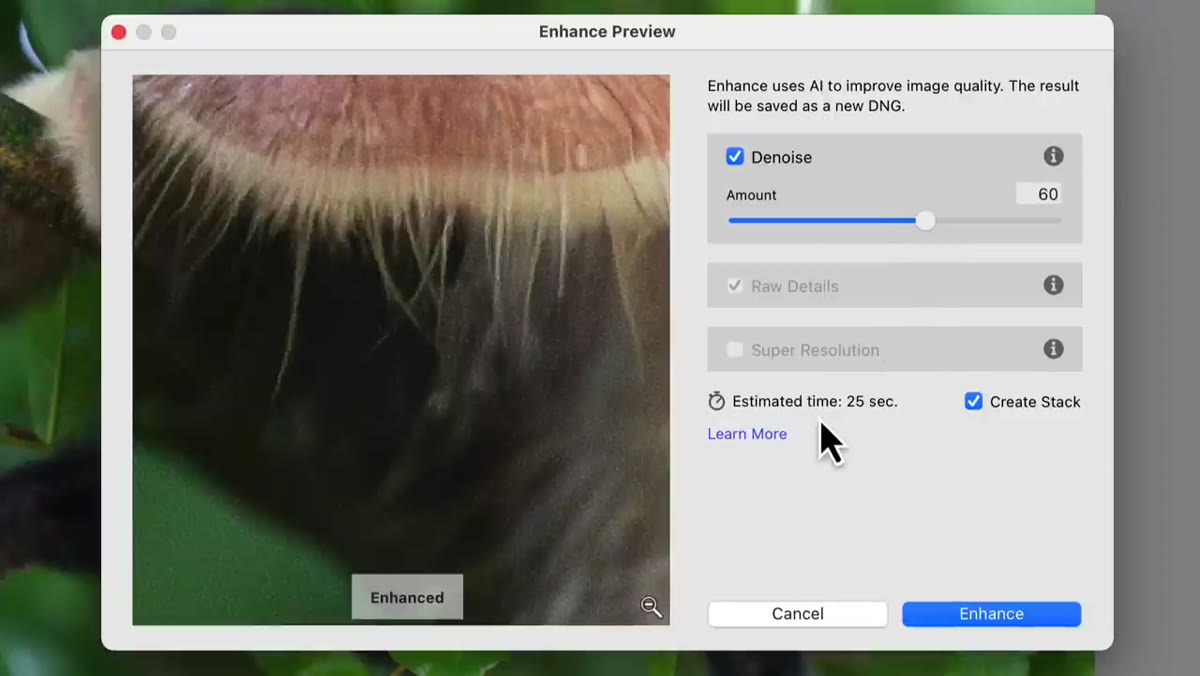 Estimated render time displayed in Enhanced dialog
Once you’ve landed on an amount, the dialog shows an estimated render time before you hit Enhance. For a typical raw file, Kloskowski notes this runs around 25 to 30 seconds, which tracks with what I’ve seen on my machine. The process creates a brand new DNG file, it does not modify your original, and Lightroom gives you the option to automatically stack it with the source image so your catalog stays tidy. The new file gets “Enhanced NR” appended to the filename, which makes it easy to identify later. Hover over it in the filmstrip and you’ll see the label clearly.
Estimated render time displayed in Enhanced dialog
Once you’ve landed on an amount, the dialog shows an estimated render time before you hit Enhance. For a typical raw file, Kloskowski notes this runs around 25 to 30 seconds, which tracks with what I’ve seen on my machine. The process creates a brand new DNG file, it does not modify your original, and Lightroom gives you the option to automatically stack it with the source image so your catalog stays tidy. The new file gets “Enhanced NR” appended to the filename, which makes it easy to identify later. Hover over it in the filmstrip and you’ll see the label clearly.
This non-destructive approach is worth appreciating. You’re not committing to anything. If you decide the processed version isn’t worth keeping, you delete the DNG and move on.
Step 5: Explore the New Masking Options - Facial Hair and Clothes
 Masking panel showing Facial Hair and Clothes options highlighted
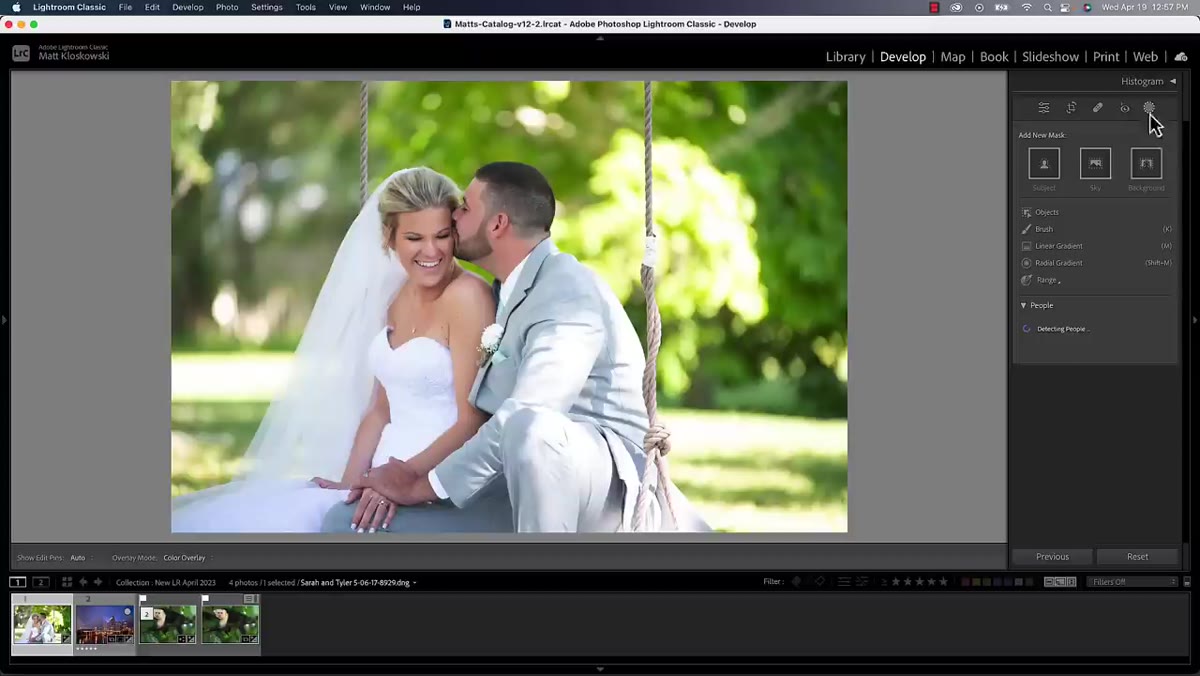
Now shift over to masking. Click the Masking icon in the toolbar at the top of the Develop panel. When Lightroom detects a person in the frame, it will prompt you to select that subject. Once you click through to the people masking options, you’ll find two additions that weren’t there before: Facial Hair and Clothes. These sit alongside the existing body-part selections like skin, hair, and eyes.
Masking panel showing Facial Hair and Clothes options highlighted
Now shift over to masking. Click the Masking icon in the toolbar at the top of the Develop panel. When Lightroom detects a person in the frame, it will prompt you to select that subject. Once you click through to the people masking options, you’ll find two additions that weren’t there before: Facial Hair and Clothes. These sit alongside the existing body-part selections like skin, hair, and eyes.
Facial Hair is genuinely useful if you’re retouching portraits of subjects with beards or stubble. Being able to isolate that area independently means you can adjust texture and clarity on the beard without affecting surrounding skin. Clothes opens up targeted adjustments to what someone is wearing, which is handy for desaturating a distracting jacket or lifting shadow detail in dark fabric. Enable either one and Lightroom paints a red overlay showing you exactly what’s selected before you apply any edits.
Step 6: Use the Updated Background Selection
 Select Background mask applied with new scrollable settings
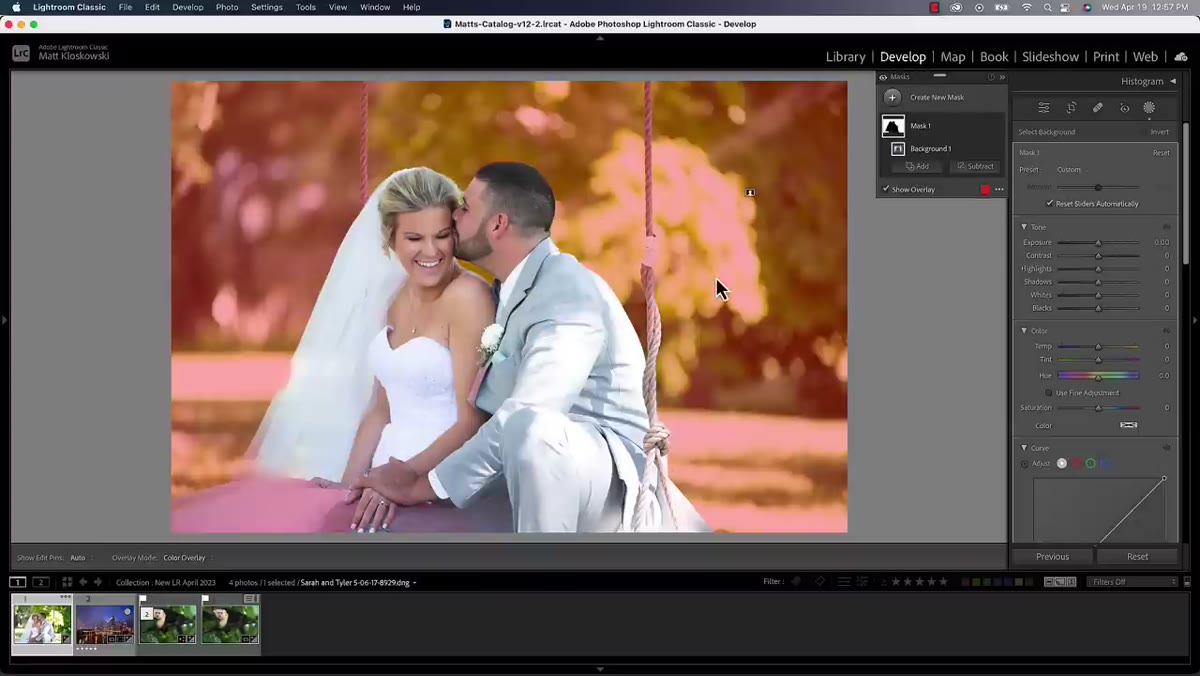
The background selection tool also received a quality-of-life improvement in this update. After applying a background mask, scroll down through the masking settings panel and you’ll find the controls are better organized for quick adjustment. Kloskowski points this out briefly, and while it’s not as flashy as the Denoise feature, a cleaner panel layout genuinely speeds up the editing process when you’re working through a session of images that all need similar background treatment.
Select Background mask applied with new scrollable settings
The background selection tool also received a quality-of-life improvement in this update. After applying a background mask, scroll down through the masking settings panel and you’ll find the controls are better organized for quick adjustment. Kloskowski points this out briefly, and while it’s not as flashy as the Denoise feature, a cleaner panel layout genuinely speeds up the editing process when you’re working through a session of images that all need similar background treatment.
My Take: Where This Fits in a Real Workflow
I’ve been running the Denoise feature on high-ISO wildlife shots from a recent trip, and the results hold up against the third-party plugin I’d been using, which costs more and requires leaving Lightroom entirely. Is it identical? No. Is the difference meaningful for client delivery? In most cases, not really. For anyone who hasn’t already invested in a dedicated noise reduction tool, building this into your Lightroom-native workflow is a straightforward decision.
The masking additions are more evolutionary than revolutionary, but they fill genuine gaps. Facial Hair masking in particular is the kind of thing that sounds niche until you spend twenty minutes trying to achieve the same result with a brush.
One thing I’d add that the tutorial doesn’t cover: run the Denoise step before you do any local adjustments. Because the feature creates a new DNG, any masking or local edits you’ve already applied live on the original file and won’t carry over automatically. Do it first, build your edit on top of the processed file, and save yourself the headache.
The single most important thing to take away here is that AI-powered denoising is now inside Lightroom Classic with no additional cost and no round-trip export. If you haven’t tried it yet, open your noisiest recent raw file and give it ten minutes. The quality floor it sets is genuinely impressive.
Watch the full tutorial on YouTube to see Matt walk through these features on his own images, including a side-by-side comparison with the old manual noise reduction.
Comments
Leave a Comment