My preset panel used to look like a junk drawer. Adobe presets I never touched sitting next to film packs I use every day, next to the black-and-white collection I hadn’t opened in eight months. Every time I went to grab something fast on a deadline, I was scrolling past three folders I didn’t need. It’s a small friction point, but small friction points add up across a hundred-photo edit session.
That’s exactly what Lightroom 7.4 quietly fixed, and I almost missed it. In this Matt Kloskowski tutorial, he walks through every change packed into the late June 2018 update, and while the headline features are preset and profile management tools, there’s also a solid Lightroom Mobile update worth sticking around for. Watch the full tutorial on YouTube if you want to follow along with the video, or use the step-by-step breakdown below to go straight to what you need.
The update isn’t a massive overhaul. It’s the kind of thoughtful, utility-focused release that makes your daily workflow cleaner without forcing you to relearn anything. Here’s everything that changed and how to use it.
Step 1: Open the Presets Panel in the Develop Module
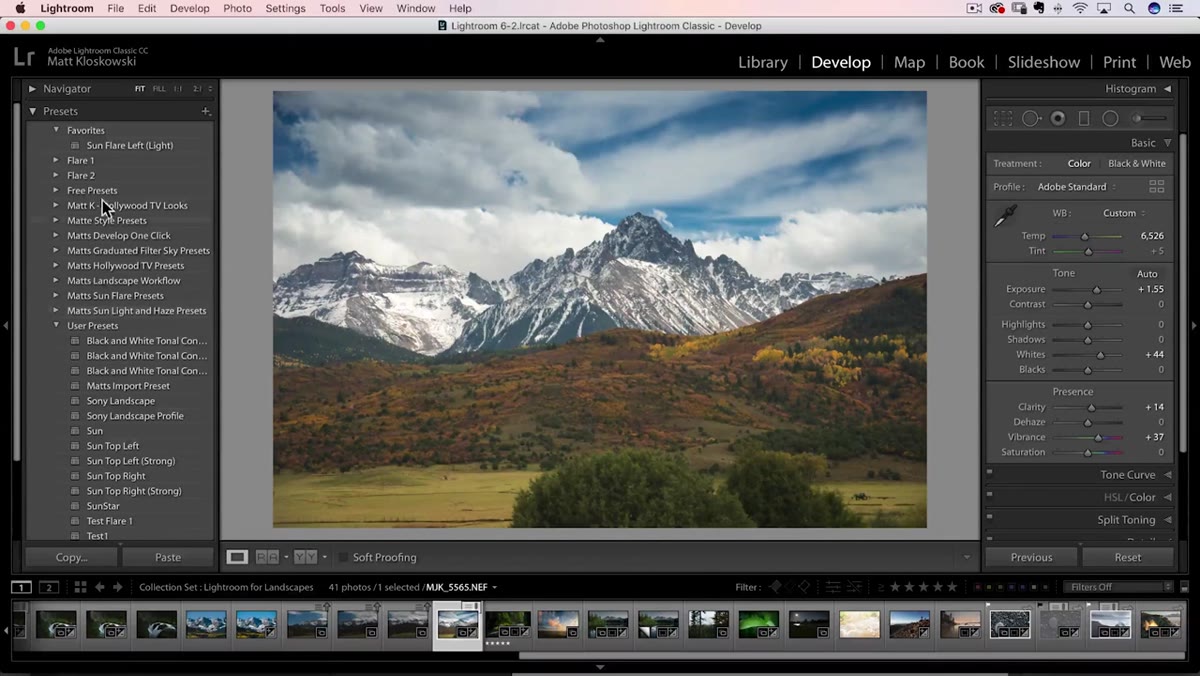
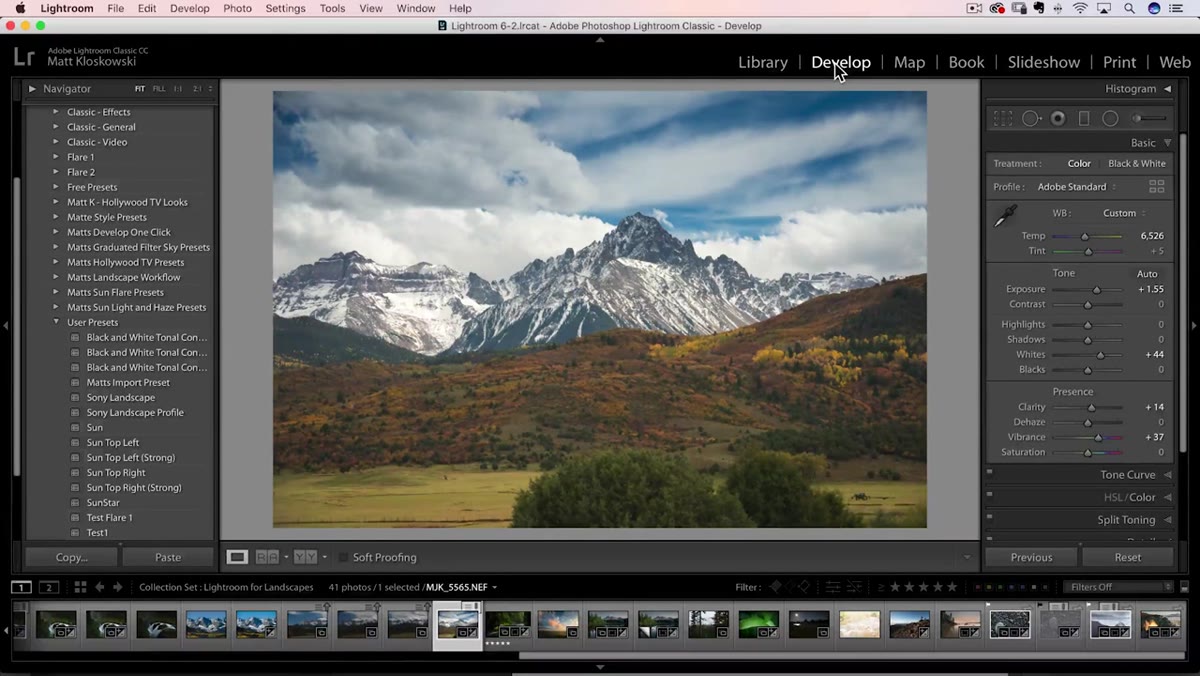 Develop module open with Presets panel visible on the left
Start in the Develop module. Your Presets panel lives on the left side, and if you haven’t opened it in a while, it might be more cluttered than you remember. Adobe ships Lightroom with a full library of built-in preset folders, and if you’ve ever installed third-party packs on top of those, things can get crowded fast. This step is just orientation, but don’t skip it. Knowing what’s actually in there before you start hiding folders will save you from accidentally tucking away something you use regularly.
Develop module open with Presets panel visible on the left
Start in the Develop module. Your Presets panel lives on the left side, and if you haven’t opened it in a while, it might be more cluttered than you remember. Adobe ships Lightroom with a full library of built-in preset folders, and if you’ve ever installed third-party packs on top of those, things can get crowded fast. This step is just orientation, but don’t skip it. Knowing what’s actually in there before you start hiding folders will save you from accidentally tucking away something you use regularly.
Step 2: Access “Manage Presets” From the Plus Icon
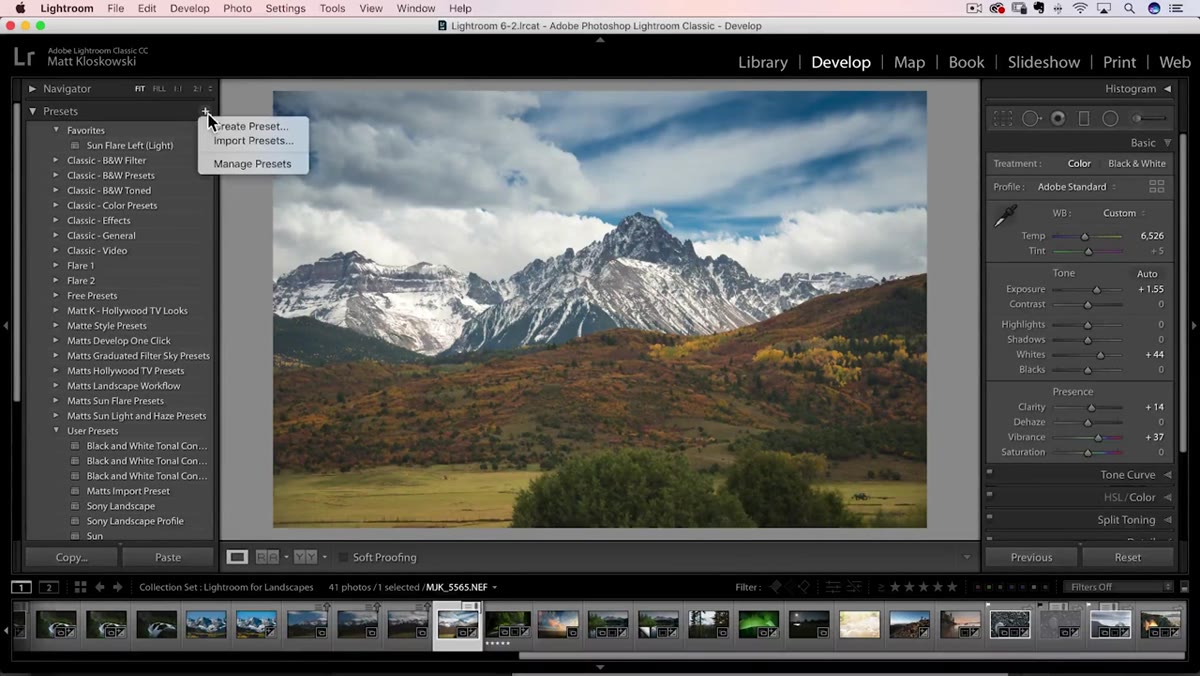 Plus icon at the top of the Presets panel being clicked
At the top of the Presets panel, there’s a small plus icon. Click it. In Lightroom 7.4, you’ll now see a new option in the dropdown: “Manage Presets.” Select that. A dialog box opens showing every preset folder currently installed in Lightroom, each with a toggle next to it. This is the new feature. Before this update, your only real option was to delete preset folders you didn’t want, which felt permanent and a little risky. Now you just turn them off.
Plus icon at the top of the Presets panel being clicked
At the top of the Presets panel, there’s a small plus icon. Click it. In Lightroom 7.4, you’ll now see a new option in the dropdown: “Manage Presets.” Select that. A dialog box opens showing every preset folder currently installed in Lightroom, each with a toggle next to it. This is the new feature. Before this update, your only real option was to delete preset folders you didn’t want, which felt permanent and a little risky. Now you just turn them off.
Step 3: Hide the Preset Folders You Don’t Currently Need
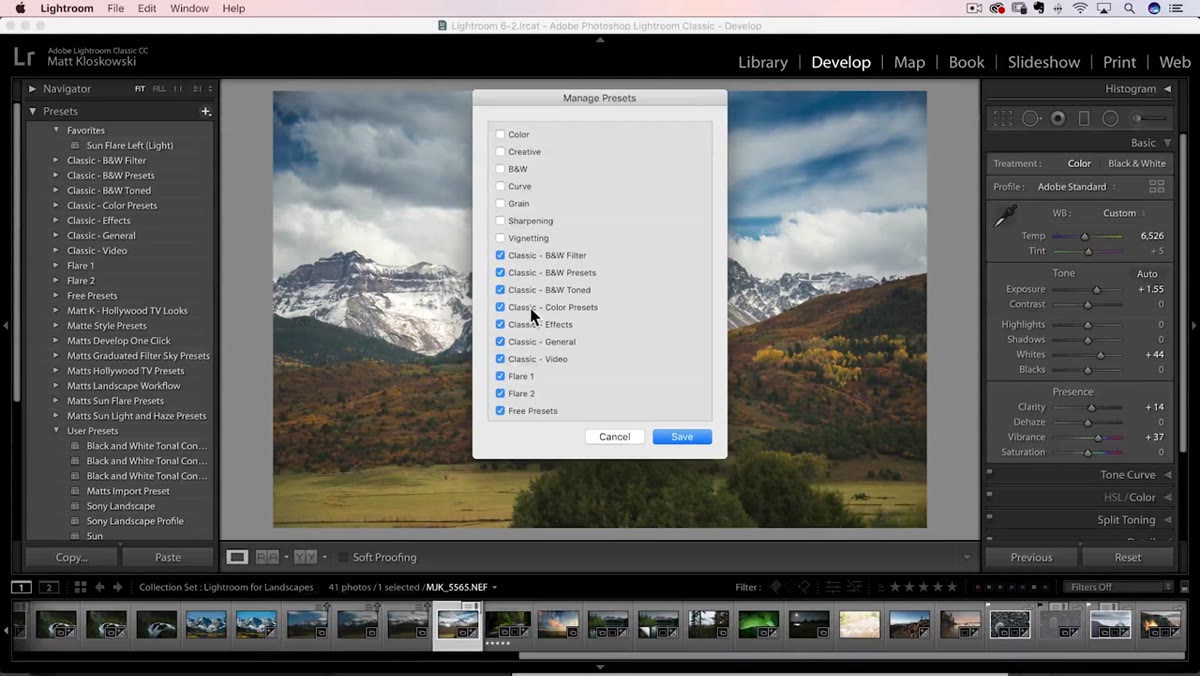 Manage Presets dialog box with folder toggles visible
Go through the list and uncheck any folders you’re not actively using. The classic Lightroom built-in presets are a good starting candidate if you’ve moved on to third-party options. Matt makes a point here that I think is worth underlining: this isn’t about deleting. It’s about hiding. Your editing style changes over time. I go through phases where I’m all-in on faded, warm tones, and then six months later I’m pulling everything toward high-contrast black and white. Being able to hide the folders that don’t fit your current phase, and bring them back when the mood shifts, is a genuinely useful workflow feature. Hit Save and your panel clears up immediately.
Manage Presets dialog box with folder toggles visible
Go through the list and uncheck any folders you’re not actively using. The classic Lightroom built-in presets are a good starting candidate if you’ve moved on to third-party options. Matt makes a point here that I think is worth underlining: this isn’t about deleting. It’s about hiding. Your editing style changes over time. I go through phases where I’m all-in on faded, warm tones, and then six months later I’m pulling everything toward high-contrast black and white. Being able to hide the folders that don’t fit your current phase, and bring them back when the mood shifts, is a genuinely useful workflow feature. Hit Save and your panel clears up immediately.
Step 4: Re-enable Hidden Presets Anytime
 Manage Presets dialog showing a previously hidden folder being toggled back on
Nothing you hide through “Manage Presets” is gone. If you come back to a project that needs something you hid three months ago, just return to the plus icon, click “Manage Presets” again, and flip the toggle back on. This is worth reinforcing because the permanence of deleting presets has made photographers hesitant to clean up their panels at all. The hide function removes that hesitation entirely. Think of it as putting a preset folder in a drawer rather than throwing it out.
Manage Presets dialog showing a previously hidden folder being toggled back on
Nothing you hide through “Manage Presets” is gone. If you come back to a project that needs something you hid three months ago, just return to the plus icon, click “Manage Presets” again, and flip the toggle back on. This is worth reinforcing because the permanence of deleting presets has made photographers hesitant to clean up their panels at all. The hide function removes that hesitation entirely. Think of it as putting a preset folder in a drawer rather than throwing it out.
Step 5: Right-Click a Profile Folder to Access “Manage Profiles”
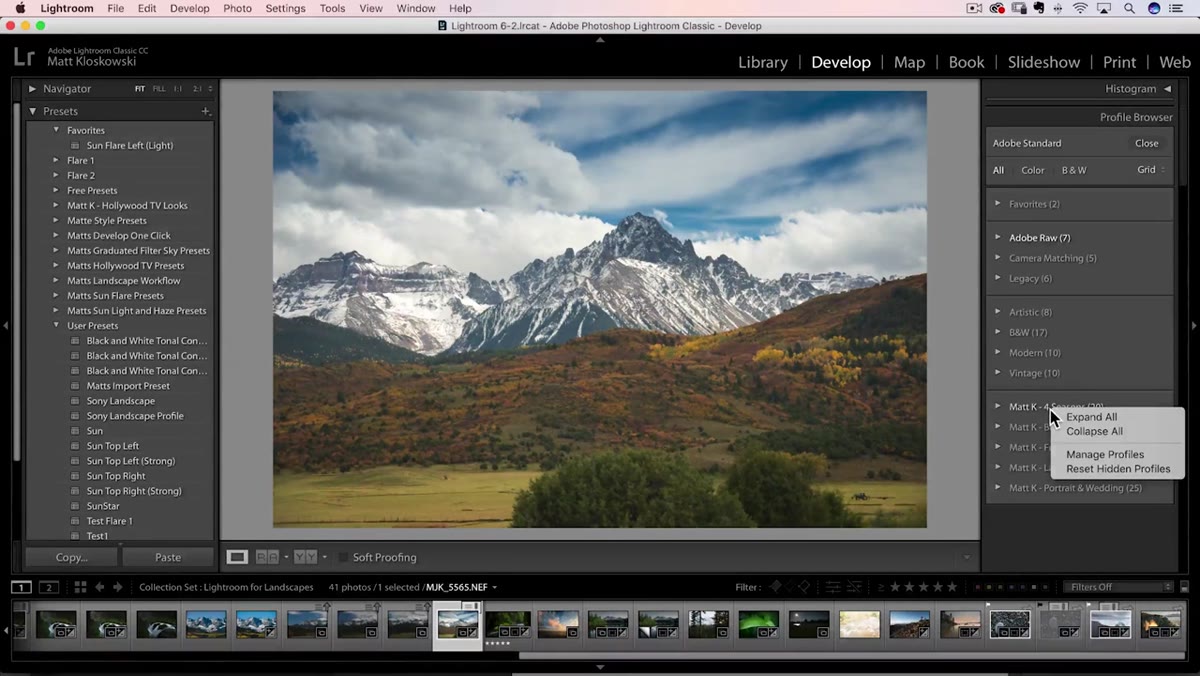 Right-click context menu on a profile folder showing “Manage Profiles” option
The same concept carries over to profiles, but the access point is slightly different. Open your Profiles section at the top of the Basic panel in the Develop module and expand the profile browser grid. Instead of a plus icon, you right-click on any profile folder to get the “Manage Profiles” option. The dialog that opens works identically to the preset version: toggle folders on or off, save, and your profile browser reflects the change immediately. If you’ve been building out your profile library, this is going to feel like a cleanup you should have been able to do a year ago. The interface parity between presets and profiles here is a nice design decision from Adobe.
Right-click context menu on a profile folder showing “Manage Profiles” option
The same concept carries over to profiles, but the access point is slightly different. Open your Profiles section at the top of the Basic panel in the Develop module and expand the profile browser grid. Instead of a plus icon, you right-click on any profile folder to get the “Manage Profiles” option. The dialog that opens works identically to the preset version: toggle folders on or off, save, and your profile browser reflects the change immediately. If you’ve been building out your profile library, this is going to feel like a cleanup you should have been able to do a year ago. The interface parity between presets and profiles here is a nice design decision from Adobe.
Step 6: Use the Same Toggle Logic to Audit Your Profile Library
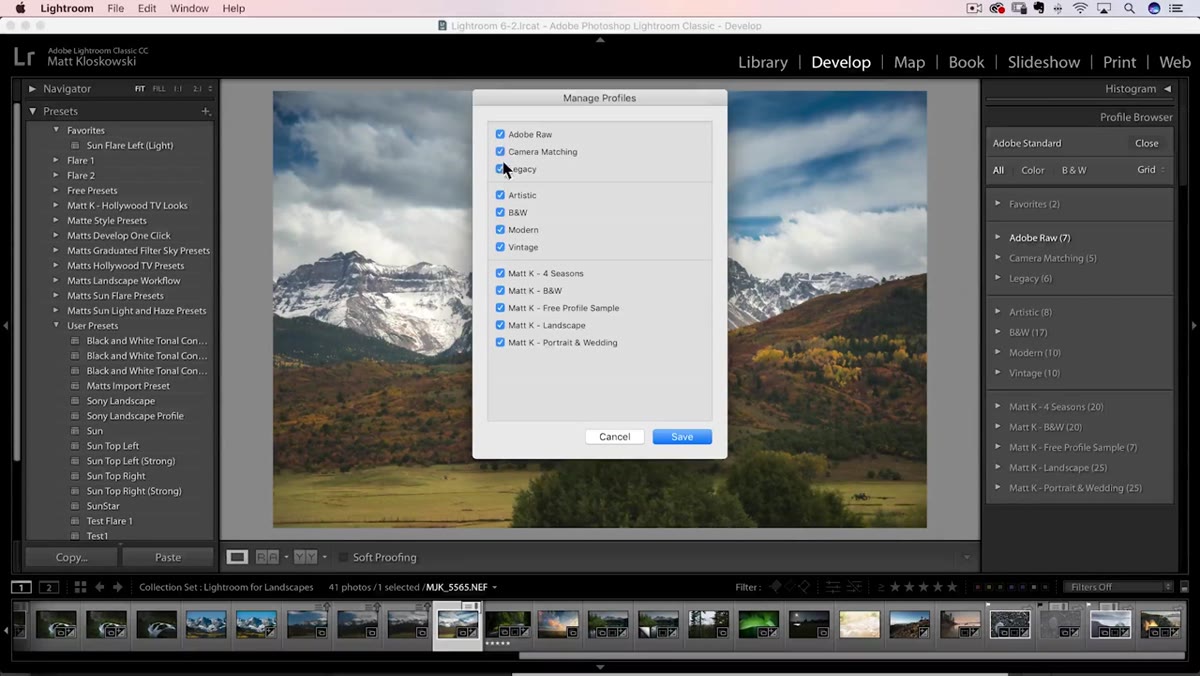 Manage Profiles dialog with multiple profile folders listed and toggles visible
Take a few minutes to actually go through your profile folders the same way you did with presets. If you’re using a custom profile pack as your primary starting point for most edits, you probably don’t need the Adobe Raw profiles cluttering up the grid every time you open it. Hide those. If you shoot a specific camera and only use that camera’s profiles, hide everything else. The profile browser is already a powerful tool for setting the base look of a photo before any slider work begins, and a cleaner browser makes it faster to use.
Manage Profiles dialog with multiple profile folders listed and toggles visible
Take a few minutes to actually go through your profile folders the same way you did with presets. If you’re using a custom profile pack as your primary starting point for most edits, you probably don’t need the Adobe Raw profiles cluttering up the grid every time you open it. Hide those. If you shoot a specific camera and only use that camera’s profiles, hide everything else. The profile browser is already a powerful tool for setting the base look of a photo before any slider work begins, and a cleaner browser makes it faster to use.
What I’d Add From My Own Workflow
The hide-don’t-delete logic from this update changed how I think about preset organization in general. I used to name presets obsessively and delete anything that felt redundant. Now I’m more comfortable keeping experimental presets around, just tucked away in a hidden folder so they don’t clutter my working panel. I’ve got a folder called “Benchmarks” sitting hidden in my panel right now with presets I tested and didn’t love but want to reference later. Before 7.4, that folder would have either cluttered my panel or been deleted. Now it just sits quietly until I need it.
One practical extension: if you share a Lightroom catalog with anyone else, or hand off a laptop to a second shooter at an event, the ability to hide preset folders means you can create a cleaner, less overwhelming view for someone who doesn’t know your full library. You’re not removing anything from the catalog. You’re just shaping what they see.
The single most important thing to take from this update is the mindset shift. Your preset and profile panels don’t have to be all-or-nothing. Hiding is a legitimate organizational strategy, and Lightroom finally built a proper interface around it. Clean up your panels, work faster, and stop scrolling past folders you don’t need.
Watch the full tutorial on YouTube for Matt’s complete walkthrough, including the Lightroom Mobile updates that round out the 7.4 release.
Comments (1)
I've watched a dozen tutorials on this and yours is the clearest by far.
Leave a Comment