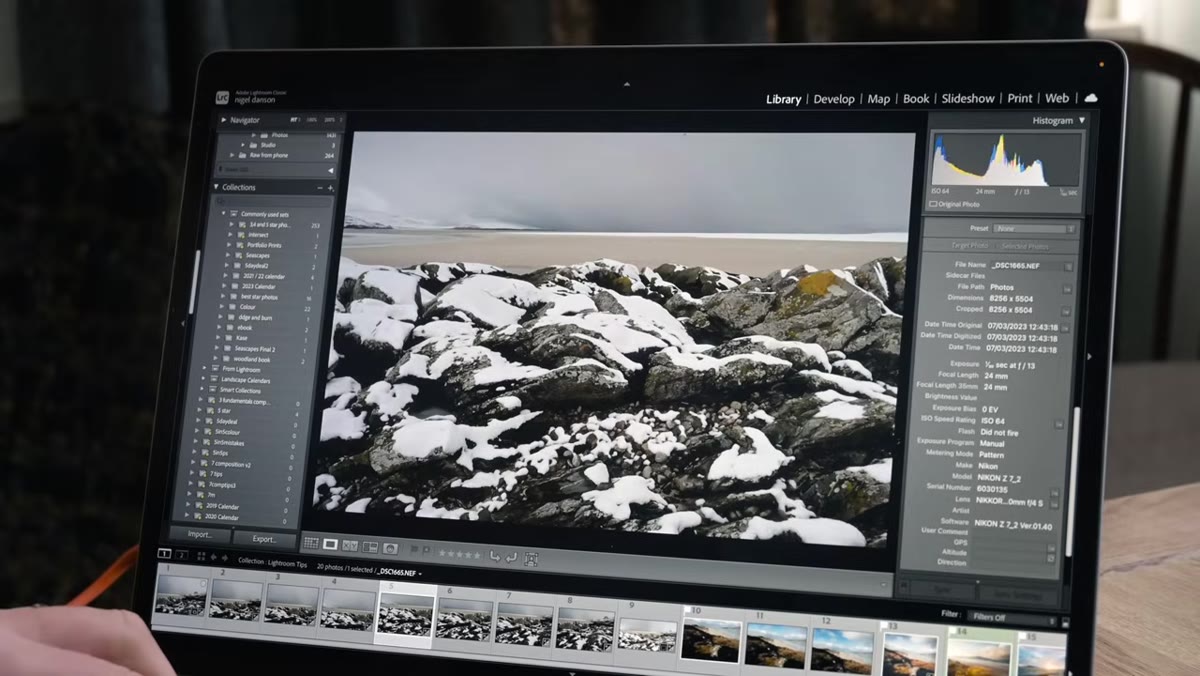
There’s a certain kind of Lightroom knowledge that doesn’t come from reading the manual. It comes from sitting inside a big editing session, staring at a problem, and stumbling onto a solution you immediately wish you’d found two years earlier. I’ve been editing in Lightroom long enough to have a system I trust, but I still catch myself learning new things from photographers who spend more time shooting in the field than I do. Nigel Danson is exactly that kind of photographer, and his tutorial on hidden Lightroom tips is the kind of video I watch once and then find myself referencing for weeks. Watch the full tutorial on YouTube before or after reading this breakdown – either order works.
What I want to do here is pull the actual techniques out of the video and give you something you can follow at your own editing desk. Danson films this while working through real landscape photos from a 30-day beach project, which means the tips aren’t theoretical – they’re solutions to problems he ran into that morning. That’s the kind of context that makes a technique stick. I’ve added my own notes where my experience in Nashville’s music and portrait scene gave me a slightly different angle on how to apply these.
Step 1: Use Panorama Stitching as a Fake Wide-Angle Lens
 Lightroom merging multiple overlapping images into panorama
Most photographers know Lightroom can stitch panoramas, but Danson’s framing of it changed how I think about it. The technique isn’t just for sweeping landscapes. It’s a legitimate workaround when you’re out with one lens and the scene demands more width than you have. Shoot a series of overlapping frames, moving horizontally, vertically, or both in a grid pattern, and Lightroom will combine them into a single file that can land anywhere from 100 to 200 megapixels depending on how many shots you take.
Lightroom merging multiple overlapping images into panorama
Most photographers know Lightroom can stitch panoramas, but Danson’s framing of it changed how I think about it. The technique isn’t just for sweeping landscapes. It’s a legitimate workaround when you’re out with one lens and the scene demands more width than you have. Shoot a series of overlapping frames, moving horizontally, vertically, or both in a grid pattern, and Lightroom will combine them into a single file that can land anywhere from 100 to 200 megapixels depending on how many shots you take.
To do it: select your overlapping images in the Library or Develop module, right-click, and choose Photo Merge, then Panorama. Lightroom’s preview will show you the stitched result. Use the Boundary Warp slider carefully – it fills in the irregular edges by stretching pixels, and pushing it too far will curve your horizon in a way that looks odd. Once merged, you’re working with a massive file that gives you significant room to crop in, effectively giving you a 20mm equivalent field of view from a 35mm or 50mm lens. Danson shows a snowy scene where this technique produced a perfect result with zero visible stitching.
Step 2: Intersect Masks to Isolate Color Selections Precisely
 Brush tool intersecting with color range mask in masking panel
This is the one I’ve used almost every week since watching this video. Danson walks through a scenario that comes up constantly in landscape work – and honestly in portrait work too. You want to boost or shift the color of one specific element, like warm golden grasses, but a simple color range selection also grabs similar tones in the sky or background. The fix is mask intersection, which sounds like a Photoshop-level move but lives right inside Lightroom’s masking panel.
Brush tool intersecting with color range mask in masking panel
This is the one I’ve used almost every week since watching this video. Danson walks through a scenario that comes up constantly in landscape work – and honestly in portrait work too. You want to boost or shift the color of one specific element, like warm golden grasses, but a simple color range selection also grabs similar tones in the sky or background. The fix is mask intersection, which sounds like a Photoshop-level move but lives right inside Lightroom’s masking panel.
Start by creating a Color Range mask. Click the eyedropper and sample the color you want to target – say, the orange in dry grass. Lightroom will build a selection. Then, instead of accepting whatever it grabbed in the background, click “Intersect Mask With” and choose Brush. Now paint only over the area you actually want affected. The intersection logic means Lightroom will only apply your edit where the color range AND your brush stroke overlap – everything else is protected. It’s the kind of precision that used to require a round-trip to Photoshop, and it’s sitting right there in the masking panel.
Step 3: Use the Boundary Warp Slider With Restraint
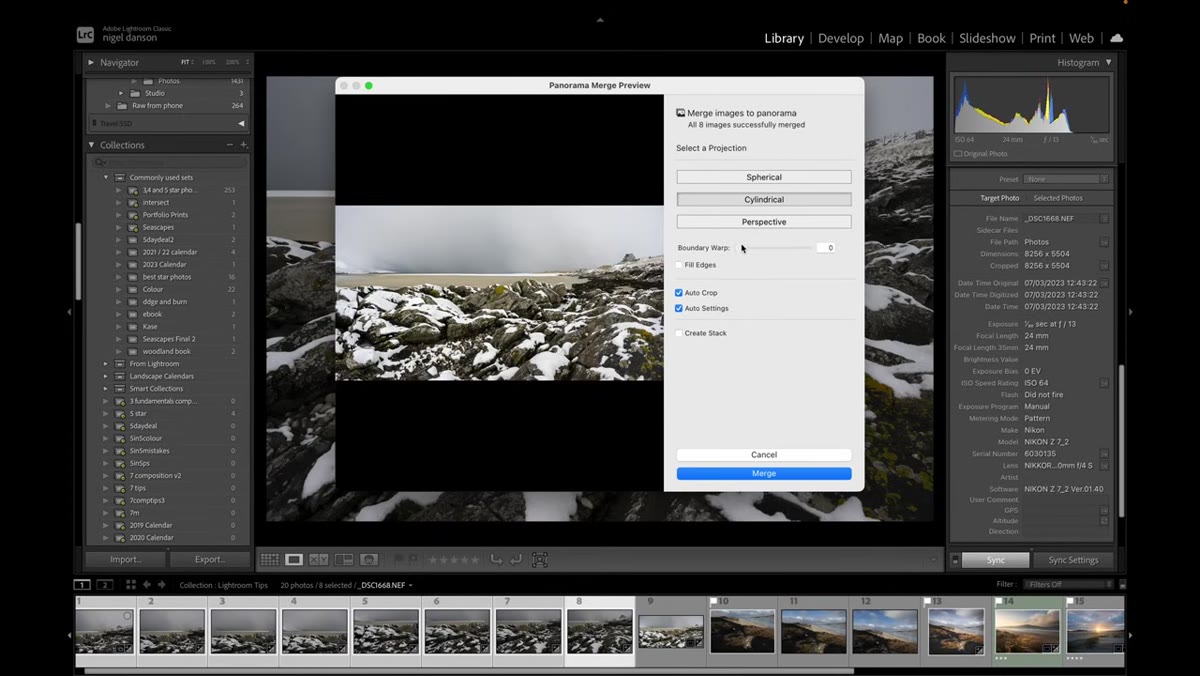 Boundary Warp slider in panorama merge dialog box
Danson flags this as a warning more than a tip, and it’s worth repeating. When you merge a panorama, the resulting image usually has irregular, jagged edges because the frames don’t form a perfect rectangle. The Boundary Warp slider in the merge dialog is designed to fix this by bending the image outward to fill those gaps. At low values, it works well. Push it past 50 or 60 and straight lines – fences, horizons, architectural elements – start to bow in ways that are hard to fix in post.
Boundary Warp slider in panorama merge dialog box
Danson flags this as a warning more than a tip, and it’s worth repeating. When you merge a panorama, the resulting image usually has irregular, jagged edges because the frames don’t form a perfect rectangle. The Boundary Warp slider in the merge dialog is designed to fix this by bending the image outward to fill those gaps. At low values, it works well. Push it past 50 or 60 and straight lines – fences, horizons, architectural elements – start to bow in ways that are hard to fix in post.
The better approach for most landscape shots: set Boundary Warp to a conservative value, accept a small amount of cropping on the edges, and let the massive resolution of the merged file give you the flexibility to reframe. A 200-megapixel file can lose 10 percent of its edge area to cropping and still deliver more detail than a single 45-megapixel frame. Work with the file’s resolution rather than against its geometry.
Step 4: Build a Multi-Row Grid Panorama for Maximum Resolution
 Selecting eight overlapping images for panorama merge
Danson demonstrates this with eight frames – two rows of four – and the result is a wide, tall image that captures way more of a scene than a single row of landscape-oriented frames would. The grid approach is worth practicing before you need it, because it requires a bit of discipline in the field. Overlap each frame by at least 30 percent, both horizontally and vertically. Move in a consistent pattern – left to right across the top row, then left to right across the bottom – so Lightroom has a logical sequence to work with.
Selecting eight overlapping images for panorama merge
Danson demonstrates this with eight frames – two rows of four – and the result is a wide, tall image that captures way more of a scene than a single row of landscape-oriented frames would. The grid approach is worth practicing before you need it, because it requires a bit of discipline in the field. Overlap each frame by at least 30 percent, both horizontally and vertically. Move in a consistent pattern – left to right across the top row, then left to right across the bottom – so Lightroom has a logical sequence to work with.
Back in Lightroom, select all the frames, right-click, and run the merge just as you would a single-row pano. Lightroom handles the grid automatically and produces a file with proportions closer to a square or medium format frame than a traditional wide panoramic strip. This is surprisingly useful for portrait-oriented landscapes where you want both width and height – mountain scenes, coastal cliffs, anything with a strong vertical element you don’t want to lose.
Why I Reach for These Tools More Than I Expected
I came into this video thinking the panorama tips would be most useful for landscape photographers and less relevant to my own work, which skews toward music and editorial portraits. I was wrong. The mask intersection technique translated immediately to color-grading band press shots, where I’m often trying to isolate a specific piece of clothing or a warm light source without contaminating the skin tones next to it. The logic is identical to what Danson is doing with his grasses and sky.
The panorama stitching surprised me too. I’ve started using it for tight interior shots where I only have a 35mm with me and the room demands a wider look. Two or three frames, a quick merge, and I have a file with genuine wide-angle perspective without any of the distortion you’d get from a 16mm. It’s not a perfect substitute for the right lens, but it’s a usable one when you’re working fast.
The single most important idea from Danson’s tutorial is that Lightroom’s masking panel is far more powerful than most people treat it. Intersecting masks is the feature that unlocks that power. If you’ve been making a color range selection and just accepting whatever Lightroom grabbed, you’re leaving precision on the table.
Watch the full tutorial on YouTube – Danson covers additional tips from his Instagram followers in the second half of the video that are worth your time, especially if you work with landscape or nature subjects regularly.
Comments
Leave a Comment