Noise has always been the tax you pay for shooting in low light. You get the shot, you get the grain, and then you spend an uncomfortable amount of time in the Detail panel trying to recover something that looks like a photograph and not a bowl of oatmeal. I’ve tried every third-party plugin, every slider combination, every “just add a little luminance reduction and pray” workaround. Some of them work okay. None of them worked the way I actually wanted.
That changed when Adobe rolled out the April 2023 update to Lightroom Classic. The headline feature is AI-powered noise reduction, and it is not subtle in how much better it performs than the traditional approach. Watch the full tutorial on YouTube from Mango Street, who walks through the new tools with real photos and real comparisons. What follows is my step-by-step breakdown of everything they cover, with enough detail that you can follow along in your own catalog without pausing every thirty seconds.
The update also adds new adaptive presets for portrait retouching, curve adjustments inside masks, and a handful of small UI tweaks that are easy to miss but genuinely useful once you know they’re there.
Step 1: Open the Detail Panel and Locate the New Denoise Button
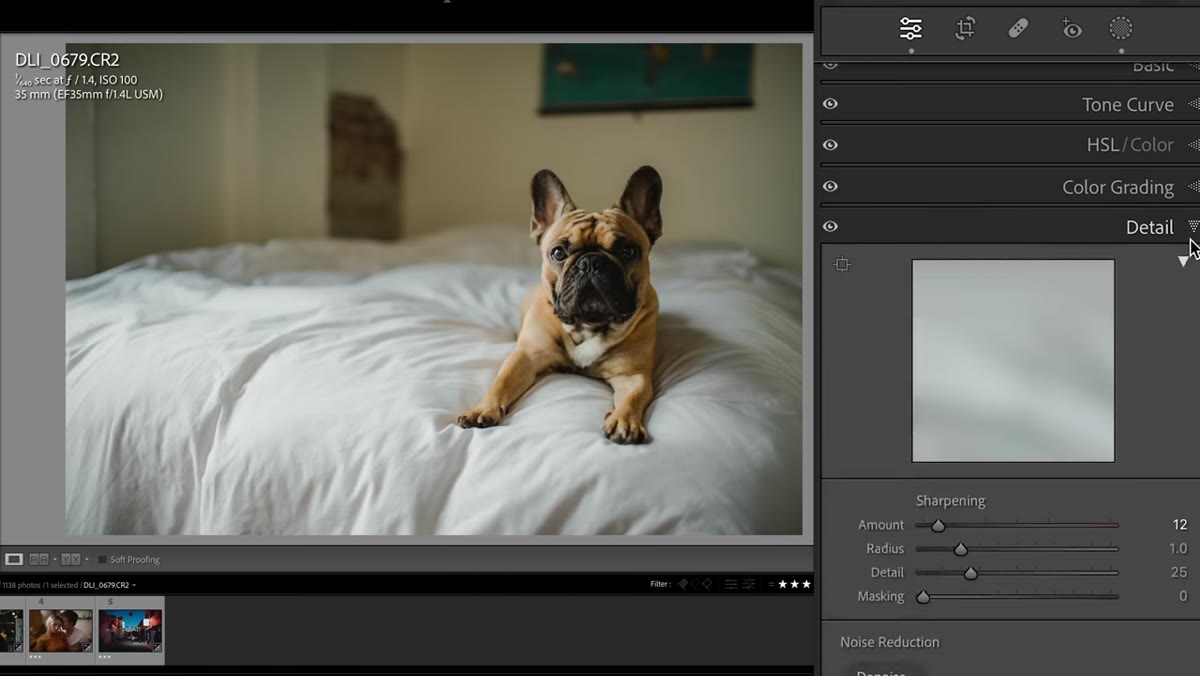 Detail panel open with Denoise button visible
Start by selecting a raw file in Lightroom Classic’s Develop module. In the right-hand panel, scroll down to the Detail section. You’ll see the familiar Sharpening and Noise Reduction sliders, but now there’s a new button labeled “Denoise” sitting just above them. This is the entry point for the AI noise reduction feature, and it only works on raw files, so if you’re working with a JPEG you won’t see it.
Detail panel open with Denoise button visible
Start by selecting a raw file in Lightroom Classic’s Develop module. In the right-hand panel, scroll down to the Detail section. You’ll see the familiar Sharpening and Noise Reduction sliders, but now there’s a new button labeled “Denoise” sitting just above them. This is the entry point for the AI noise reduction feature, and it only works on raw files, so if you’re working with a JPEG you won’t see it.
The tool is clean and minimal. When you click Denoise, a preview window opens so you can see the effect at 100% zoom before committing to anything.
Step 2: Adjust the Amount Slider and Find Your Sweet Spot
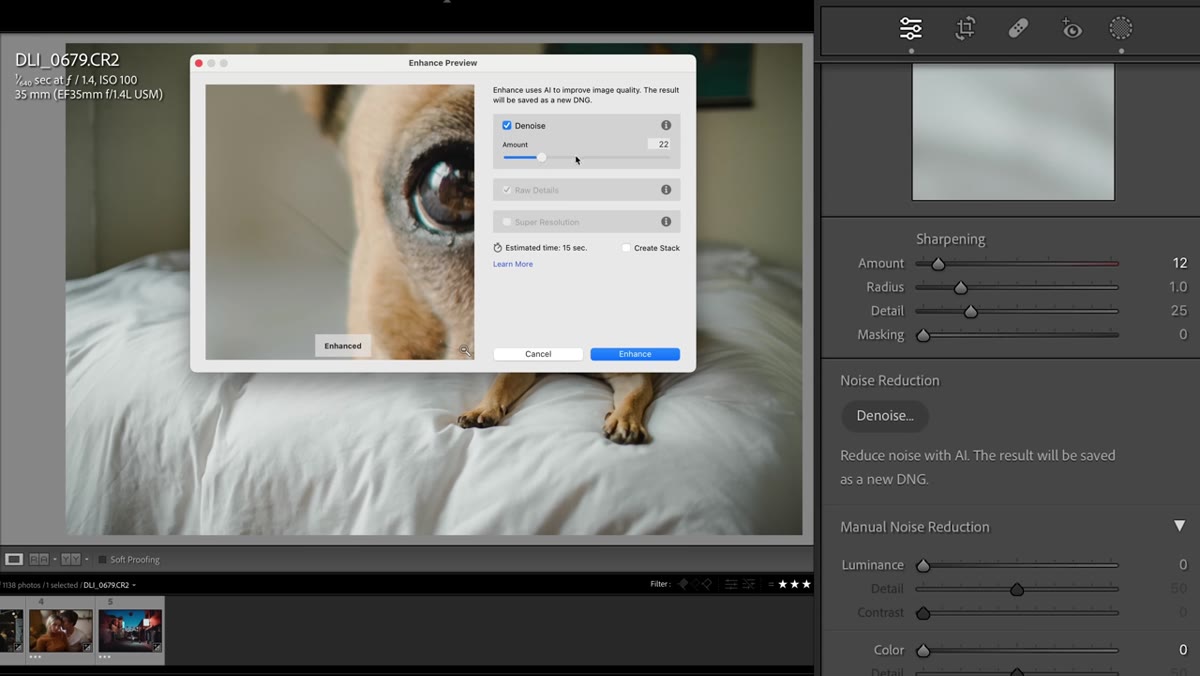 Amount slider at 50 with preview window open
The preview window shows you a before and after at full resolution, and the only control you really need to worry about is the Amount slider. The default is set to 50, which is a reasonable starting point for most images. In Mango Street’s example, a photo shot at ISO 100 with some color noise on a flat background came out remarkably clean at the default setting, with no noticeable loss of detail in fine textures like fur or hair.
Amount slider at 50 with preview window open
The preview window shows you a before and after at full resolution, and the only control you really need to worry about is the Amount slider. The default is set to 50, which is a reasonable starting point for most images. In Mango Street’s example, a photo shot at ISO 100 with some color noise on a flat background came out remarkably clean at the default setting, with no noticeable loss of detail in fine textures like fur or hair.
Try dragging the slider up and down while watching the preview. For moderately noisy files, 50 is often enough. For heavier grain or pushed shadows, you’ll want to experiment higher. Once you’re happy with the result, click Enhance.
Step 3: Let Lightroom Generate the Enhanced DNG File
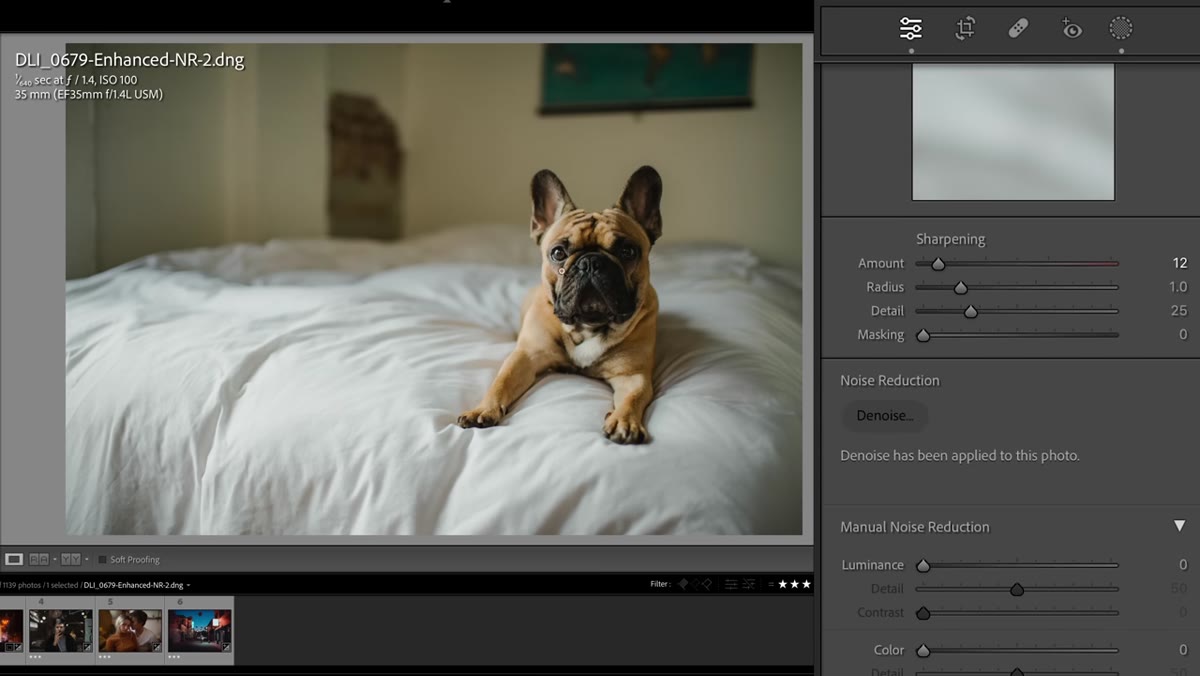 Progress bar as Lightroom generates new DNG file
After clicking Enhance, Lightroom processes the image and creates a brand new DNG file. This is not a destructive edit to your original, which matters. Your source file stays exactly as it was, and the denoised version appears as a separate file in your catalog, right next to the original.
Progress bar as Lightroom generates new DNG file
After clicking Enhance, Lightroom processes the image and creates a brand new DNG file. This is not a destructive edit to your original, which matters. Your source file stays exactly as it was, and the denoised version appears as a separate file in your catalog, right next to the original.
The processing takes a moment depending on your machine, but the output is a full-resolution DNG with the noise reduction baked in. From there you can edit it exactly as you would any other file, stack your presets on top, pull the shadows, whatever the image needs.
Step 4: Compare AI Denoise Against the Legacy Noise Reduction Sliders
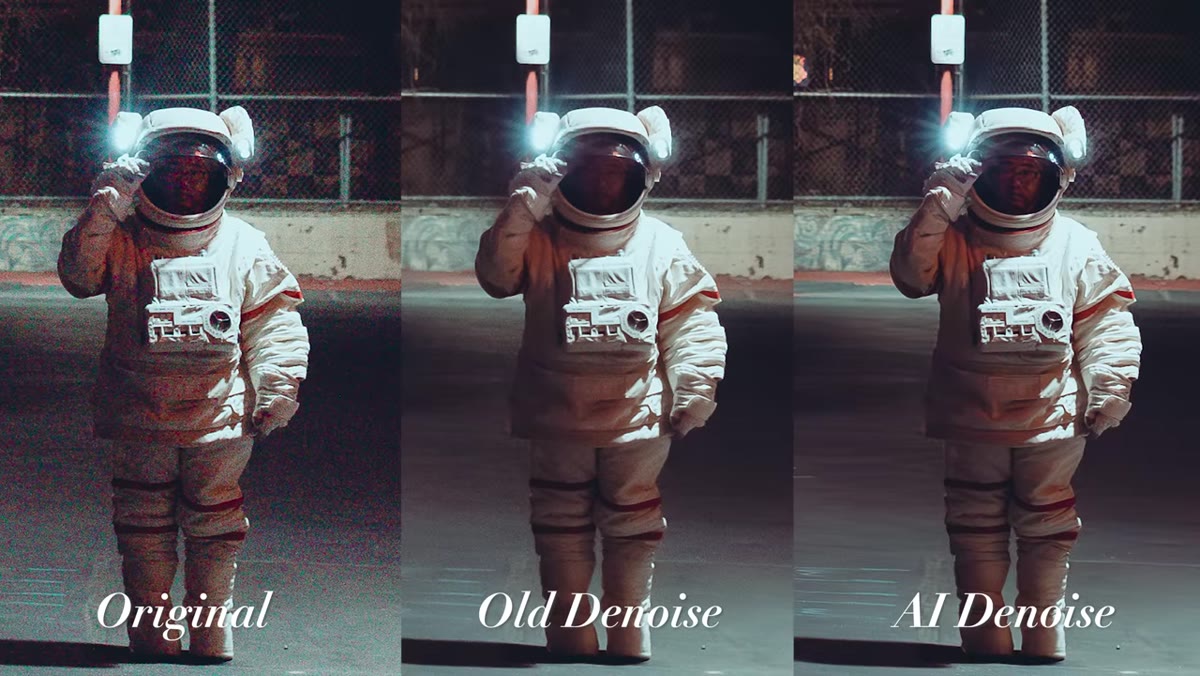 Side-by-side comparison of AI vs legacy noise reduction
This is where things get convincing. Mango Street tests the feature on a photo shot at ISO 2000, where the noise is significant and the comparison is stark. When you try to match the AI’s noise removal using the traditional Luminance and Color sliders, you have to push them hard enough that the image starts to lose sharpness and fine detail. The AI version holds onto edge definition noticeably better.
Side-by-side comparison of AI vs legacy noise reduction
This is where things get convincing. Mango Street tests the feature on a photo shot at ISO 2000, where the noise is significant and the comparison is stark. When you try to match the AI’s noise removal using the traditional Luminance and Color sliders, you have to push them hard enough that the image starts to lose sharpness and fine detail. The AI version holds onto edge definition noticeably better.
The practical takeaway: if you’ve been avoiding the old noise reduction sliders because they made your images look watercolored, this is your replacement. And if you’re dealing with photos where you’ve deliberately lifted the shadows in post and created noise in the process, the AI handles that scenario well too. It gets a little soft in the mushiest areas of extreme examples, but the result is still far cleaner than what the old sliders can do at the same settings.
Step 5: Apply New Adaptive Portrait Presets (and Apply Them First)
 Adaptive presets panel showing new portrait options
Adaptive presets aren’t new, but the April 2023 update added three portrait-specific ones: Polished Portrait, Darkened Beard, and Enhanced Clothes. These presets use AI subject detection to create custom masks for each photo, then apply targeted adjustments to specific features like skin, eyes, and eyebrows.
Adaptive presets panel showing new portrait options
Adaptive presets aren’t new, but the April 2023 update added three portrait-specific ones: Polished Portrait, Darkened Beard, and Enhanced Clothes. These presets use AI subject detection to create custom masks for each photo, then apply targeted adjustments to specific features like skin, eyes, and eyebrows.
Here’s the important catch, and Mango Street flags this clearly: apply these presets before you do any of your own editing. The Polished Portrait preset will wipe out any changes you’ve made to the HSL panel, and the Darkened Beard preset resets the Calibration panel entirely. These feel like bugs rather than features, and hopefully Adobe patches them. For now, treat adaptive presets as your starting point, not a finishing touch.
Step 6: Use Curves Inside Masks for Precise Local Contrast
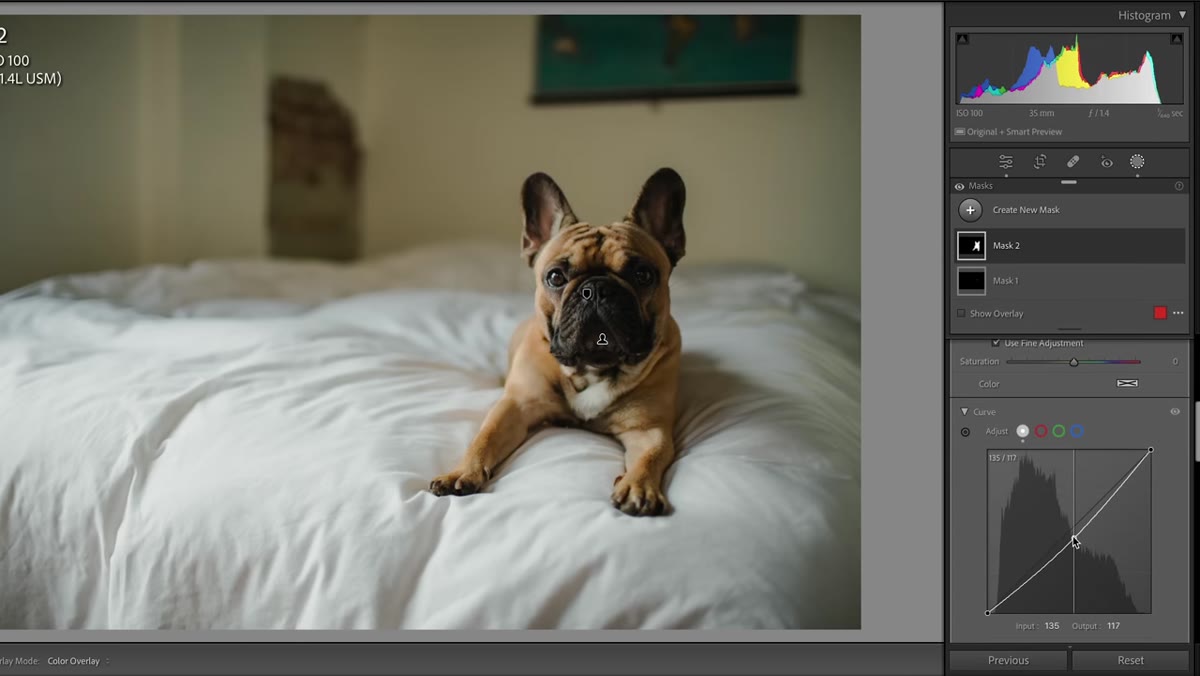 Tone curve control visible inside a mask adjustment panel
This one is quiet but it’s useful. You can now add a tone curve adjustment directly inside any mask, whether that’s a subject mask, a luminance range mask, or anything else. Previously you were limited to basic sliders like Exposure, Contrast, and Highlights when working inside a masked area. The curve gives you more surgical control over how that region’s contrast behaves.
Tone curve control visible inside a mask adjustment panel
This one is quiet but it’s useful. You can now add a tone curve adjustment directly inside any mask, whether that’s a subject mask, a luminance range mask, or anything else. Previously you were limited to basic sliders like Exposure, Contrast, and Highlights when working inside a masked area. The curve gives you more surgical control over how that region’s contrast behaves.
To find it, create or select any mask in the Masks panel, then look for the Tone Curve option within that mask’s adjustment controls. If you’ve been doing a lot of local adjustments in Lightroom and wishing you had more control than the sliders allow, this is worth building into your regular workflow.
Step 7: Learn the New UI Indicators in the Develop Module
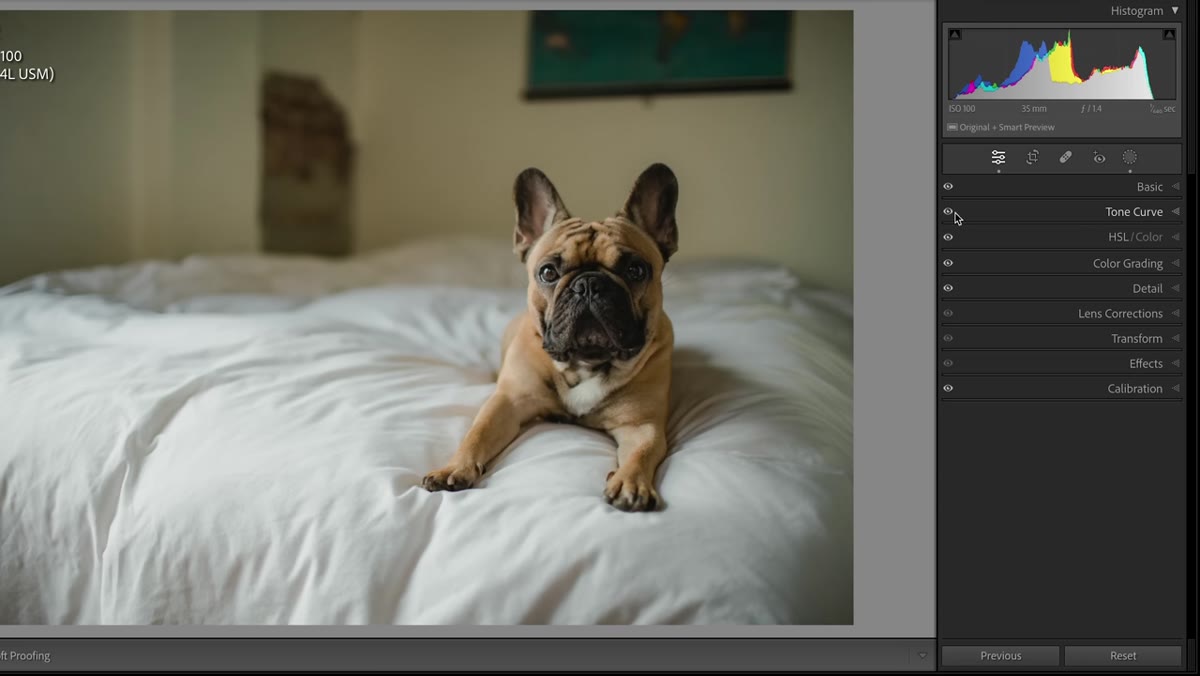 Develop panel showing eyeball icons and dot indicators
Two small UI changes are easy to miss. First, the panel on/off switches on the left side of each Develop panel have been replaced with eye icons. Clicking the eye toggles the visibility of that panel’s effect, so you can quickly audition what your Color Grading or Detail adjustments are contributing. If you prefer the old switch behavior, hold Alt (Windows) or Option (Mac) and the eye turns back into a toggle switch.
Develop panel showing eyeball icons and dot indicators
Two small UI changes are easy to miss. First, the panel on/off switches on the left side of each Develop panel have been replaced with eye icons. Clicking the eye toggles the visibility of that panel’s effect, so you can quickly audition what your Color Grading or Detail adjustments are contributing. If you prefer the old switch behavior, hold Alt (Windows) or Option (Mac) and the eye turns back into a toggle switch.
Second, there are small dots underneath the tool icons at the top of the right panel column. These dots indicate which tools you’ve actually used in your current edit. It’s a small thing, but it means you can glance up and quickly remember whether you made any local adjustments without hunting through every panel.
My Take: Where AI Denoise Fits Into a Real Editing Session
I’ve started applying AI Denoise as part of my initial file prep, right after import and before I open the image for creative editing. For anything shot above ISO 800, it’s now automatic. The DNG it generates is stable to edit on top of, and I’m not fighting grain when I’m trying to fine-tune color. Think of it less as a correction and more as a foundation you lay down before the real work begins.
The adaptive portrait presets are more conditional. They can save time during batch work on portrait sessions, but you need to know their current limitations around panel resets before trusting them in a deadline workflow. Use them early, verify the masks they generate, and then take over manually from there.
AI Denoise is genuinely the most significant upgrade Lightroom Classic has shipped in a while. It doesn’t just reduce noise, it preserves the image in a way that the old tools simply couldn’t. Watch the full tutorial on YouTube to see Mango Street’s before and after comparisons at each ISO level. The visual difference makes the case better than any description can.
Comments
Leave a Comment