I have a problem with adding software to my workflow. Every new tool promises to be the one that finally fixes everything, and most of them end up collecting digital dust while I keep doing what I was already doing in Lightroom. So when photographers kept mentioning DxO PureRAW in the same breath as “game changer,” I filed it under “probably not for me” and moved on.
Then I shot a series of landscape edits at high ISO last fall, and the noise reduction in Lightroom, even the AI-powered Denoise tool, left me wanting more. The detail in the shadows felt smeared. The texture in the rock faces looked processed rather than sharp. That’s what sent me down the rabbit hole that eventually led me to this Mark Denney tutorial.
What PureRAW Actually Does (And When It Matters)
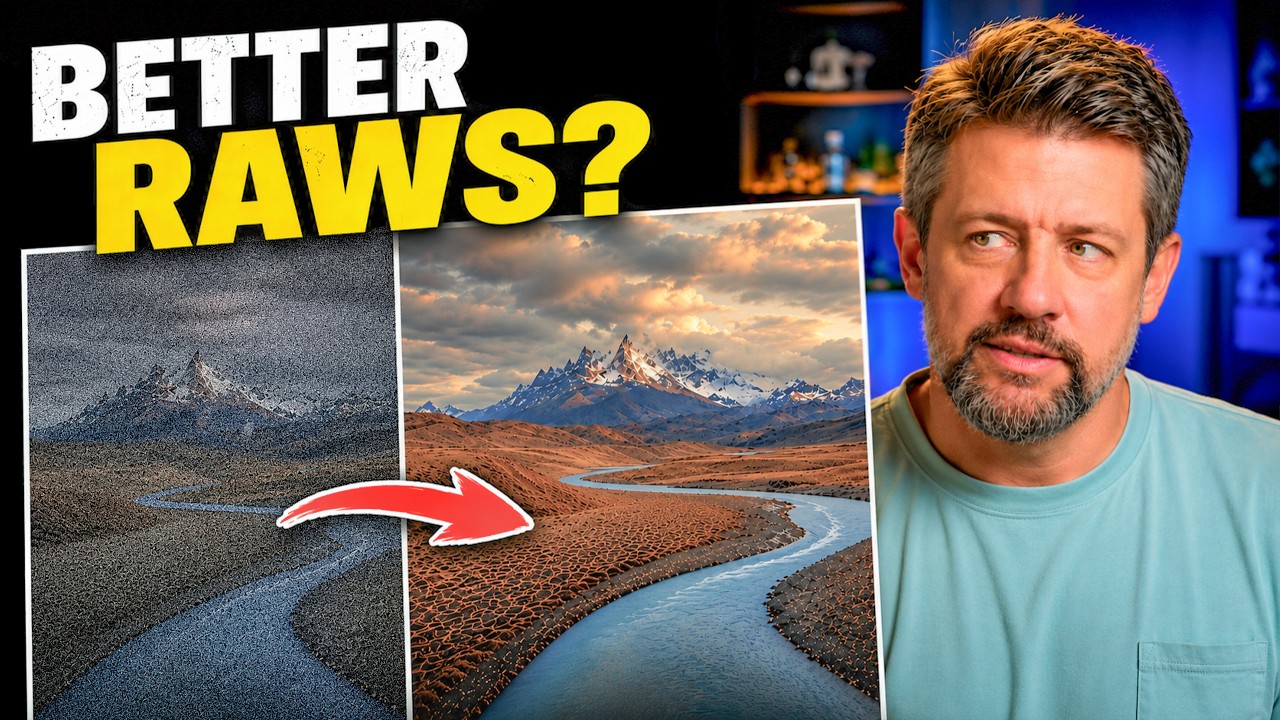
Most of us think of noise reduction as something you dial in during the edit. You pull the Luminance slider, maybe use Lightroom’s Denoise, and call it done. What Mark tests here is something different: processing the RAW file itself before it ever hits Lightroom, using DxO’s lens and noise profiles to produce a cleaner DNG that your editing software then works with.
The distinction matters more than it sounds. When Lightroom applies noise reduction, it’s working on a file that’s already been demosaiced. PureRAW processes the raw sensor data directly, which gives its algorithms more information to work with. The result, as Mark shows across several landscape images, is that fine detail like individual blades of grass, bark texture, and cloud gradients survives the process in a way that post-edit noise reduction often can’t match.
DeepPRIME 3 vs. DeepPRIME XD3: Which One to Actually Use
Mark tests two processing modes in PureRAW 6: DeepPRIME 3 and DeepPRIME XD3. The short version is that XD3 is the more aggressive of the two. It digs deeper into shadow noise and recovers more fine detail, but it takes longer to process and the results can occasionally look over-sharpened on files that didn’t need that level of intervention.
His recommendation lands where I suspected it would: use DeepPRIME 3 as your default for most landscape work, and reach for XD3 when you’re working with files shot at ISO 3200 and above, or when you’re planning a large print where every recovered pixel counts. Neither mode does anything destructive to your exposure, color, or tonal balance. PureRAW is strictly handling noise and lens correction, which means your Lightroom editing process stays exactly the same afterward.
The AI Dust Removal and High Fidelity Compression Features
Two additions in version 6 that Mark spends time on: AI dust spot removal and a new High Fidelity File Compression option.
The dust removal works by scanning your image for sensor dust artifacts and removing them before export. For landscape photographers who shoot stopped down (where dust shows up most aggressively), this is a legitimate time-saver. Mark’s before and after comparisons show the tool handling most spots cleanly, though he notes it occasionally misidentifies small background elements like distant birds as dust. Worth checking the output before you commit.
High Fidelity File Compression is more interesting to me as someone who shoots a lot and manages large archives. The feature compresses the output DNG without losing meaningful image data, reducing file sizes while keeping the quality gains from the DeepPRIME processing intact. Mark compares file size outputs side by side, and the compression is real enough to matter if you’re working with hundreds of files.
Where I’d Push Back on This Workflow
Here’s my honest counterpoint: for anything shot at ISO 800 or below in decent light, I’m not sure PureRAW adds enough to justify the processing time and the extra step in the workflow. I ran a batch of my own golden-hour landscape shots through DeepPRIME 3, and when I compared them at 100% against Lightroom’s native Denoise, the differences were subtle enough that I had to toggle back and forth several times to see them at all.
That’s not a knock on the software. It’s more a reminder that no tool is worth adding to your process unless you’re actually hitting the problem it solves. If you regularly shoot in low light, push ISO hard, or make large prints where shadow detail is critical, PureRAW earns its place immediately. If most of your work is shot at base ISO in controlled conditions, Lightroom’s built-in tools are probably enough, and the extra processing step may create more friction than it removes.
The One Thing This Tutorial Changed for Me
What Mark’s testing made clear is that the moment to think about noise isn’t in post. It’s before you open Lightroom, at the RAW file level, where the algorithms have the most to work with. That’s the mindset shift, more than any specific setting or slider value.
If your noise reduction results have ever felt like a compromise, like you’re choosing between grain and smeared detail rather than actually solving the problem, this is the step worth investigating. Watch the full video to see Mark’s before and after comparisons in motion. The difference is one of those things that’s much easier to see than to describe.
You can check out DxO PureRAW 6 at the link in Mark’s description. There’s a discount code there if you want to give it a proper test on your own files before committing.
Comments
Leave a Comment