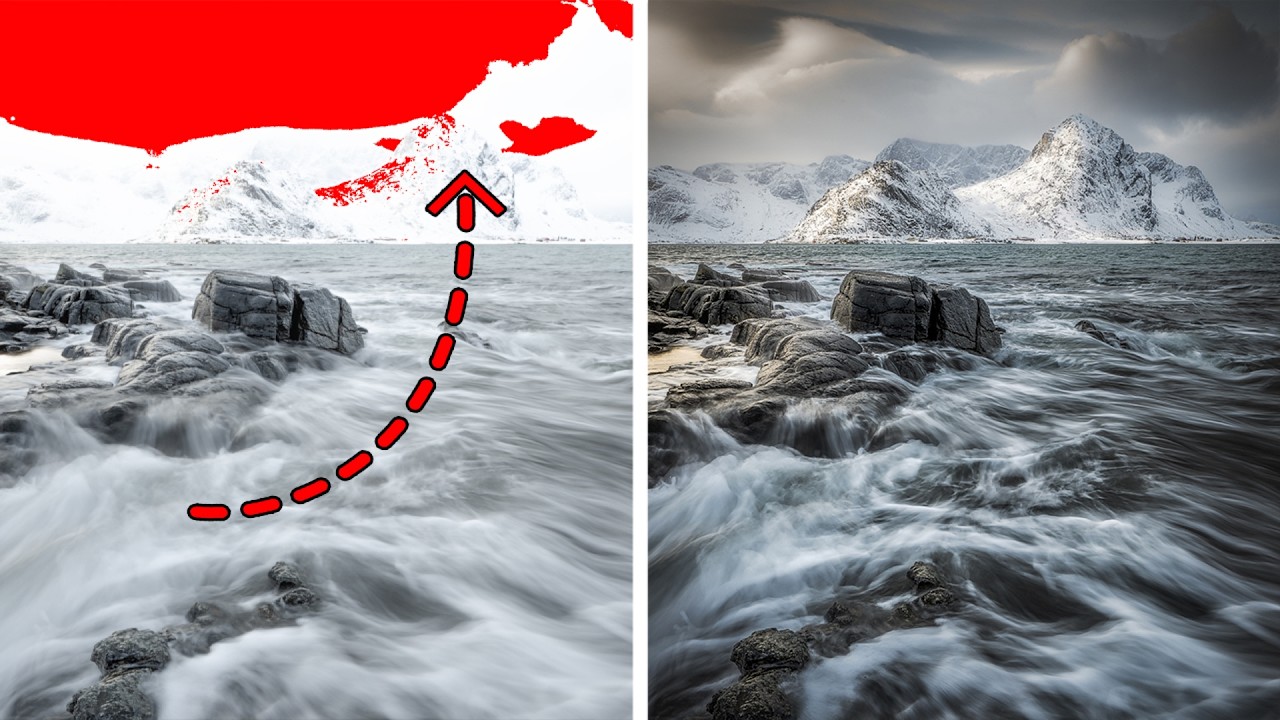
There’s a particular kind of heartbreak that happens when you come home from a shoot, pull up your RAW files, and realize the best frame of the day has a chunk of pure white where the sky used to be. No detail. No texture. Just a blank spot where your highlights burned straight through the sensor’s ceiling. I’ve been there more times than I want to admit, and for a long time my instinct was the same as everyone else’s: drag it to the trash and hope lightning strikes twice.
That’s exactly the scenario Mark Denney walks through in this tutorial. Watch the full tutorial on YouTube. He’s working with a landscape shot from Norway, captured midday in fast-changing light. He stopped down to f/20 to slow his shutter speed without filters, got the motion in the water he wanted, and blew out the upper corner of the frame in the process. It’s a completely real-world mistake, and the fix he demonstrates is one I’ve since applied to my own work more times than I expected.
What makes this tutorial worth your time is that Denney doesn’t just show you the happy path. He starts by demonstrating why the obvious approach fails, then shows you what actually works. That structure matters because understanding why something breaks is what stops you from panicking the next time it happens.
Step 1: Turn On the Clipping Indicator
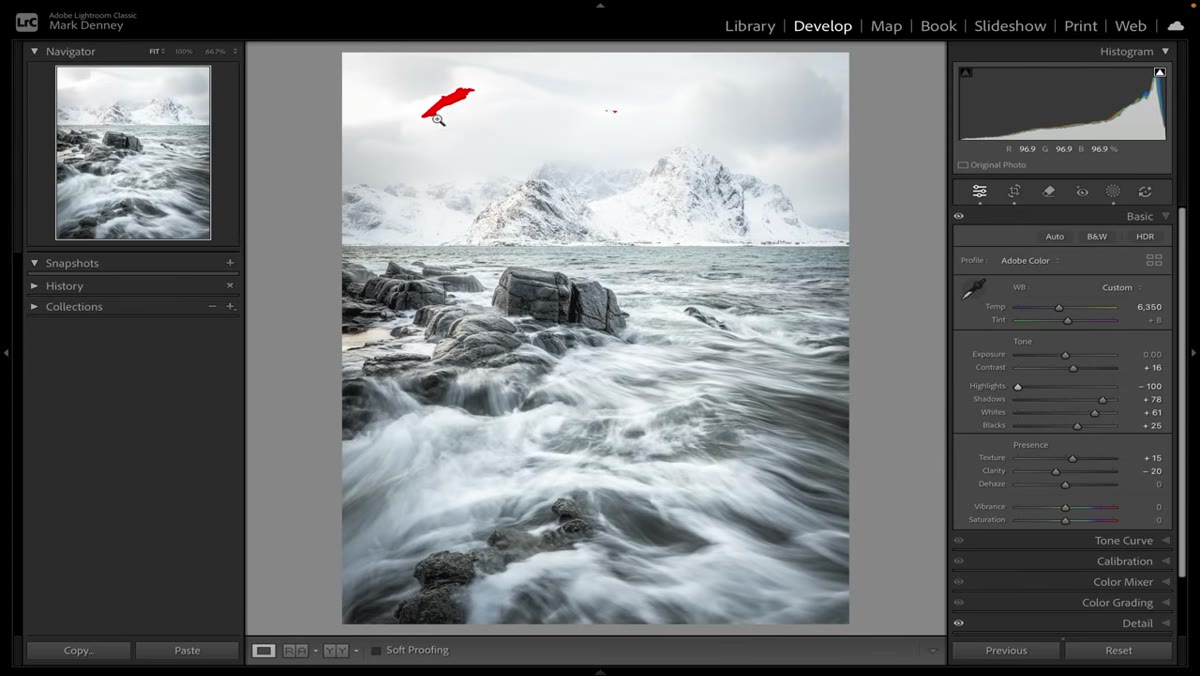 Red clipping overlay visible in upper-left sky area
Before you touch a single slider, you need to see exactly where the problem lives. In Lightroom’s Develop module, press J on your keyboard to toggle the clipping indicators. Blown highlights will show up as a red overlay on your image. This is your map. It tells you not just whether highlights are clipped, but precisely which pixels have lost all recoverable data. Don’t skip this step, because editing blind is how you convince yourself you’ve fixed something you haven’t.
Red clipping overlay visible in upper-left sky area
Before you touch a single slider, you need to see exactly where the problem lives. In Lightroom’s Develop module, press J on your keyboard to toggle the clipping indicators. Blown highlights will show up as a red overlay on your image. This is your map. It tells you not just whether highlights are clipped, but precisely which pixels have lost all recoverable data. Don’t skip this step, because editing blind is how you convince yourself you’ve fixed something you haven’t.
Step 2: Understand Why the Default Move Fails
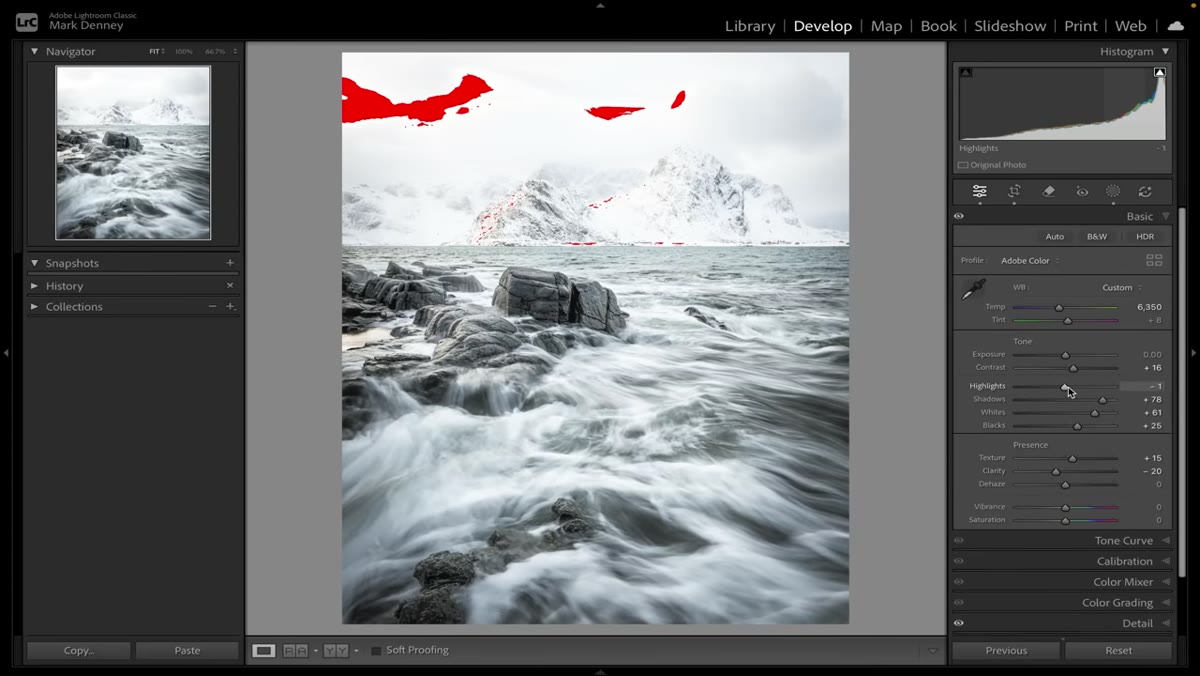 Highlights slider pulled to -100 in Basic panel
Most photographers, myself included for years, reach immediately for the Highlights slider and yank it all the way to -100. Denney shows this approach honestly, and the result is instructive: the clipping indicator disappears, but the sky area stays pure white. When you bring overall exposure down, that region doesn’t respond. It just sits there, flat and blank. The reason is simple but brutal. If the sensor never recorded any data in those pixels because the light was too intense, there is nothing to recover. Pulling the Highlights slider doesn’t summon detail from nothing. It only works when there’s something faint still hiding in the RAW data.
Highlights slider pulled to -100 in Basic panel
Most photographers, myself included for years, reach immediately for the Highlights slider and yank it all the way to -100. Denney shows this approach honestly, and the result is instructive: the clipping indicator disappears, but the sky area stays pure white. When you bring overall exposure down, that region doesn’t respond. It just sits there, flat and blank. The reason is simple but brutal. If the sensor never recorded any data in those pixels because the light was too intense, there is nothing to recover. Pulling the Highlights slider doesn’t summon detail from nothing. It only works when there’s something faint still hiding in the RAW data.
Taking your Highlights to -100 also flattens the rest of the image. Highlights aren’t just a problem to eliminate. They’re part of what gives a photo dimension and air. Nuking them globally is trading one problem for another.
Step 3: Reset and Let Lightroom Suggest a Starting Point
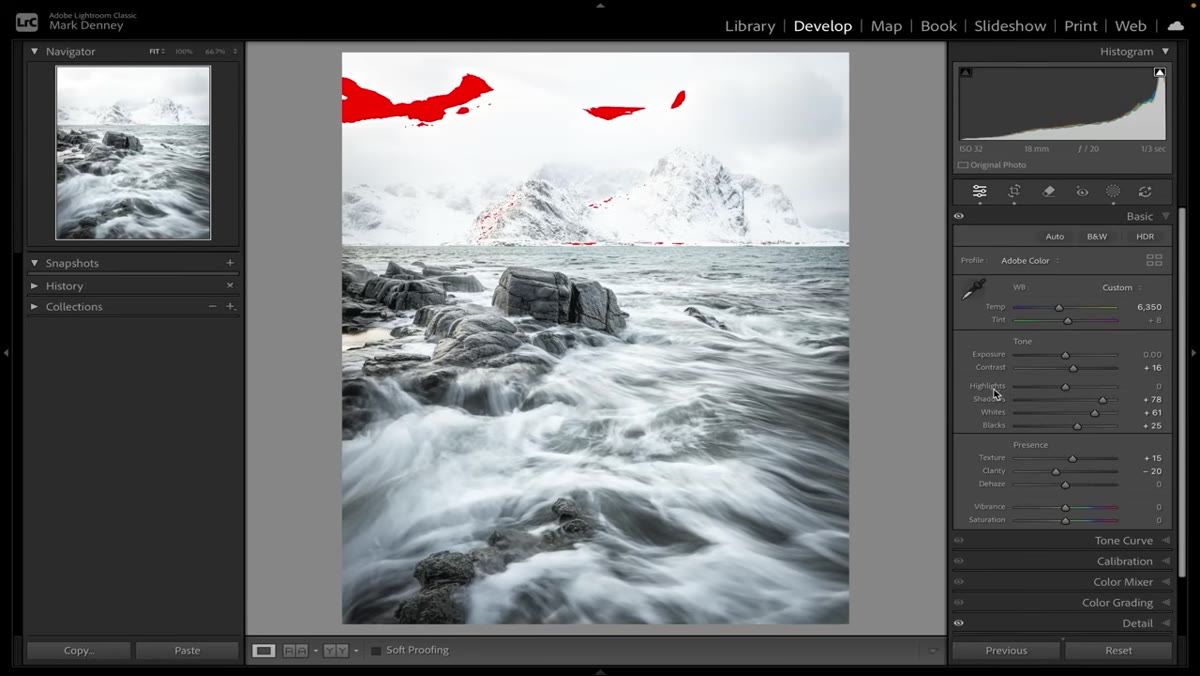 Shift-double-click on Highlights slider showing auto value
Here’s a move I now use constantly. Hold Shift and double-click any slider in the Basic panel to let Lightroom apply its own suggested value. It’s not magic, but it’s a useful calibration point because it reflects what the algorithm thinks is appropriate based on the actual tonal range of your file. For Denney’s Norway image, Lightroom suggests -70 for Highlights rather than -100. That’s a meaningful difference. It means you’re recovering what’s there without stripping highlights from the parts of the image that don’t need intervention. Run the same move on your Exposure slider and use those values as your baseline before making any manual adjustments.
Shift-double-click on Highlights slider showing auto value
Here’s a move I now use constantly. Hold Shift and double-click any slider in the Basic panel to let Lightroom apply its own suggested value. It’s not magic, but it’s a useful calibration point because it reflects what the algorithm thinks is appropriate based on the actual tonal range of your file. For Denney’s Norway image, Lightroom suggests -70 for Highlights rather than -100. That’s a meaningful difference. It means you’re recovering what’s there without stripping highlights from the parts of the image that don’t need intervention. Run the same move on your Exposure slider and use those values as your baseline before making any manual adjustments.
Step 4: Create a Targeted Sky Mask
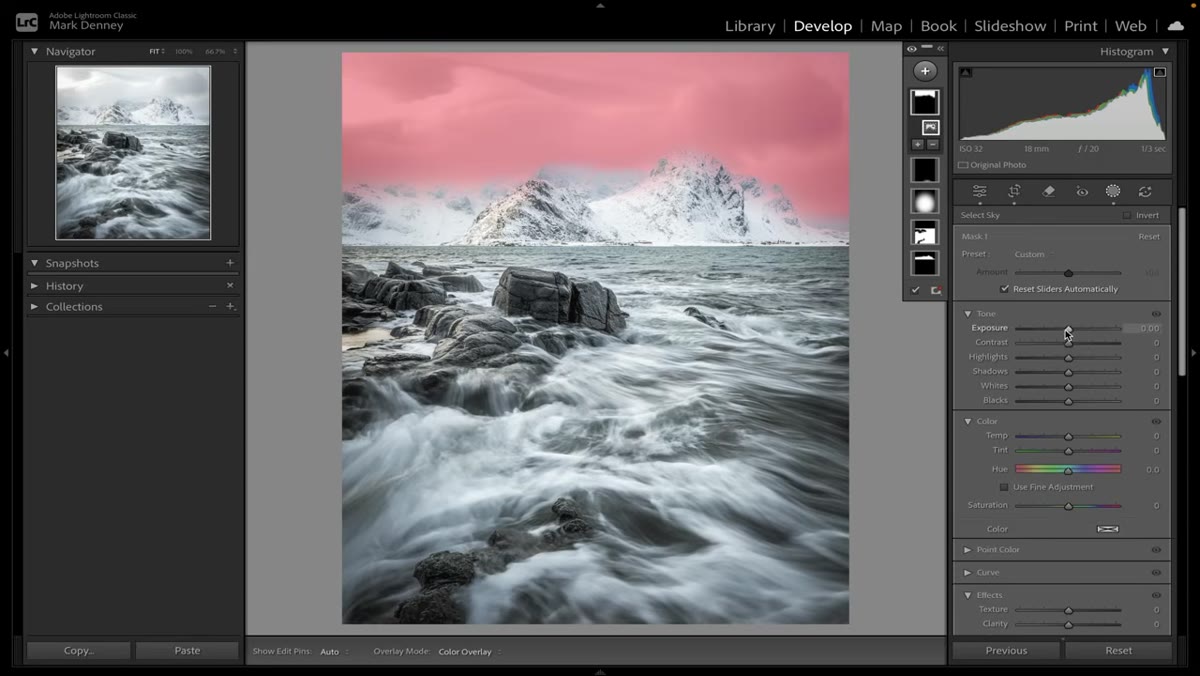 Sky mask created in Masking panel
Once your global sliders are dialed in and you’ve confirmed that the blown area genuinely contains no recoverable data, it’s time to isolate the problem zone. Open the Masking panel (shortcut: Shift + W) and select Sky. Lightroom’s AI masking is genuinely good at this, especially with landscape shots where the horizon creates a clean boundary. The mask will light up in red overlay mode so you can verify it selected what you intended before you commit to any adjustments.
Sky mask created in Masking panel
Once your global sliders are dialed in and you’ve confirmed that the blown area genuinely contains no recoverable data, it’s time to isolate the problem zone. Open the Masking panel (shortcut: Shift + W) and select Sky. Lightroom’s AI masking is genuinely good at this, especially with landscape shots where the horizon creates a clean boundary. The mask will light up in red overlay mode so you can verify it selected what you intended before you commit to any adjustments.
This step is where the real work happens. By working on the sky independently from the rest of the image, you can push the exposure and contrast in that region without destroying the foreground, midtones, or anything else you’ve already balanced.
Step 5: Adjust Within the Mask, Not Globally
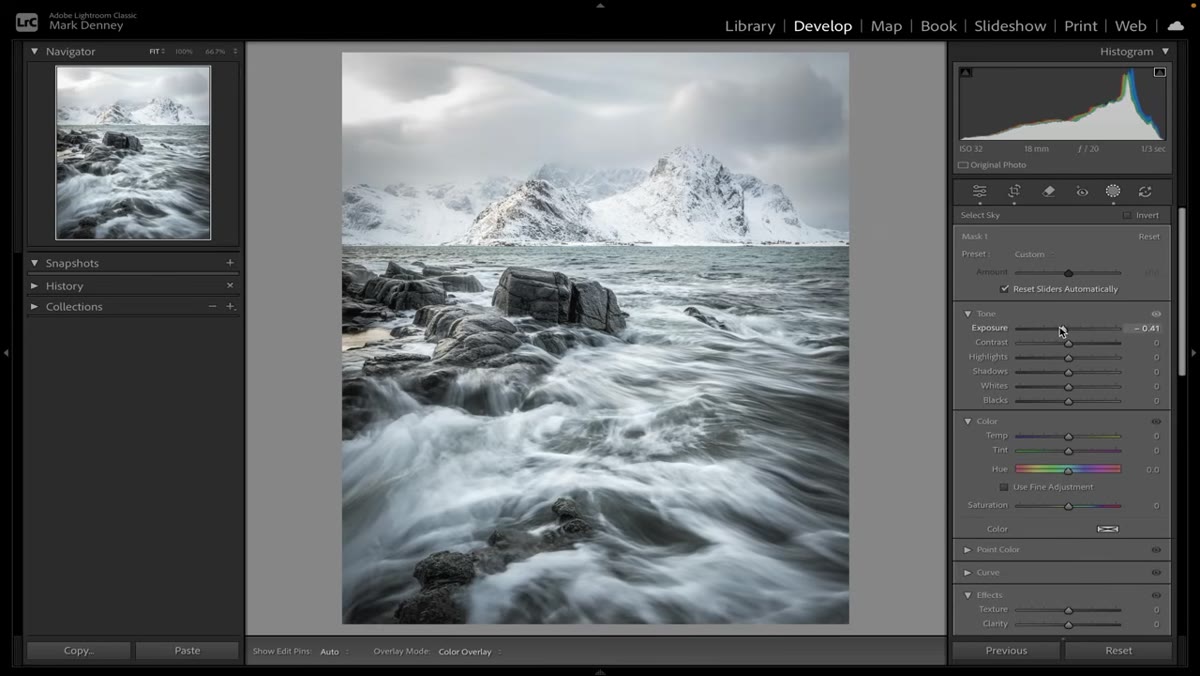 Exposure slider inside active Sky mask adjustment
With your Sky mask active, bring the Exposure slider down gradually while watching the actual pixels, not just the clipping indicator. The indicator disappearing doesn’t mean the area looks good. If the area was genuinely clipped with zero data, it will stay white no matter how far you push exposure down within the mask. That’s your confirmation that you’re dealing with true data loss rather than recoverable overexposure. In that case, the fix isn’t about slider values. It’s about replacing or blending that region, which leads to the Photoshop side of this workflow.
Exposure slider inside active Sky mask adjustment
With your Sky mask active, bring the Exposure slider down gradually while watching the actual pixels, not just the clipping indicator. The indicator disappearing doesn’t mean the area looks good. If the area was genuinely clipped with zero data, it will stay white no matter how far you push exposure down within the mask. That’s your confirmation that you’re dealing with true data loss rather than recoverable overexposure. In that case, the fix isn’t about slider values. It’s about replacing or blending that region, which leads to the Photoshop side of this workflow.
For areas where some data survived but the clipping indicator was showing, this targeted mask approach will let you recover detail without the flat, compressed look you get from global slider adjustments.
My Own Extension: When the Data Really Is Gone
The technique Denney demonstrates works brilliantly when highlights are close to the edge. But there’s a version of this problem where the data genuinely isn’t there, and I’ve learned to treat that as a separate creative decision rather than a Lightroom problem. Sometimes I’ll clone texture from an adjacent area of sky using the Healing Brush in Lightroom or the Content-Aware fill tools in Photoshop. Other times, if the blown region is small enough and positioned at the edge of the frame, a subtle crop solves it cleaner than any recovery technique. The goal isn’t always perfection. Sometimes it’s deciding whether the photo is still worth telling a story with, even with the flaw visible. Denney’s Norway image works partly because the energy of the light and the water motion carries more weight than a bit of clipping in the corner.
The single most important thing I took from this tutorial is the order of operations: check what’s actually there before deciding what’s fixable. Most photographers, especially early on, assume a clipping indicator means the photo is dead. Often it isn’t. And even when the data is gone, the image might still be worth saving through other means. The habit of reaching for delete too quickly costs you photographs you’d have loved.
Watch the full tutorial on YouTube to see Denney walk through the full before and after on the Norway image, including how the final version came together.
Comments (5)
Would love to see a follow-up going deeper into this topic.
Finally someone explains this in a way that actually makes sense.
I've been looking for exactly this kind of tutorial. Perfect timing.
Clear and practical. No fluff. Appreciate that.
Shared this with my photography group. Everyone loved it.
Leave a Comment