
There is one question I heard constantly when I first started helping friends learn Lightroom: “Where did my photos go?” Not “how do I edit this” or “what’s a good preset for skin tones” - just a panicked message asking why an entire shoot had disappeared into the void. The answer, almost every single time, came back to the import step. People skip past it, click through the dialog without reading it, and then spend an hour hunting through their hard drive wondering if they accidentally deleted a whole card full of portraits.
In this Marc Muench tutorial on importing into Lightroom, he cuts straight to the root of that problem with a workflow that is clean, deliberate, and honestly something I wish someone had shown me years ago. Watch the full tutorial on YouTube before or after reading this - either way works, but the steps below should give you everything you need to follow along in real time.
The core thing Muench wants you to understand before touching the import button is the relationship between two separate systems: your operating system (where your actual image files live on disk) and the Lightroom catalog (a database that tracks those files and stores your edits). These are not the same thing. Confusing them is what causes photos to “disappear.”
Step 1: Understand What the Lightroom Catalog Actually Is
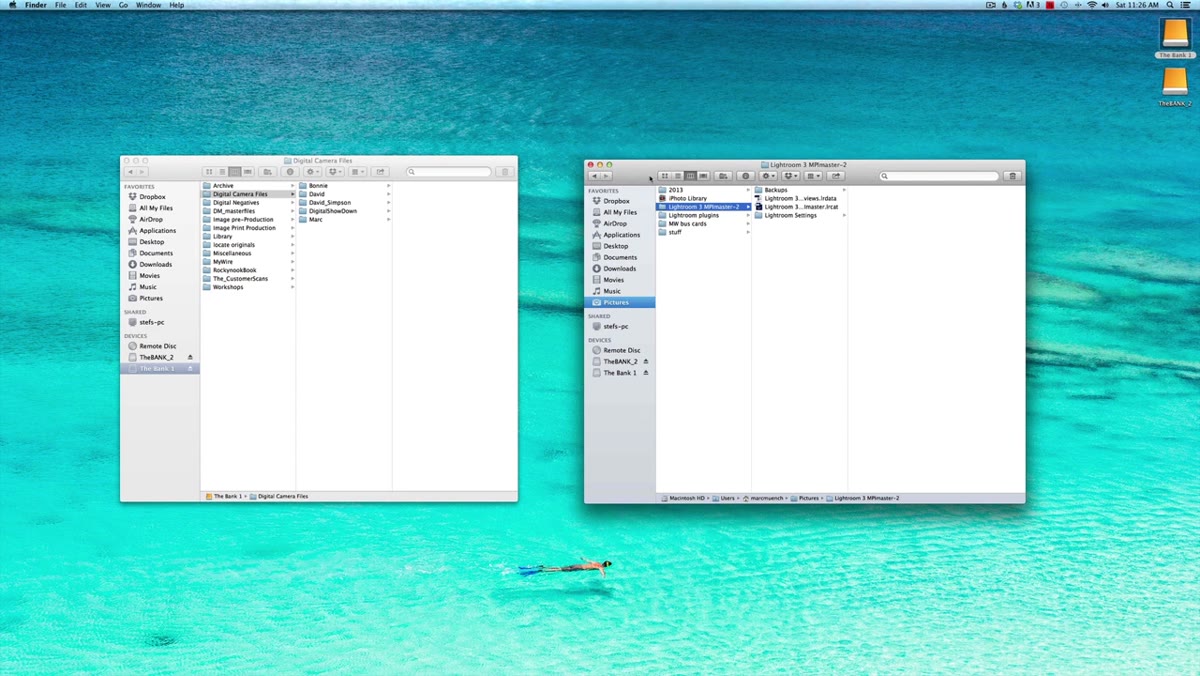 Diagram showing Lightroom catalog folder inside Pictures directory
Lightroom creates a catalog folder inside your Pictures directory when you first install it. Inside that folder you will find two key items: a preview file and the actual catalog file with an .lrcat extension. Your photos do not live in this folder. The catalog just knows where they are and stores every edit you have ever made. This distinction matters because if you move photos around in Finder or Windows Explorer after importing them, Lightroom loses track of them entirely - and that is how shoots disappear.
Diagram showing Lightroom catalog folder inside Pictures directory
Lightroom creates a catalog folder inside your Pictures directory when you first install it. Inside that folder you will find two key items: a preview file and the actual catalog file with an .lrcat extension. Your photos do not live in this folder. The catalog just knows where they are and stores every edit you have ever made. This distinction matters because if you move photos around in Finder or Windows Explorer after importing them, Lightroom loses track of them entirely - and that is how shoots disappear.
Step 2: Know the Four Rules Before You Import Anything
 Text list of four Lightroom import rules on screen
Muench lays out four principles that frame everything else in the tutorial. First, the OS and the catalog are separate systems. Second, Lightroom only sees folders you have specifically imported - if you have never pointed it at a folder, that folder does not exist inside the catalog. Third, once images are imported, all file management (including moving folders) has to happen inside Lightroom, not through your operating system. Fourth, by default Lightroom stores imported images in a year-based folder structure, but you can and should override that to match your own organizational system.
Text list of four Lightroom import rules on screen
Muench lays out four principles that frame everything else in the tutorial. First, the OS and the catalog are separate systems. Second, Lightroom only sees folders you have specifically imported - if you have never pointed it at a folder, that folder does not exist inside the catalog. Third, once images are imported, all file management (including moving folders) has to happen inside Lightroom, not through your operating system. Fourth, by default Lightroom stores imported images in a year-based folder structure, but you can and should override that to match your own organizational system.
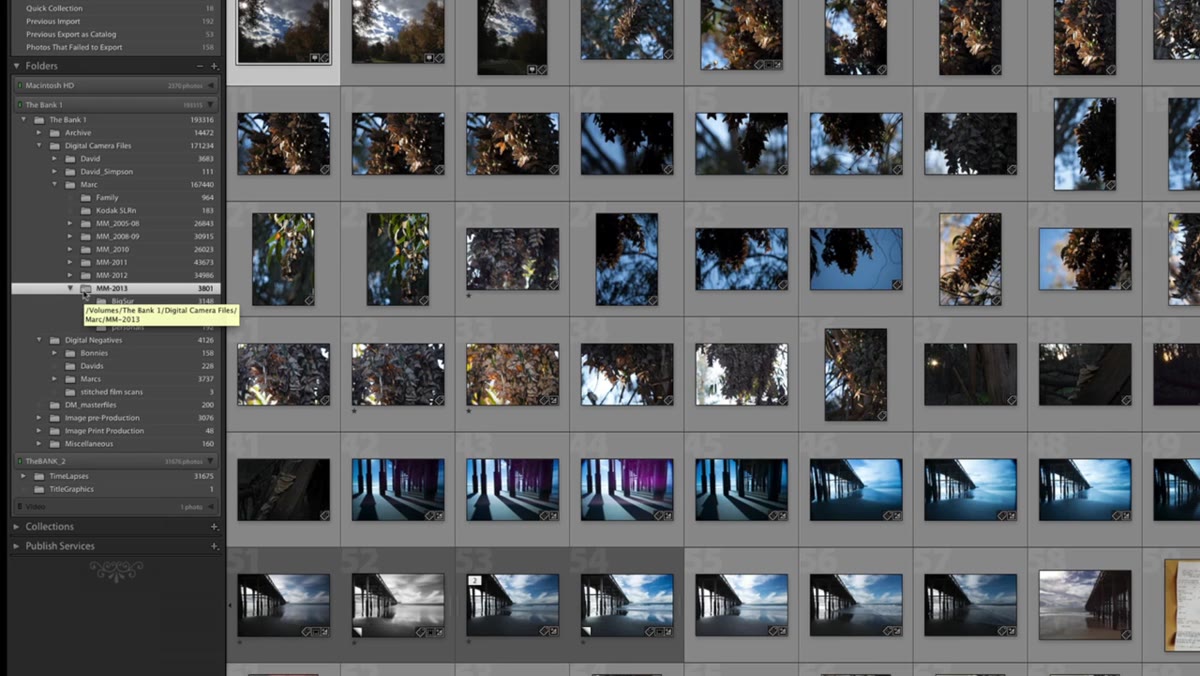
Step 3: Build Your Folder Structure Before Importing
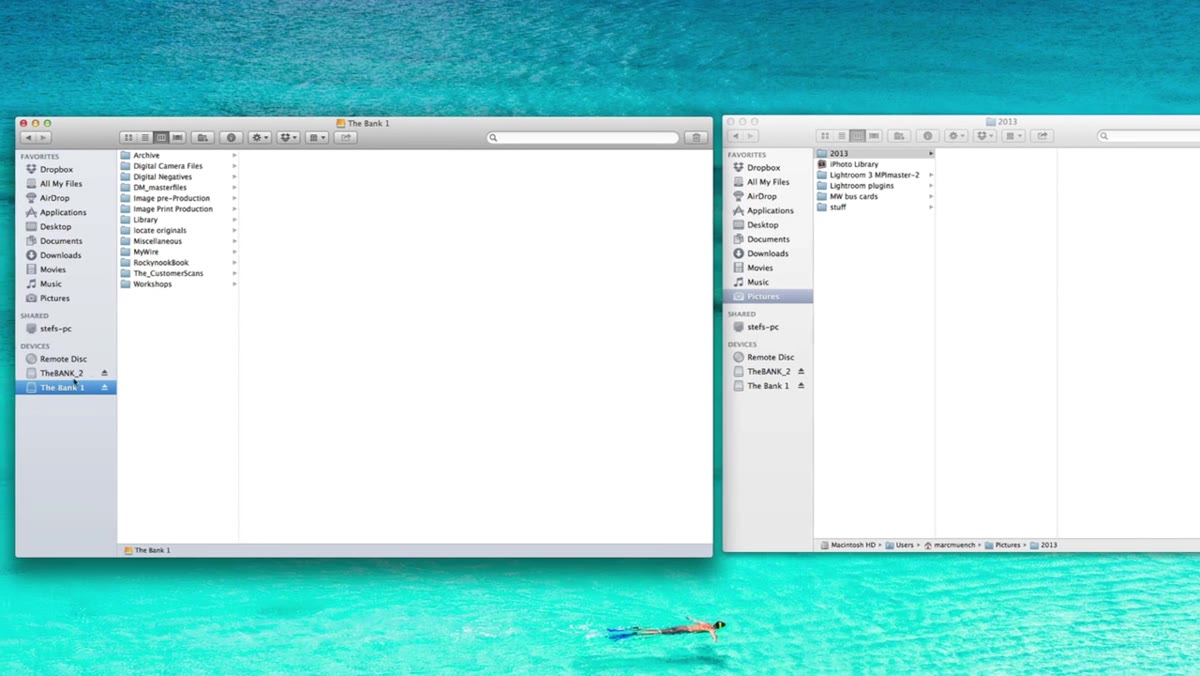 Custom folder hierarchy inside a RAID drive shown in Lightroom
Muench keeps his photos on a RAID drive in a folder called “Digital Camera Files,” organized by year, with subfolders for each specific shoot. This is not just preference - it is a system that makes sense at scale. When you have ten years of shoots, a date-only structure becomes impossible to navigate. I organize mine similarly, with a top-level folder by year and then named subfolders for each project or location. The point is to decide on your system before you start importing, because changing it later inside Lightroom is doable but tedious.
Custom folder hierarchy inside a RAID drive shown in Lightroom
Muench keeps his photos on a RAID drive in a folder called “Digital Camera Files,” organized by year, with subfolders for each specific shoot. This is not just preference - it is a system that makes sense at scale. When you have ten years of shoots, a date-only structure becomes impossible to navigate. I organize mine similarly, with a top-level folder by year and then named subfolders for each project or location. The point is to decide on your system before you start importing, because changing it later inside Lightroom is doable but tedious.
Step 4: Turn Off the Auto-Import Dialog in Preferences
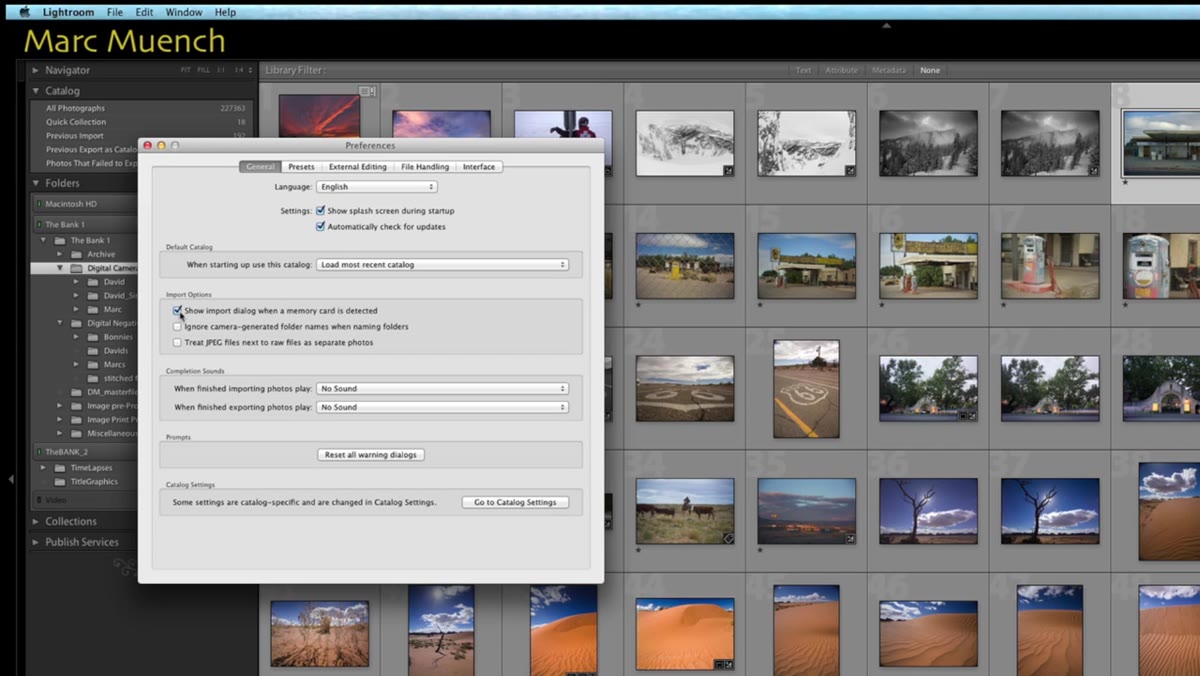 Lightroom Preferences general tab with import dialog checkbox unchecked
Go to Lightroom Preferences, open the General tab, and uncheck “Show import dialog when a memory card is detected.” This sounds counterintuitive - why would you turn off the import dialog? Because when it fires automatically the moment you plug in a card, you end up importing before you have set up your destination folder. Muench’s method is to build the folder first, then trigger the import manually from exactly where you want the files to land. Removing the auto-popup puts you in control of that sequence.
Lightroom Preferences general tab with import dialog checkbox unchecked
Go to Lightroom Preferences, open the General tab, and uncheck “Show import dialog when a memory card is detected.” This sounds counterintuitive - why would you turn off the import dialog? Because when it fires automatically the moment you plug in a card, you end up importing before you have set up your destination folder. Muench’s method is to build the folder first, then trigger the import manually from exactly where you want the files to land. Removing the auto-popup puts you in control of that sequence.
Step 5: Create Your Destination Folder Inside the Library Module
 Right-click menu in Lightroom folders panel showing “Create Folder” option
With your card plugged in and the auto-dialog disabled, go to the Library module and find the Folders panel on the left. Navigate to wherever you want this shoot to live, right-click the parent folder, and select “Create Folder.” Name it something descriptive - Muench names his “Employees” because that is what he shot. Once the folder exists, right-click it and choose “Import to this folder.” Now you know with absolute certainty where every file is going before a single byte gets moved. This is the step most people skip, and it is the one that causes all the panic later.
Right-click menu in Lightroom folders panel showing “Create Folder” option
With your card plugged in and the auto-dialog disabled, go to the Library module and find the Folders panel on the left. Navigate to wherever you want this shoot to live, right-click the parent folder, and select “Create Folder.” Name it something descriptive - Muench names his “Employees” because that is what he shot. Once the folder exists, right-click it and choose “Import to this folder.” Now you know with absolute certainty where every file is going before a single byte gets moved. This is the step most people skip, and it is the one that causes all the panic later.
Step 6: Set the Import Options Correctly
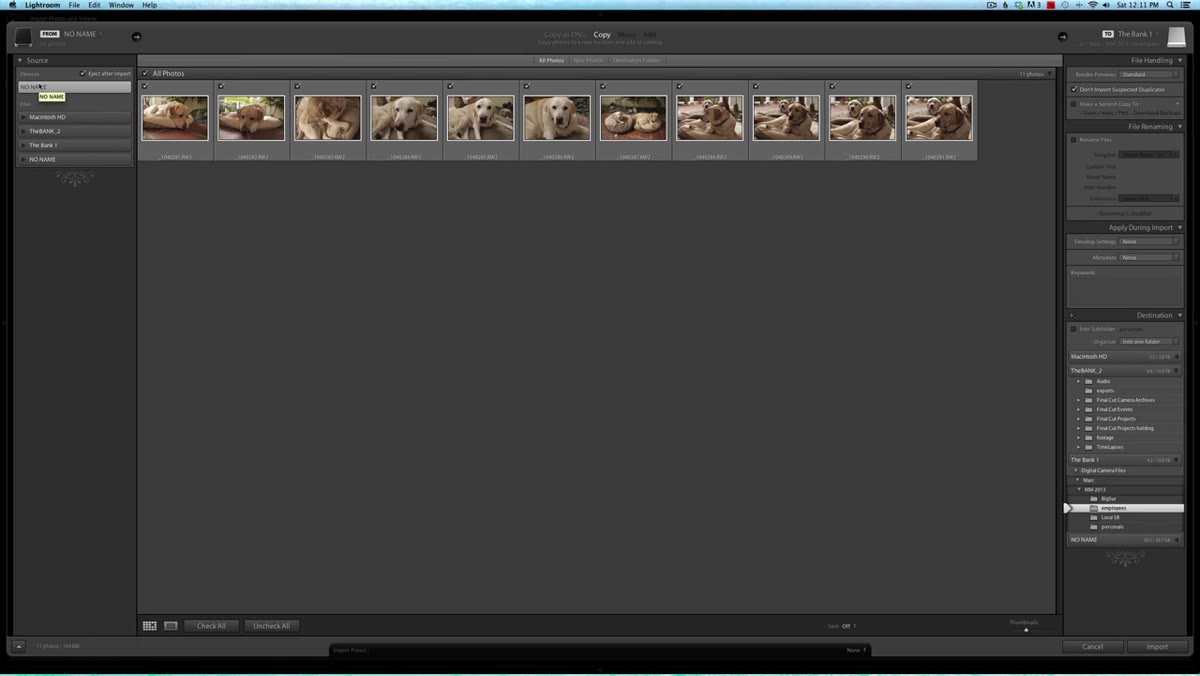 Lightroom import screen showing Copy option selected at top center
The import screen has a row of options across the top center: Copy as DNG, Copy, Move, and Add. For files coming off a camera card, always choose Copy. You are pulling images from a card to your computer - Move would delete them from the card, Add would leave them on the card without copying, and Copy as DNG is a format conversion step you can do separately later. In the File Handling panel, Muench specifically recommends checking “Don’t Import Suspected Duplicates.” If you shoot across multiple sessions on the same card without formatting it between shoots, this setting prevents Lightroom from importing files it has already cataloged.
Lightroom import screen showing Copy option selected at top center
The import screen has a row of options across the top center: Copy as DNG, Copy, Move, and Add. For files coming off a camera card, always choose Copy. You are pulling images from a card to your computer - Move would delete them from the card, Add would leave them on the card without copying, and Copy as DNG is a format conversion step you can do separately later. In the File Handling panel, Muench specifically recommends checking “Don’t Import Suspected Duplicates.” If you shoot across multiple sessions on the same card without formatting it between shoots, this setting prevents Lightroom from importing files it has already cataloged.
Step 7: Confirm the Destination Path Before Clicking Import
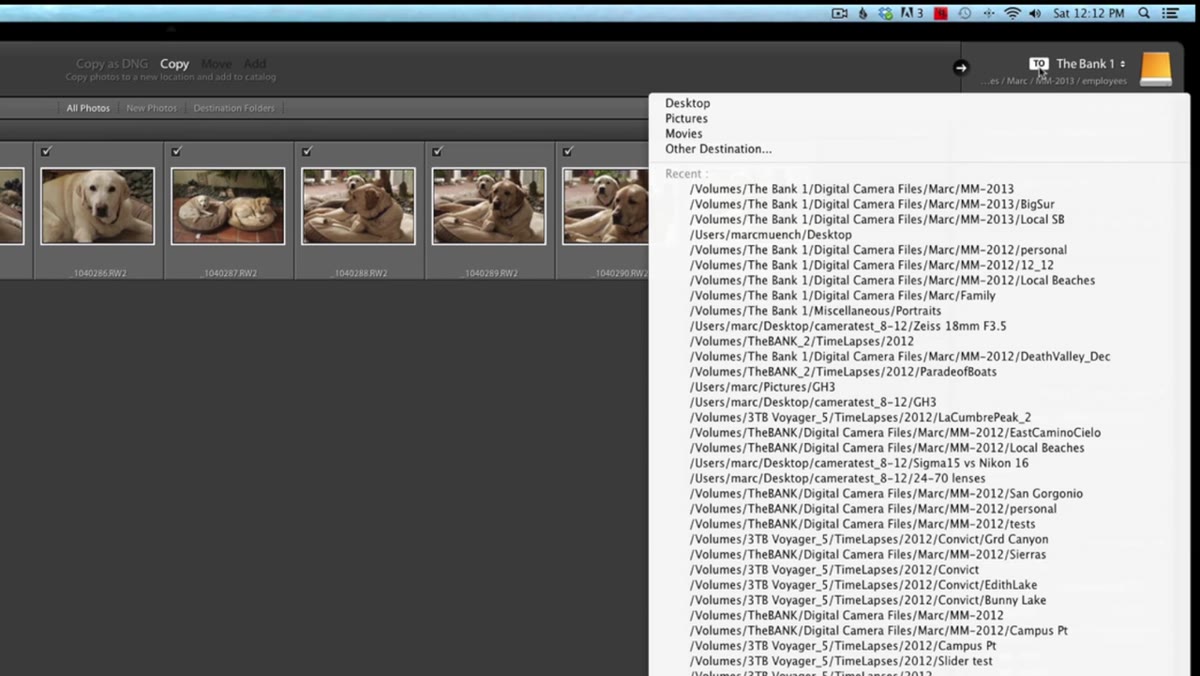 Destination path hyperlink visible in Lightroom import screen
Before you hit the Import button, look at the destination path displayed on the right side of the import screen. It shows exactly where your files are heading. Muench calls it a hyperlink, and you can click it to verify the path is correct. This is a five-second check that eliminates 90% of the “where did my photos go” situations. If that path does not match the folder you created in Step 5, stop and fix it before proceeding.
Destination path hyperlink visible in Lightroom import screen
Before you hit the Import button, look at the destination path displayed on the right side of the import screen. It shows exactly where your files are heading. Muench calls it a hyperlink, and you can click it to verify the path is correct. This is a five-second check that eliminates 90% of the “where did my photos go” situations. If that path does not match the folder you created in Step 5, stop and fix it before proceeding.
One Thing I Do Differently
Muench’s system is solid, and I follow most of it directly. The one place I diverge is with folder naming. I name my project subfolders the same way I name my Lightroom presets - after songs. A portrait session from last spring is sitting in a folder called “Harvest Moon” on my drive. It is completely impractical and I would not recommend it professionally, but it means I can find any shoot from memory in about four seconds because I associate each job with whatever record was on the turntable that day. Your system just needs to be consistent and make sense to you six months from now.
The single most important thing to take away from this tutorial is that the import step is not a formality - it is where you establish the relationship between Lightroom’s catalog and your actual files on disk. Get that relationship set up correctly and deliberately, and Lightroom works beautifully. Rush through it, and you will spend more time hunting for missing photos than you ever spend editing them.
Watch the full tutorial on YouTube to see Marc Muench walk through the entire process in real time - his explanation of the catalog versus OS distinction alone is worth the ten minutes.
Comments
Leave a Comment