Here is the honest truth about most Lightroom-to-Photoshop workflows: they leak quality somewhere in the handoff. You export a JPEG, open it in Photoshop, do your thing, save it back, and suddenly you are three generations deep into a file that started as a beautiful raw. I have done this more times than I want to admit, usually late on a Friday night with a record on the turntable and a deadline in the morning. The fix is not complicated, but it requires knowing one specific setting that most tutorials skip right past.
In this Aaron Nace (PHLEARN) tutorial, part of his 30 Days of Lightroom series, he walks through a workflow that keeps your raw data alive all the way through Photoshop, then shows how to composite layers and text on top of it without ever flattening that foundation. Watch the full tutorial on YouTube before or after reading this breakdown. Either way, here is exactly how the technique works.
Step 1: Open Your Image as a Smart Object, Not a Standard File
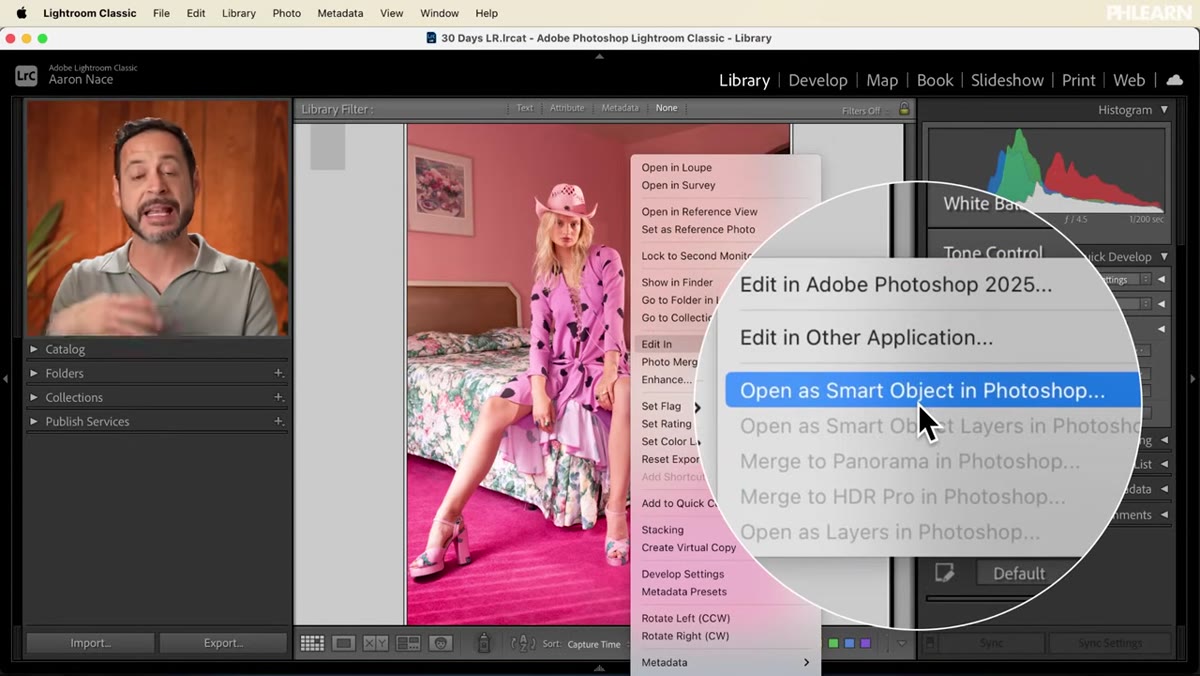 Photo menu open showing “Open as Smart Object in Photoshop”
Right-clicking your image in Lightroom Classic and choosing “Edit In Photoshop” is the obvious move, but it is not the right one if you want to preserve raw editing capability. Instead, go to the Photo menu at the top, select “Edit In,” and choose “Open as Smart Object in Photoshop.” That single distinction changes everything downstream.
Photo menu open showing “Open as Smart Object in Photoshop”
Right-clicking your image in Lightroom Classic and choosing “Edit In Photoshop” is the obvious move, but it is not the right one if you want to preserve raw editing capability. Instead, go to the Photo menu at the top, select “Edit In,” and choose “Open as Smart Object in Photoshop.” That single distinction changes everything downstream.
When Photoshop receives the file as a smart object, it keeps the raw data intact and wrapped inside the layer. Nothing is baked. Nothing is committed. You can still go back and adjust white balance, exposure, shadows, and highlights exactly as you would in Lightroom’s Develop module.
Step 2: Edit the Raw Data Inside Camera Raw
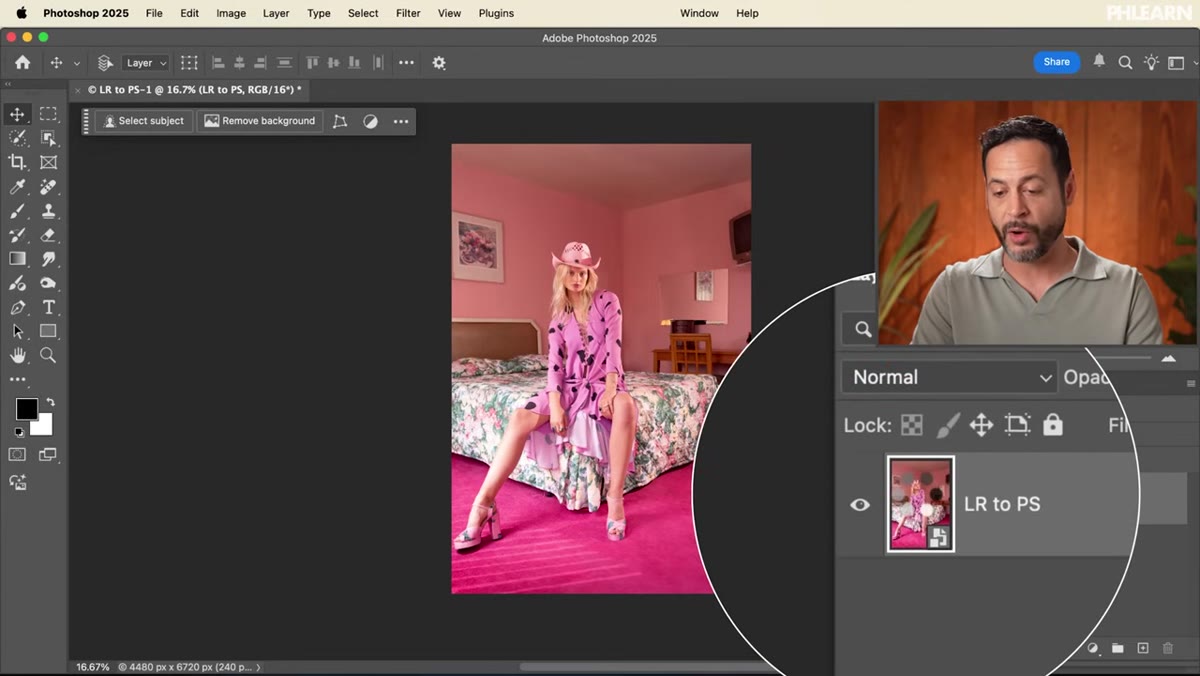 Double-clicking smart object thumbnail opens Camera Raw panel
Once your image is open in Photoshop, double-click the thumbnail in the Layers panel. This opens Camera Raw directly inside Photoshop, and it behaves identically to Lightroom’s Develop module. You get the same sliders, the same tone curve, the same color grading tools. Aaron runs the Auto adjustment here as a quick starting point, then nudges exposure manually.
Double-clicking smart object thumbnail opens Camera Raw panel
Once your image is open in Photoshop, double-click the thumbnail in the Layers panel. This opens Camera Raw directly inside Photoshop, and it behaves identically to Lightroom’s Develop module. You get the same sliders, the same tone curve, the same color grading tools. Aaron runs the Auto adjustment here as a quick starting point, then nudges exposure manually.
The key thing to understand is that this is a 16-bit workflow the whole way through. You are not working on a flattened, tone-mapped copy of your raw file. Every adjustment you make here is non-destructive and fully revisable. Hit OK when you are satisfied and Photoshop applies those changes while keeping the smart object intact underneath.
Step 3: Place Supporting Graphics Using “Place Embedded”
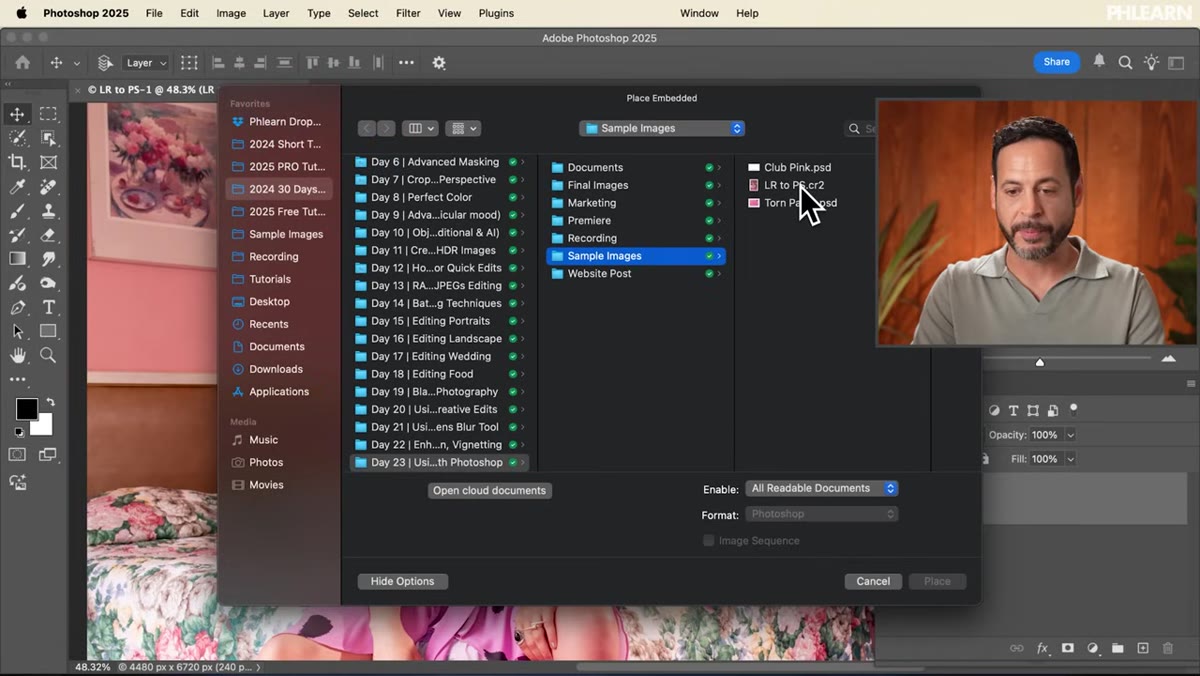 File menu open with “Place Embedded” option highlighted
Here is where the Photoshop layer advantage kicks in. Go to File, then Place Embedded, and bring in any graphic or texture you want to composite into the image. Aaron uses a torn paper graphic in this example, placing it into the document as its own layer sitting above the base image.
File menu open with “Place Embedded” option highlighted
Here is where the Photoshop layer advantage kicks in. Go to File, then Place Embedded, and bring in any graphic or texture you want to composite into the image. Aaron uses a torn paper graphic in this example, placing it into the document as its own layer sitting above the base image.
“Place Embedded” keeps the graphic linked to its source file rather than flattening the pixel data into the document, which gives you flexibility to swap or update the asset later. Once placed, position it where you want it and press Enter to commit the transform.
Step 4: Use Select Subject to Isolate Your Main Figure
 Contextual taskbar showing “Select Subject” button active
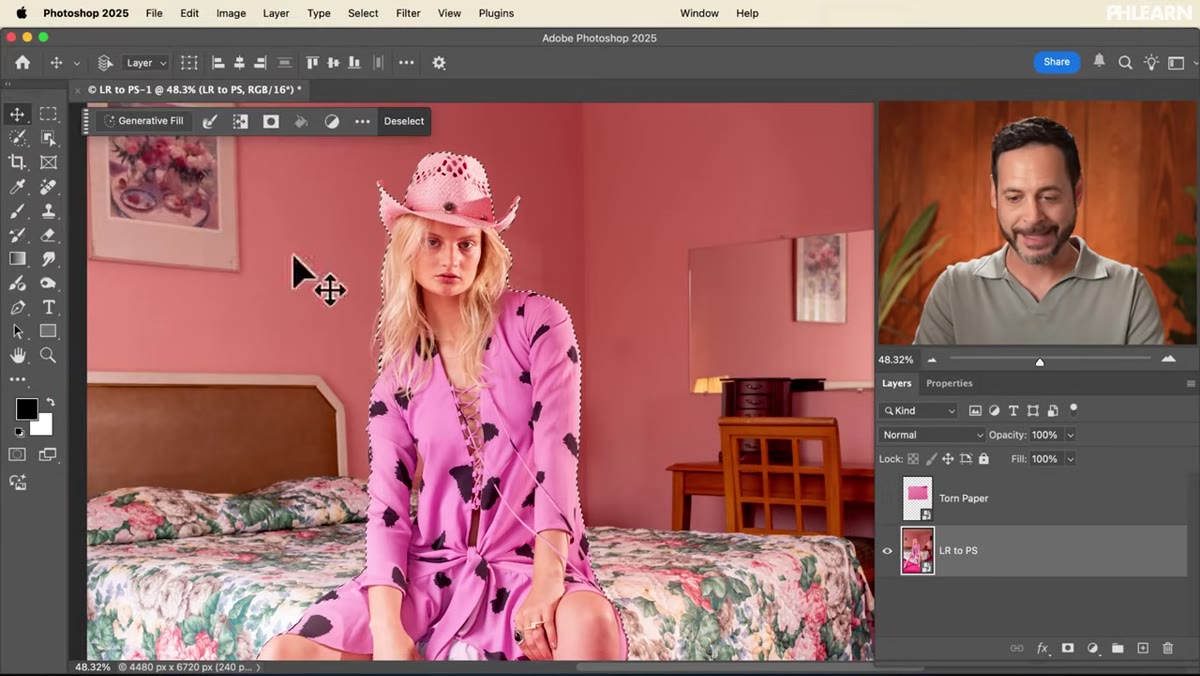
To get the torn paper sitting behind the subject rather than in front of them, you need a clean selection of the person in the photo. Toggle off the graphic layer temporarily so you can see just the base image, then click on that base layer. In the contextual taskbar running along the bottom of the canvas, hit “Select Subject.” Photoshop’s AI handles the selection in a second or two.
Contextual taskbar showing “Select Subject” button active
To get the torn paper sitting behind the subject rather than in front of them, you need a clean selection of the person in the photo. Toggle off the graphic layer temporarily so you can see just the base image, then click on that base layer. In the contextual taskbar running along the bottom of the canvas, hit “Select Subject.” Photoshop’s AI handles the selection in a second or two.
This is one of those tools that still impresses me every time I use it. The edges are not always perfect on flyaway hair or complex backgrounds, but for a composite like this it is more than accurate enough to get a convincing result.
Step 5: Add a Layer Mask and Invert It
 Layer mask applied to torn paper layer, mask thumbnail visible
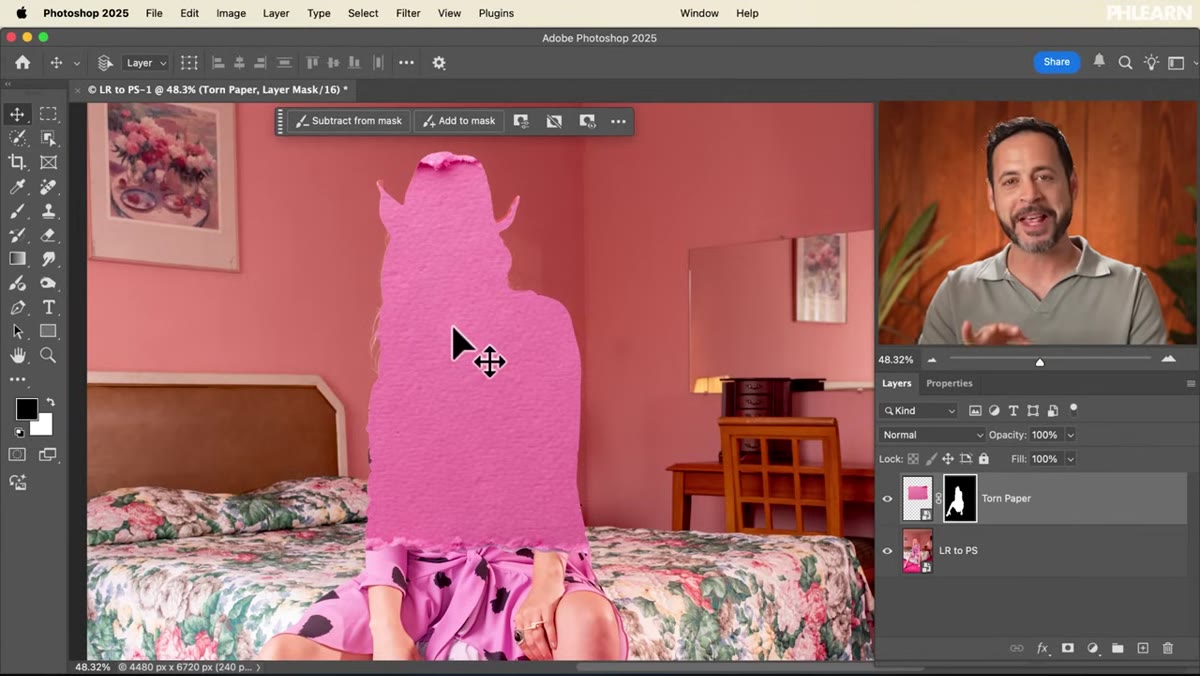
Turn the graphic layer back on and make sure it is the active layer. Click the Layer Mask icon at the bottom of the Layers panel. Photoshop creates a mask using your current selection, but because the selection was the subject, the result hides the subject and shows the paper everywhere else. That is the opposite of what you want.
Layer mask applied to torn paper layer, mask thumbnail visible
Turn the graphic layer back on and make sure it is the active layer. Click the Layer Mask icon at the bottom of the Layers panel. Photoshop creates a mask using your current selection, but because the selection was the subject, the result hides the subject and shows the paper everywhere else. That is the opposite of what you want.
With the mask thumbnail still selected in the Layers panel, either use the contextual taskbar’s “Invert Mask” option or press Command-I (Mac) or Control-I (Windows). Now the graphic appears behind the subject, and the cutout holds the figure in the foreground where it belongs.
Step 6: Unlink the Layer Mask to Move Elements Independently
 Chain link icon between layer and mask in Layers panel
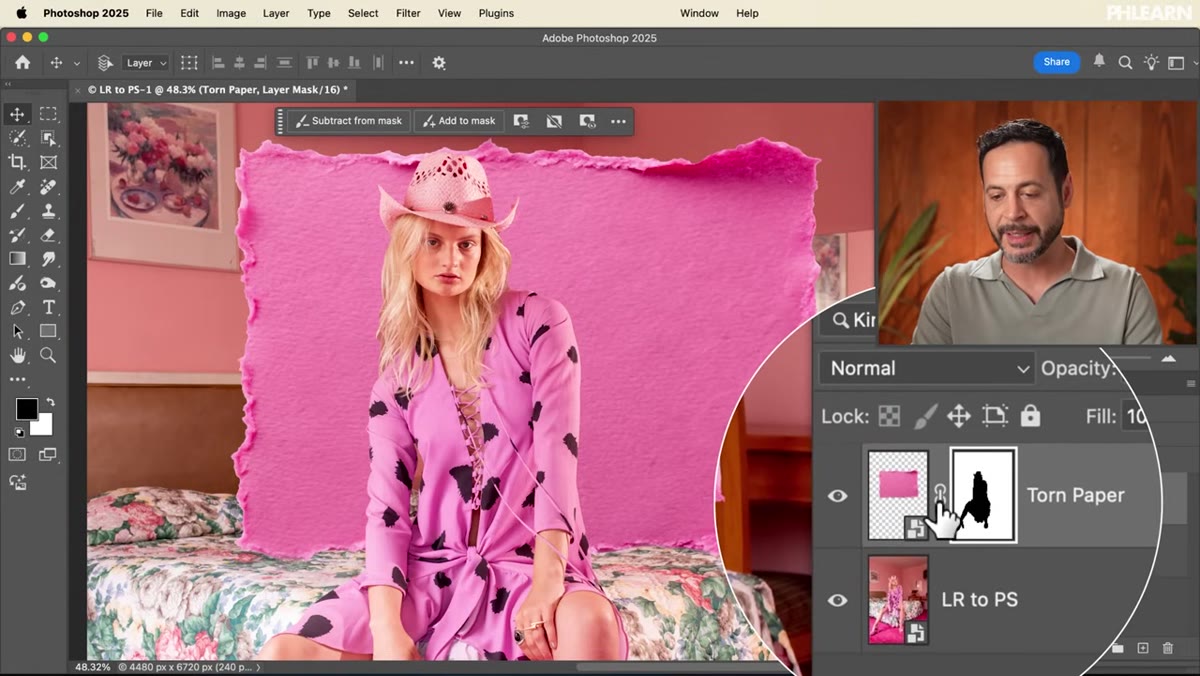
By default, Photoshop chains the mask to the layer so that moving one moves the other. That sounds convenient until you try to reposition the torn paper graphic and watch your entire mask shift along with it, ruining the composite. Aaron points to the small chain link icon sitting between the layer thumbnail and the mask thumbnail in the Layers panel. Click it once to break the link.
Chain link icon between layer and mask in Layers panel
By default, Photoshop chains the mask to the layer so that moving one moves the other. That sounds convenient until you try to reposition the torn paper graphic and watch your entire mask shift along with it, ruining the composite. Aaron points to the small chain link icon sitting between the layer thumbnail and the mask thumbnail in the Layers panel. Click it once to break the link.
After unlinking, you can grab the Move tool (V), click on the layer thumbnail specifically, and slide the graphic around the canvas freely. The mask stays anchored in place. This is a small thing that makes a large difference when you are trying to dial in a composition.
A Note on Keeping This Workflow Repeatable
The part of this tutorial I want to flag from my own experience is the naming and organization side. Once you have three or four layers stacked up including the smart object base, the graphic, the mask, and eventually text layers, the Layers panel gets messy fast. I keep a simple naming convention: the base layer gets the subject’s name or shoot date, every placed graphic gets the filename, and every mask gets a suffix like “-mask.” It takes about four extra seconds per layer and saves ten minutes of confusion later.
Also worth noting: if you need to send this file to a client for revision, save it as a PSD rather than flattening to a TIFF. The smart object round-trip back to Camera Raw stays open that way, and you can revisit the raw adjustments months later if the client changes direction on the grade.
The biggest single thing I took away from Aaron’s tutorial is the Smart Object entry point. Everything else in this workflow, the masking, the unlinking, the text layers, those are standard Photoshop techniques. But opening from Lightroom as a smart object is the specific handshake that keeps raw capability alive on both sides of the workflow. That alone is worth the runtime of the video.
Watch the full tutorial on YouTube to see Aaron build the final composite with text layers added on top. The full 30 Days of Lightroom series is worth bookmarking if you are working through the application systematically.
Comments (3)
Tried this technique this morning. Game changer for real.
This should be required reading for anyone starting out.
Excellent tutorial. I'd add that from a retouching standpoint, this technique is incredibly versatile.
Leave a Comment