
There’s a version of me from about two years ago who would have rolled his eyes at presets. Hard. I named my own presets after Wilco songs and built every mask by hand because I believed that was the only honest way to edit a photo. Then I watched Thomas Heaton — a landscape photographer I respect precisely because he’s methodical and unsentimental about gear and software — admit on camera that he’d been running an outdated version of Lightroom for so long that he used it during a paid Adobe presentation. If that guy updated and came back raving, I figured I should pay attention.
Watch the full tutorial on YouTube
In this Thomas Heaton tutorial, he walks through the features that changed his editing workflow after finally updating to Lightroom 11.3 and then 11.4. The two that immediately rewired how I think about presets are the Adaptive Sky and Adaptive Subject preset categories. They are not what you think when you hear the word “preset.” They are not one-click Instagram filters. They are masked, targeted adjustments that Lightroom applies only to specific regions of your image using its AI masking engine. That distinction matters a lot, and it’s worth slowing down to understand exactly what’s happening under the hood.
Step 1: Open the Presets Panel and Navigate to Adaptive Presets
 Presets panel open on the left side of Lightroom
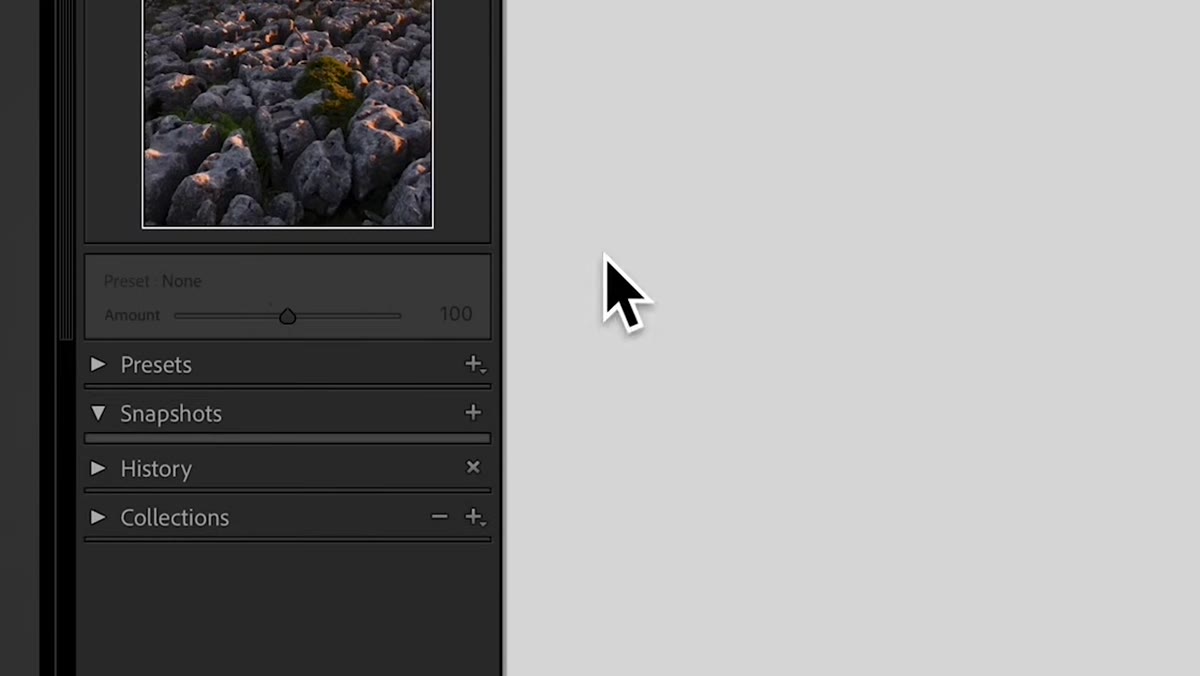
Start in Lightroom’s Develop module with a raw file loaded. On the left-hand panel, find the Presets section and scroll down until you see the category labeled “Adaptive: Sky.” This won’t appear in outdated versions of Lightroom, so if you’re not seeing it, that’s your sign to finally run the update you’ve been ignoring. The preset categories are organized clearly once you’re in the right version. You’re looking specifically for the adaptive groups, which are separated from the standard global presets above them.
Presets panel open on the left side of Lightroom
Start in Lightroom’s Develop module with a raw file loaded. On the left-hand panel, find the Presets section and scroll down until you see the category labeled “Adaptive: Sky.” This won’t appear in outdated versions of Lightroom, so if you’re not seeing it, that’s your sign to finally run the update you’ve been ignoring. The preset categories are organized clearly once you’re in the right version. You’re looking specifically for the adaptive groups, which are separated from the standard global presets above them.
Step 2: Hover Over the Sky Presets to Preview Before Committing
 Hovering over sky preset options showing live preview on image
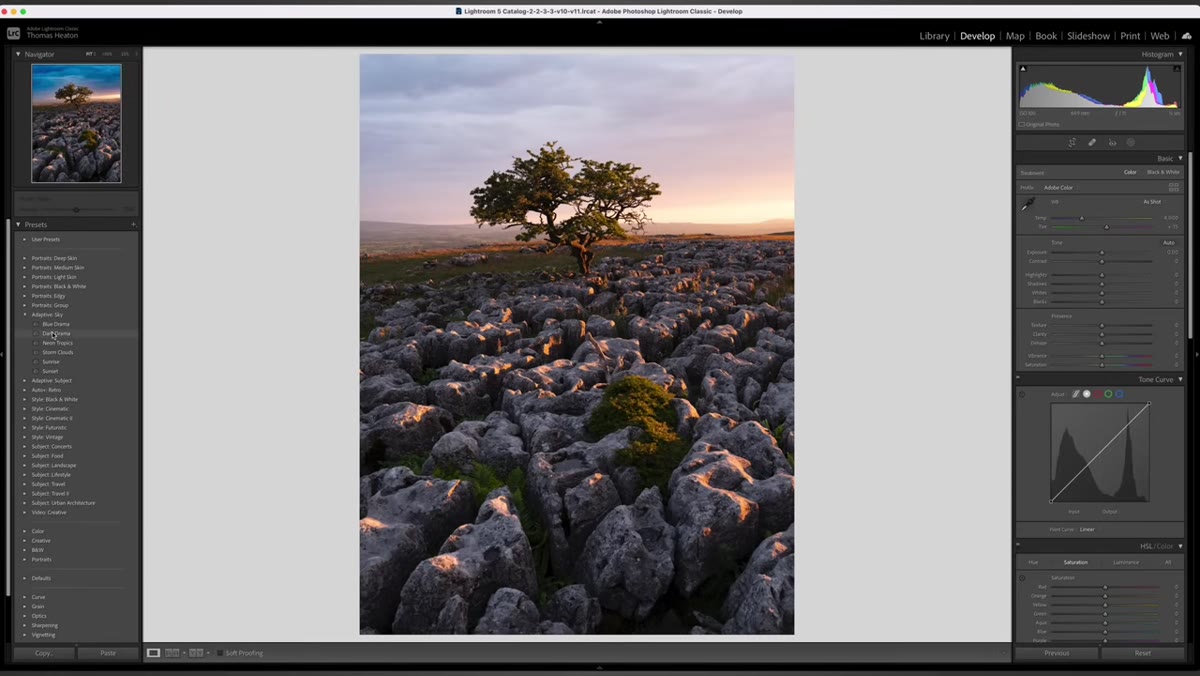
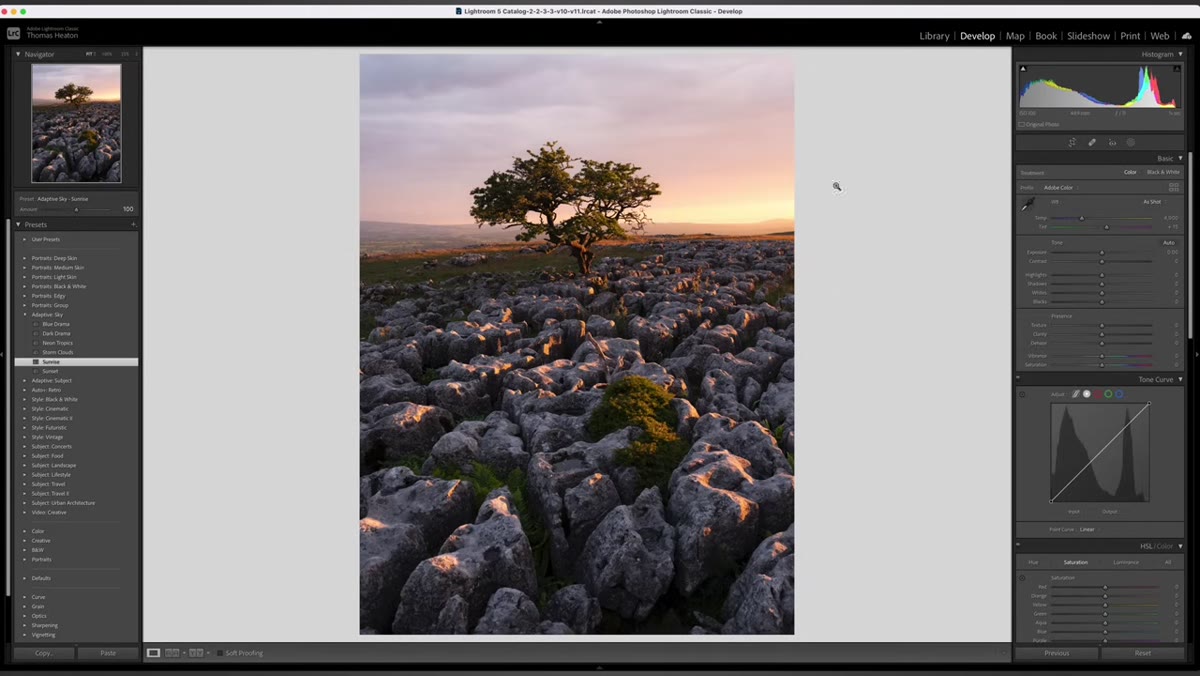
Before clicking anything, just hover your cursor over the individual preset names inside the Adaptive Sky category. Lightroom will display a live preview in the main image window, and here’s the critical thing to notice: the change is only rendering on the sky. The foreground stays untouched. Options you’ll see include labels like Storm Clouds, Neon Tropics, and Sunrise and Sunset variations. Some of them are dramatic and won’t suit your image. Heaton points out that the Sunrise preset gave his raw landscape a soft, warm, slightly dreamy quality that he actually liked, while the Sunset version looked overcooked. The hover preview lets you make that call in about five seconds without committing.
Hovering over sky preset options showing live preview on image
Before clicking anything, just hover your cursor over the individual preset names inside the Adaptive Sky category. Lightroom will display a live preview in the main image window, and here’s the critical thing to notice: the change is only rendering on the sky. The foreground stays untouched. Options you’ll see include labels like Storm Clouds, Neon Tropics, and Sunrise and Sunset variations. Some of them are dramatic and won’t suit your image. Heaton points out that the Sunrise preset gave his raw landscape a soft, warm, slightly dreamy quality that he actually liked, while the Sunset version looked overcooked. The hover preview lets you make that call in about five seconds without committing.
Step 3: Apply the Preset and Inspect the Mask It Creates
 Mask panel showing sky selection after applying adaptive preset
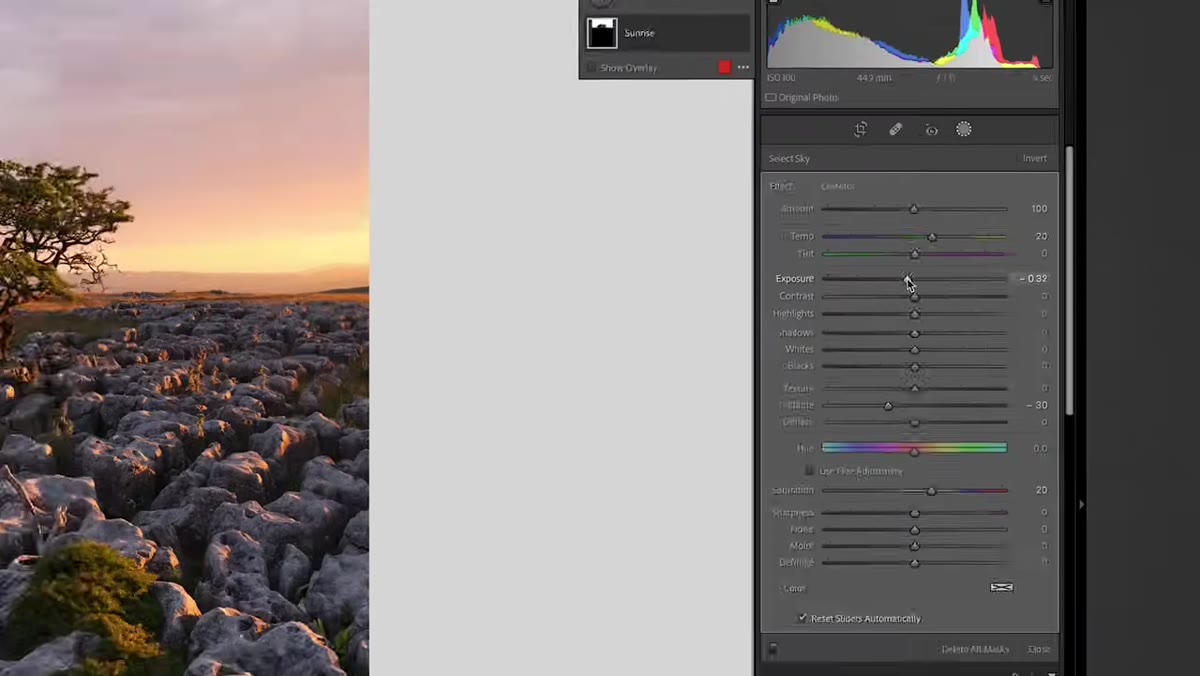
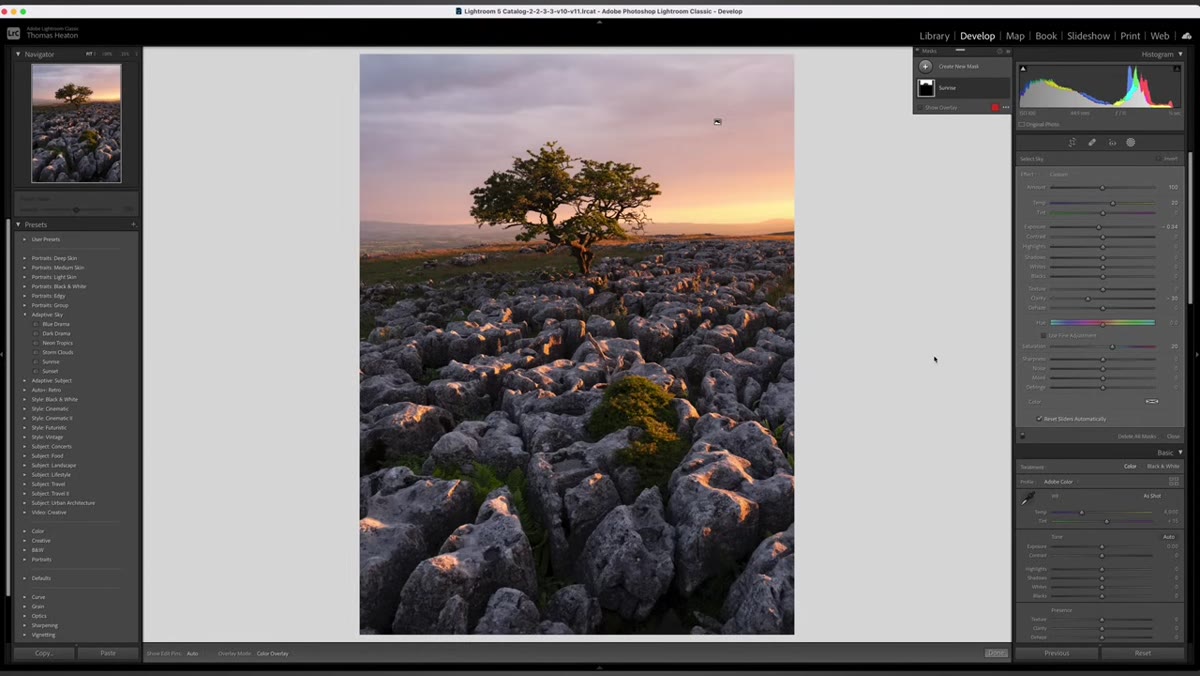
Click the preset you’ve chosen. Lightroom will apply it and simultaneously generate a mask, which you can see appear in the Masks panel on the right side. Click on that mask to expand it. What you’re actually looking at is an AI-generated sky selection paired with a specific set of local adjustment values. In the Sunrise example Heaton uses, the adjustments are: temperature increased (warmer), clarity reduced (softer and more ethereal), and saturation nudged up slightly. That’s the whole recipe. There’s no magic here, which is the point. You can read exactly what the preset did, adjust any of those sliders yourself, and understand why the sky looks the way it does.
Mask panel showing sky selection after applying adaptive preset
Click the preset you’ve chosen. Lightroom will apply it and simultaneously generate a mask, which you can see appear in the Masks panel on the right side. Click on that mask to expand it. What you’re actually looking at is an AI-generated sky selection paired with a specific set of local adjustment values. In the Sunrise example Heaton uses, the adjustments are: temperature increased (warmer), clarity reduced (softer and more ethereal), and saturation nudged up slightly. That’s the whole recipe. There’s no magic here, which is the point. You can read exactly what the preset did, adjust any of those sliders yourself, and understand why the sky looks the way it does.
Step 4: Fine-Tune the Adjustment Values Inside the Mask
 Slider adjustments visible inside an active mask in Lightroom
Once the mask is applied, you’re not locked into the preset’s default values. Click directly on the mask in the panel and the local adjustment sliders for that mask become active. If the sky is slightly too bright, pull the exposure down. If the warmth is too heavy for the mood you’re after, dial back the temperature. Think of the adaptive preset as a smart starting point rather than a finished product. This is exactly where my old resistance to presets broke down. I used to reject them because they felt like giving up control. But a preset that creates a mask and hands the sliders back to you is just a workflow accelerator, not a creative crutch.
Slider adjustments visible inside an active mask in Lightroom
Once the mask is applied, you’re not locked into the preset’s default values. Click directly on the mask in the panel and the local adjustment sliders for that mask become active. If the sky is slightly too bright, pull the exposure down. If the warmth is too heavy for the mood you’re after, dial back the temperature. Think of the adaptive preset as a smart starting point rather than a finished product. This is exactly where my old resistance to presets broke down. I used to reject them because they felt like giving up control. But a preset that creates a mask and hands the sliders back to you is just a workflow accelerator, not a creative crutch.
Step 5: Repeat the Process With Adaptive Subject Presets
 Adaptive subject preset applied to tree with visible mask overlay
With your sky adjusted, go back to the Presets panel and this time scroll to the “Adaptive: Subject” category. The workflow is identical. Hover to preview, watch the adjustment land only on Lightroom’s detected subject (in Heaton’s example, a lone tree in the foreground), and click to apply. The preset called “Warm Pop” worked well on his image, and when he opened the mask it created, the adjustments were modest: a little warming, some texture added, a touch of clarity. Subtle, targeted, and fast. The subject mask that Lightroom generates from its AI detection is surprisingly accurate on well-defined subjects like trees, people, or buildings with clear separation from the background.
Adaptive subject preset applied to tree with visible mask overlay
With your sky adjusted, go back to the Presets panel and this time scroll to the “Adaptive: Subject” category. The workflow is identical. Hover to preview, watch the adjustment land only on Lightroom’s detected subject (in Heaton’s example, a lone tree in the foreground), and click to apply. The preset called “Warm Pop” worked well on his image, and when he opened the mask it created, the adjustments were modest: a little warming, some texture added, a touch of clarity. Subtle, targeted, and fast. The subject mask that Lightroom generates from its AI detection is surprisingly accurate on well-defined subjects like trees, people, or buildings with clear separation from the background.
Step 6: Use the Masks to Learn, Not Just to Edit
 Close-up of mask adjustment panel showing temperature and clarity sliders
This is the part of Heaton’s tutorial that I think gets undersold. If you’re newer to Lightroom or you’re still building your editing intuition, these adaptive presets are a free masterclass in how experienced editors actually treat skies and subjects. Open the mask, look at which sliders were moved and in which direction, and ask yourself why. Warmer temperature and lower clarity in a sky creates softness and atmosphere. Added texture and clarity in a foreground subject creates tactile presence and weight. Those relationships between sliders and mood are the foundation of intentional editing, and the presets demonstrate them on your own photos in real time.
Close-up of mask adjustment panel showing temperature and clarity sliders
This is the part of Heaton’s tutorial that I think gets undersold. If you’re newer to Lightroom or you’re still building your editing intuition, these adaptive presets are a free masterclass in how experienced editors actually treat skies and subjects. Open the mask, look at which sliders were moved and in which direction, and ask yourself why. Warmer temperature and lower clarity in a sky creates softness and atmosphere. Added texture and clarity in a foreground subject creates tactile presence and weight. Those relationships between sliders and mood are the foundation of intentional editing, and the presets demonstrate them on your own photos in real time.
What I’d Add: Don’t Let the AI Mask Be the Final Word
Lightroom’s AI masking is good. It is not perfect. On images with complex or low-contrast transitions between sky and land, the mask edge can bleed or miss areas entirely. Before you call any adaptive preset edit finished, zoom in to 100% and check the mask boundary. In the Masks panel, toggle the overlay on by clicking the mask thumbnail to see the selection rendered in red. Refine it using the Subtract tool with a Brush if anything looks rough. I’ve found this takes maybe thirty seconds on most images and saves you from a halo or a color shift bleeding into your mountain ridge that you won’t notice until you’ve already exported.
The biggest thing I took from Heaton’s tutorial is the reframe: adaptive presets are not the lazy option, they’re the smart starting point. Apply, inspect, adjust, and move on. I still name my presets after songs. But now I’m a lot less precious about where the edit begins.
Watch the full tutorial on YouTube to see Heaton walk through his full before-and-after on a landscape raw file and keep going into the other features from the update that changed his workflow.
Comments
Leave a Comment